Introduction
So much valuable information is trapped in PDF and image files. Luckily, we have these powerful brains capable of processing those files to find specific information, which in fact is great.
But how many of us, deep inside wouldn’t like to have a tool that can answer any question about a given document?
That is the whole purpose of this article. I will explain step-by-step how to build a system that can chat with any PDFs and image files.
If you prefer to watch video instead, check the link below:
General Workflow of the project
It’s always good to have a clear understanding of the main components of the system being built. So let’s get started.
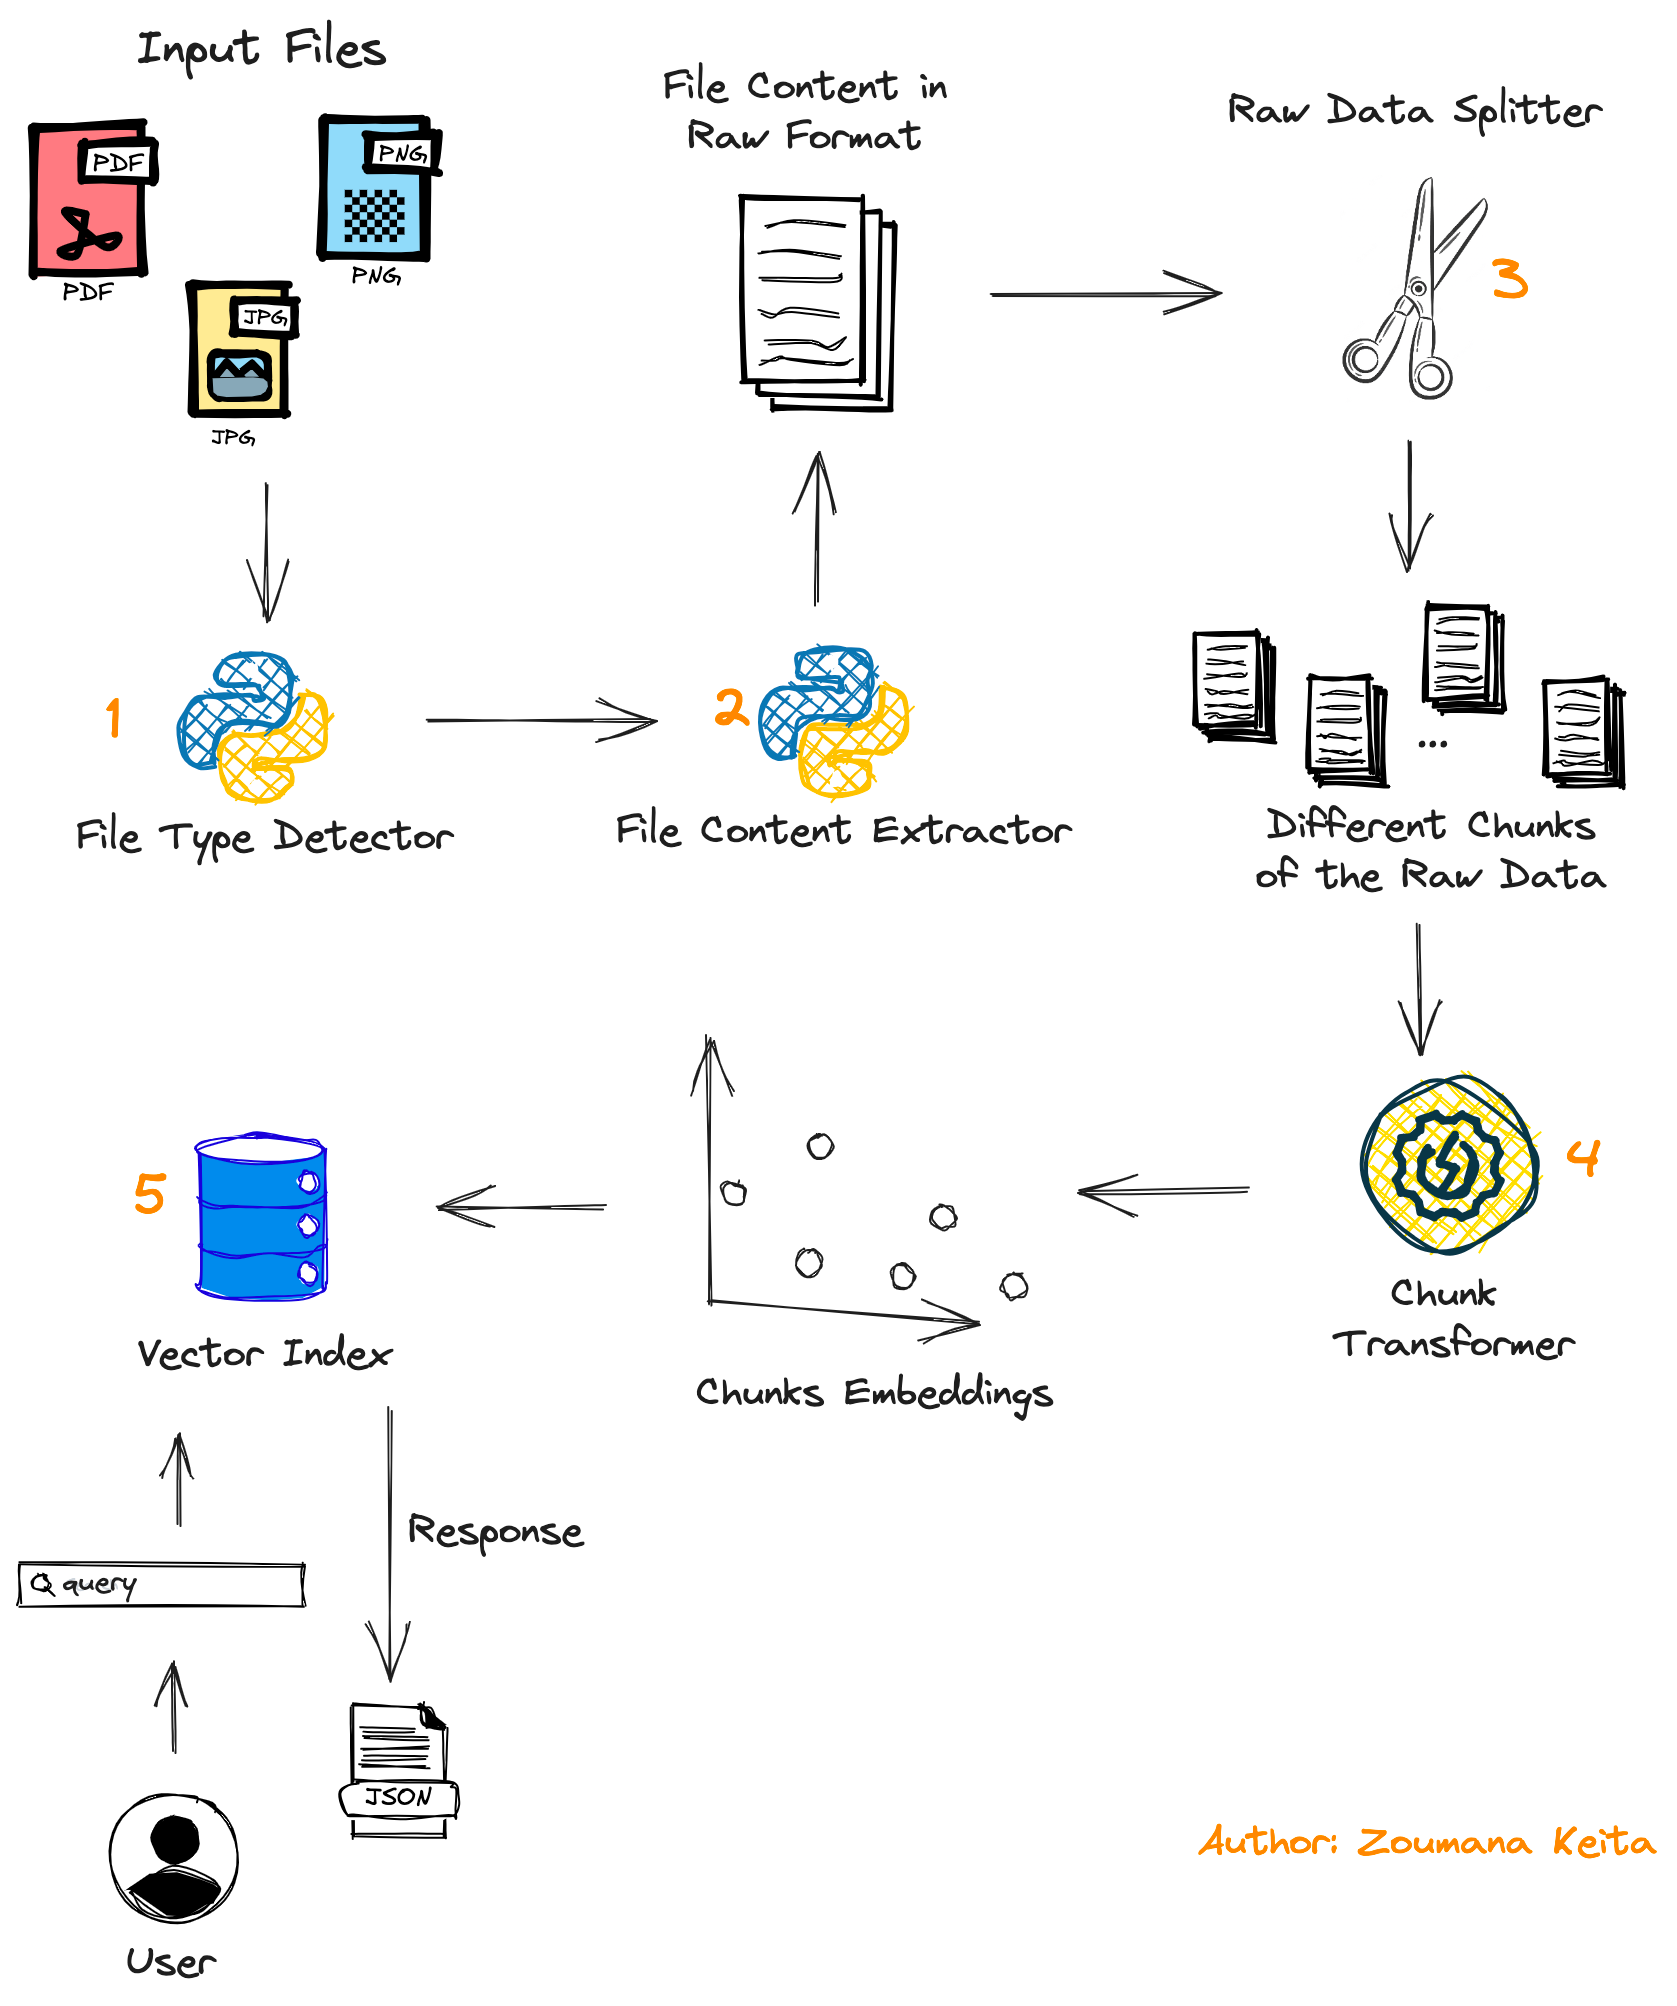
- First, the user submits the document to be processed, which can be in PDF or image format.
- A second module is used to detect the format of the file so that the relevant content extraction function is applied.
- The content of the document is then split into multiple chunks using the
Data Splittermodule. - Those chunks are finally transformed into embeddings using the
Chunk Transformerbefore they are stored in the vector store. - At the end of the process, the user’s query is used to find relevant chunks containing the answer to that query, and the result is returned as a JSON to the user.
1. Detect document type
For each input document, specific processing is applied depending on its type, whether it is PDF , or image.
This can be achieved with the helper function detect_document_type combined with the guess function from the built-in Python module.
def detect_document_type(document_path):

    guess_file = guess(document_path)
    file_type = ""
    image_types = ['jpg', 'jpeg', 'png', 'gif']

    if(guess_file.extension.lower() == "pdf"):
        file_type = "pdf"

    elif(guess_file.extension.lower() in image_types):
        file_type = "image"

    else:
        file_type = "unkown"

    return file_type
Now we can test the function on two types of documents:
transformer_paper.pdfis the Transformers research paper from Arxiv.zoumana_article_information.pngis the image document containing information about the main topics I have covered on Medium.
research_paper_path = "./data/transformer_paper.pdf"
article_information_path = "./data/zoumana_article_information.png"

print(f"Research Paper Type: {detect_document_type(research_paper_path)}")
print(f"Article Information Document Type: {detect_document_type(article_information_path)}")
Output:

Both file type is successfully detected by the detect_document_type function.
2. Extract content based on document type
The [langchain](https://python.langchain.com/docs/get_started/introduction.html) library provides different modules to extract the content of a given type of document.
UnstructuredImageLoaderextracts image content.UnstructuredFileLoaderextracts the content of any pdf and Txt files.
We can combine these modules and the above detect_document_type function to implement the text extraction logic.
These modules can be used to implement end-to-end text extraction logic within the extract_file_content function.
Let’s see them in action! 
from langchain.document_loaders.image import UnstructuredImageLoader
from langchain.document_loaders import UnstructuredFileLoader
def extract_file_content(file_path):
file_type = detect_document_type(file_path)
if(file_type == "pdf"):
loader = UnstructuredFileLoader(file_path)
elif(file_type == "image"):
loader = UnstructuredImageLoader(file_path)
documents = loader.load()
documents_content = 'n'.join(doc.page_content for doc in documents)
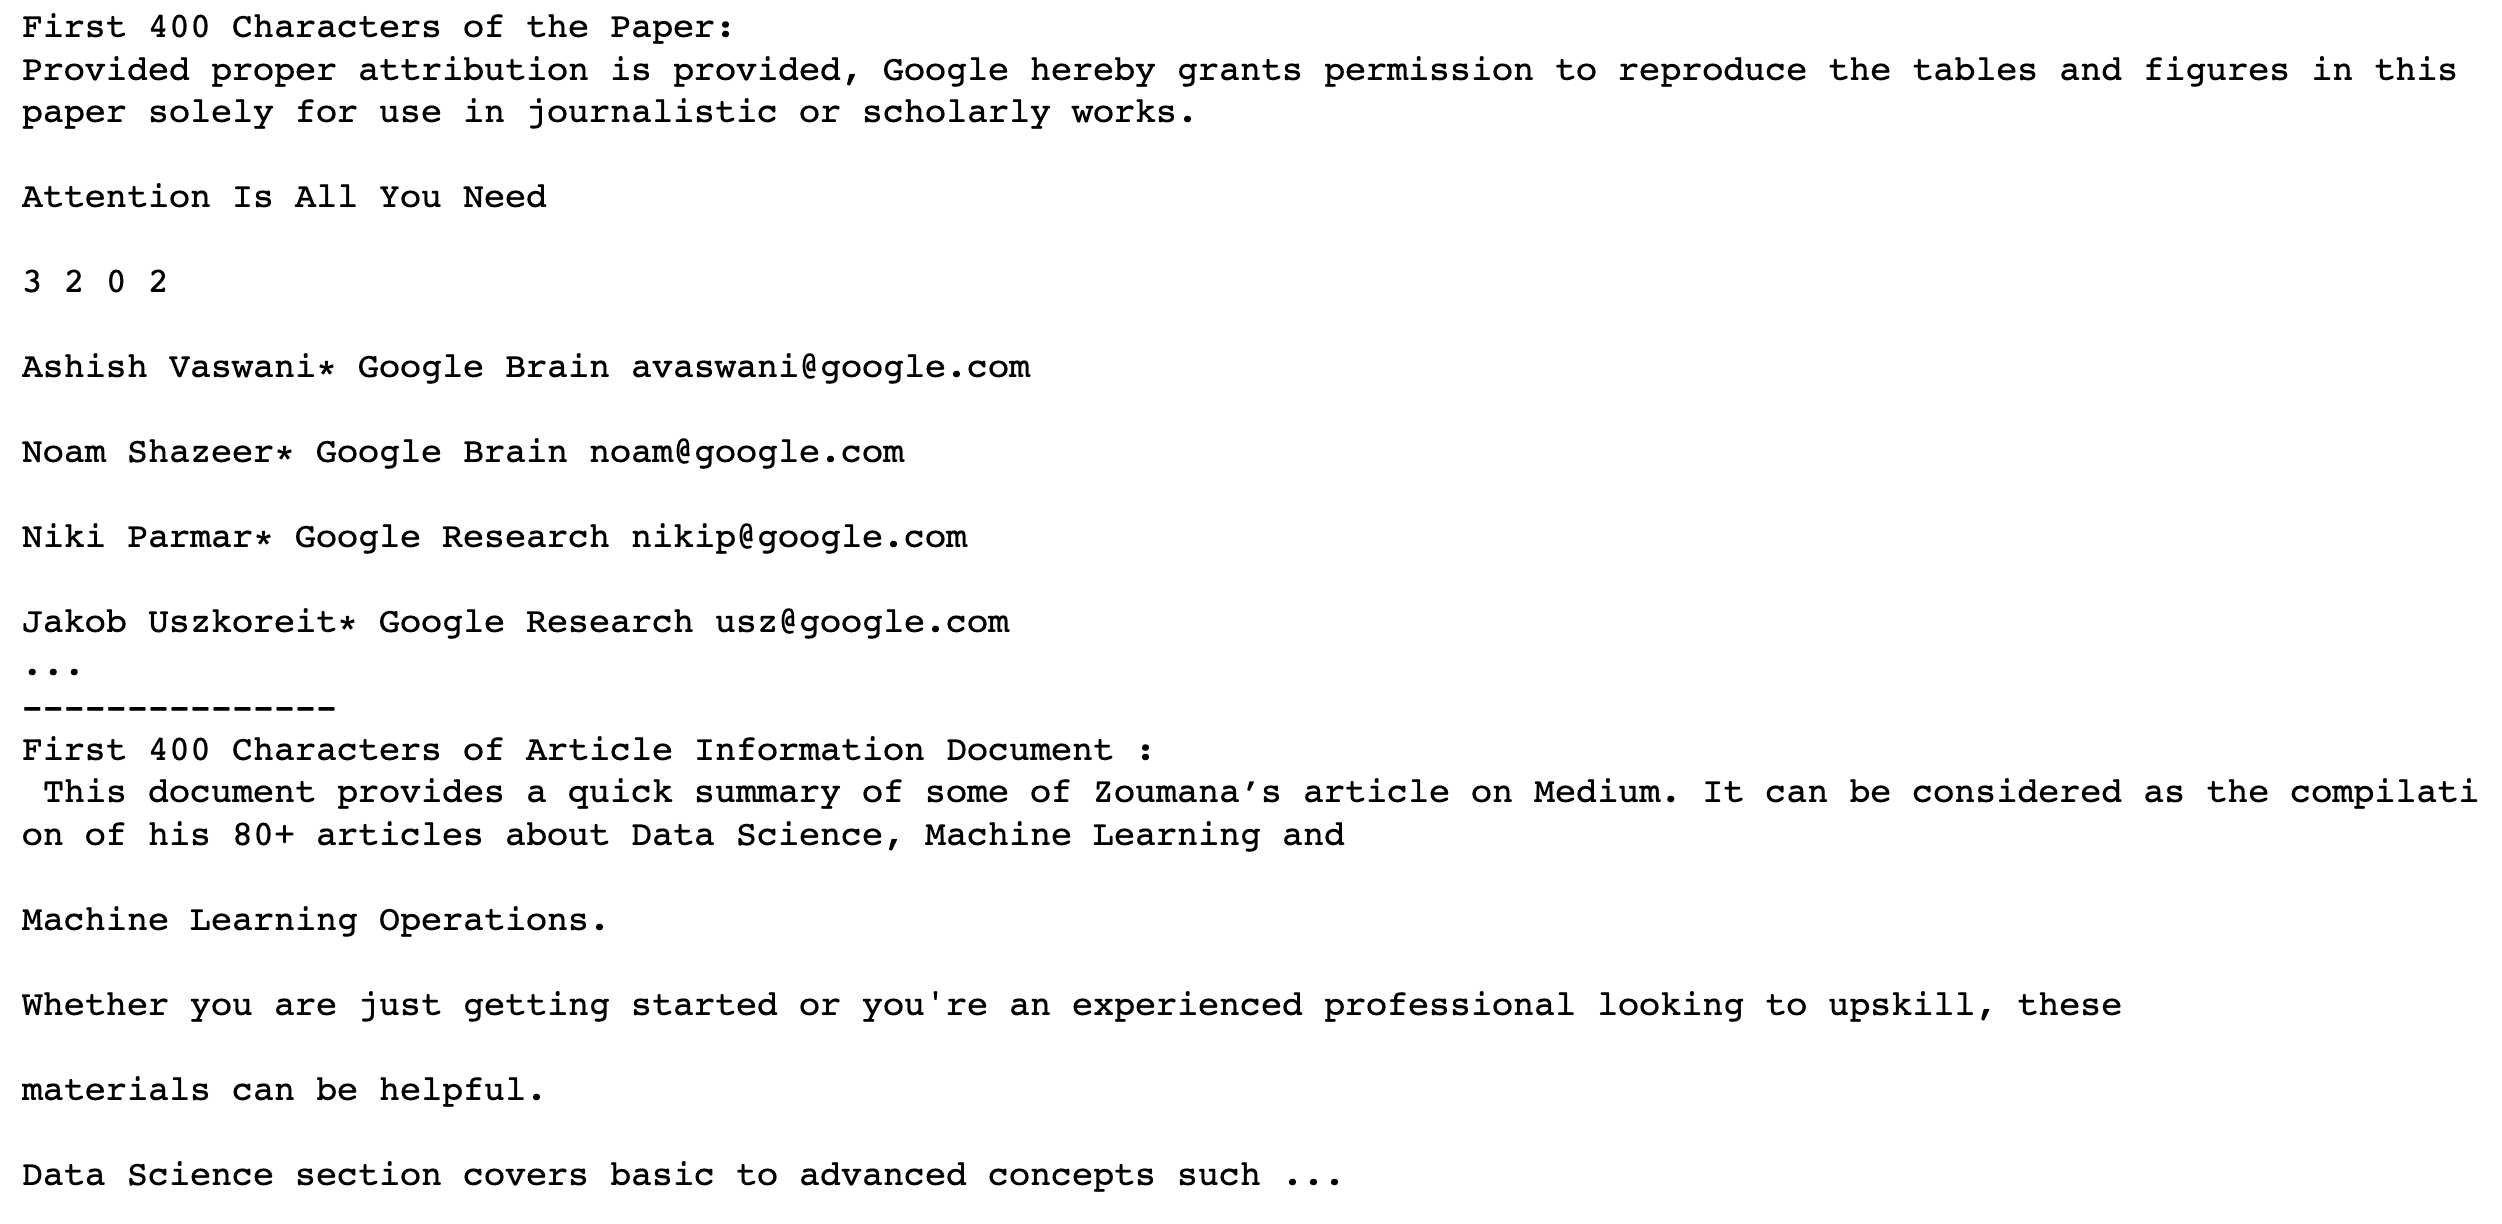
return documents_contentNow, let’s print the first 400 characters of each file content.
research_paper_content = extract_file_content(research_paper_path)
article_information_content = extract_file_content(article_information_path)

nb_characters = 400

print(f"First {nb_characters} Characters of the Paper: n{research_paper_content[:nb_characters]} ...")
print("---"*5)
print(f"First {nb_characters} Characters of Article Information Document :n {research_paper_content[:nb_characters]} ...")
Output:
The first 400 characters of each of the above documents are shown below:
- The research paper content starts with
Provided proper attribution is providedand ends withJacod Uszkoreit* Google Research usz@google.com. - The image document’s content starts with
This document provides a quick summaryand ends withData Science section covers basic to advance concepts.
3. Chat Implementation
The input document is broken into chunks, then an embedding is created for each chunk before implementing the question-answering logic.
a. Document chunking
The chunks represent smaller segments of a larger piece of text. This process is essential to ensure that a piece of content is represented with as little noise as possible, making it semantically relevant.
Multiple chunking strategies can be applied. For instance, we have the NLTKTextSplitter , SpacyTextSplitter , RecursiveCharacterTextSplitter , CharacterTextSplitter and more.
Each one of these strategies has its own pros and cons.
The main focus of this article is made on the CharacterTextSplitter which creates chunks from the input documents based on nn , and measure each chunk’s length (length_function ) by its number of characters.
text_splitter = CharacterTextSplitter(
    separator = "nn",
    chunk_size = 1000,
    chunk_overlap  = 200,
    length_function = len,
)
The chunk_size tells that we want a maximum of 1000 characters in each chunk, and a smaller value will result in more chunks, while a larger one will generate fewer chunks.
It is important to note that the way the chunk_size is chosen can affect the overall result. So, a good approach is to try different values and chose the one that better fits one’s use case.
Also, the chunk_overlap means that we want a maximum of 200 overlapping characters between consecutive chunks.
For instance, imagine that we have a document containing the text Chat with your documents using LLMs and want to apply the chunking using the Chunk Size = 10 and Chunk overlap = 5.
The process is explained in the image below:
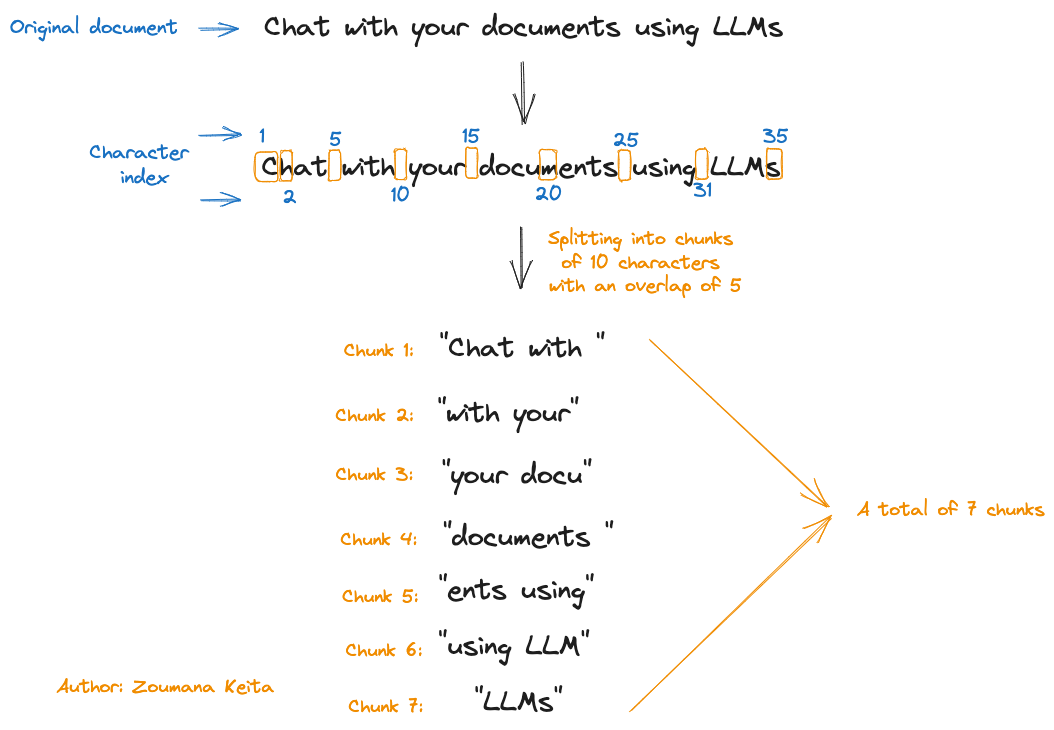
We can see that we ended up with a total of 7 chunks for an input document of 35 characters (spaces included).
But, why do we use these overlaps in the first place?
Including these overlaps, the CharacterTextSplitter ensures that the underlying context is maintained between the chunks, which is especially useful when working with long pieces of documents.
Similarly to the chunk_size there is no fixed value of chunk_overlap . Different values need to be tested to choose the one with better results.
Now, let’s see their application in our scenario:
research_paper_chunks = text_splitter.split_text(research_paper_content)
article_information_chunks = text_splitter.split_text(article_information_content)

print(f"# Chunks in Research Paper: {len(research_paper_chunks)}")
print(f"# Chunks in Article Document: {len(article_information_chunks)}")
Output:

For a larger document like the research paper, we have a lot more chunks (51) compared to the one-page article document, which is only 2.
b. Create embeddings of the chunks
We can use the OpenAIEmbeddings module, which uses text-embedding-ada-002 model by default to create the embedding of the chunks.
Instead of using the text-embedding-ada-002 can use a different model (e.g. gpt-3.5-turbo-0301) by changing the following parameters:
- model = "
gpt-3.5-turbo-0301" - deployment = "
<DEPLOYMENT-NAME>" which corresponds to the name given during the deployment of the model. The default value is alsotext-embedding-ada-002
For simplicity’s sake, we will stick to using the default parameters’ value in this tutorial. But before that, we need to acquire the OpenAI credentials, and all the steps are provided in the following article.
from Langchain.embeddings.openai import OpenAIEmbeddings
import os

os.environ["OPENAI_API_KEY"] = "<YOUR_KEY>"
embeddings = OpenAIEmbeddings()
c. Create document search
To get the answer to a given query, we need to create a vector store that finds the closest matching chunk to that query.
Such vector store can be created using the from_texts function from FAISS module and the function takes two main parameters: text_splitter and embeddings which are both defined previously.
from langchain.vectorstores import FAISS

def get_doc_search(text_splitter):

    return FAISS.from_texts(text_splitter, embeddings)
By running the get_doc_search on the research paper chunks, we can see that the result is of a vectorstores . The result would have been the same if we used the article_information_chunks.
doc_search_paper = get_doc_search(research_paper_chunks)
print(doc_search_paper)
Output:

d. Start chatting with your documents
Congrats on making it that far! 
The chat_with_file function is used to implement the end-to-end logic of the chat by combining all the above functions, along with the with similarity_search function.
The final function takes two parameters:
- The file we want to chat with, and
- The query provided by the user
from langchain.llms import OpenAI
from langchain.chains.question_answering import load_qa_chain
chain = load_qa_chain(OpenAI(), chain_type = "map_rerank",
                      return_intermediate_steps=True)

def chat_with_file(file_path, query):

    file_content = extract_file_content(file_path)
    text_splitter = text_splitter.split_text(file_content)

    document_search = get_doc_search(text_splitter)
    documents = document_search.similarity_search(query)

    results = chain({
                        "input_documents":documents,
                        "question": query
                    },
                    return_only_outputs=True)
    answers = results['intermediate_steps'][0]

    return answers
Let’s take a step back to properly understand what is happening in the above code block.
- The
load_qa_chainprovides an interface to perform question-answering over a set of documents. In this specific case, we are using the defaultOpenAI GPT-3large language model. - The
chain_typeismap_rerank. By doing so, theload_qa_chainfunction returns the answers based on a confidence score given by the chain. There are otherchain_typethat can be used such asmap_reduce,stuff,refineand more. Each one has its own pros and cons. - By setting
return_intermediate_steps=True, we can access the metadata such as the above confidence score.
Its output is a dictionary of two keys: the answer to the query, and the confidence score.
We can finally chat with the our files, starting with the image document:
- Chat with the image document
To chat with the image document, we provide the path to the document, and the question we want the model to answer.
query = "What is the document about"

results = chat_with_file(article_information_path, query)

answer = results["answer"]
confidence_score = results["score"]

print(f"Answer: {answer}nnConfidence Score: {confidence_score}")
Output:

The model is 100% confident in its response. By looking at the first paragraph of the original document below, we can see that the model response is indeed correct.

One of the most interesting parts is that it provided a brief summary of the main topics covered in the document ( statistics, model evaluation metrics, SQL queries, etc.).
- Chat with the PDF file
The process with the PDF file is similar to the one in the above section.
query = "Why is the self-attention approach used in this document?"

results = chat_with_file(research_paper_path, query)

answer = results["answer"]
confidence_score = results["score"]

print(f"Answer: {answer}nnConfidence Score: {confidence_score}")
Output:
Once again we are getting a 100% confidence score from the model. The answer to the question looks pretty correct!

In both cases, the model was able to provide a human-like response in a few seconds. Making a human go through the same process would take minutes, even hours depending on the length of the document.
Conclusion
Congratulations!!!
I hope this article provided enough tools to help you take your knowledge to the next level. The code is available on my GitHub.
In my next article, I will explain how to integrate this system into a nice user interface. Stay tuned!
Also, If you enjoy reading my stories and wish to support my writing, consider becoming a Medium member. It’s $5 a month, giving you unlimited access to thousands of Python guides and Data science articles.
By signing up using my link, I will earn a small commission at no extra cost to you.
Feel free to follow me on Twitter, and YouTube, or say Hi on LinkedIn.
Let’s connect here for a 1–1 discussion
Before you leave, there are more great resources below you might be interested in reading!
Introduction to Text Embeddings with the OpenAI API
How to Extract Text from Any PDF and Image for Large Language Model


