Keen to plan a holiday? Uncertain about how to navigate the constantly changing sea of information about COVID-19 travel restrictions? Then you felt similar to me when I decided to make this web app.
This web app retrieves data from the UK Government API on outbound and inbound travel restrictions, adds these to a sqlite database, and then uses a Keras machine learning model to classify the sentiment of these restrictions and assign a numerical score.
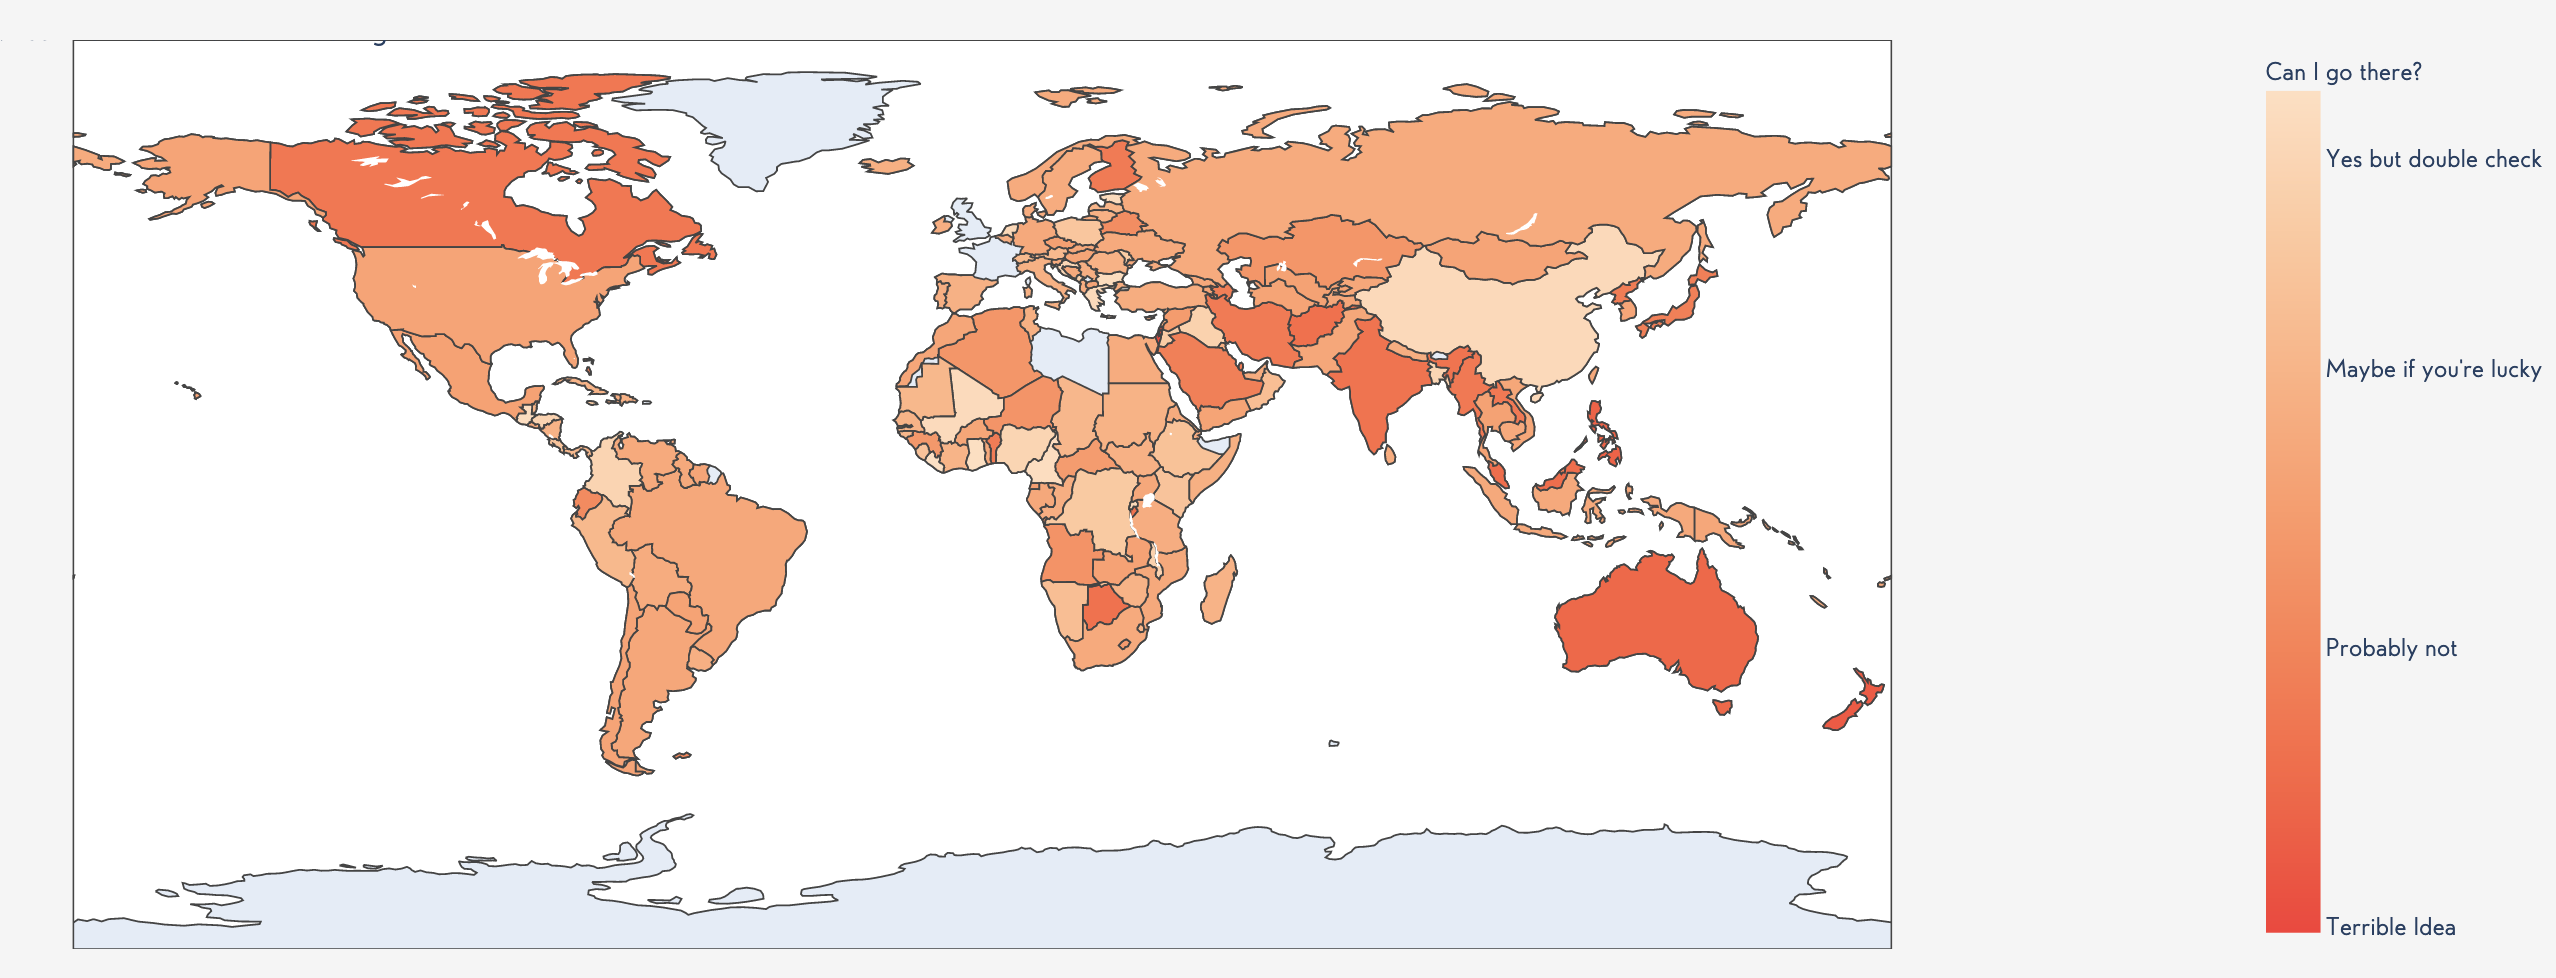
What’s the point of doing this? It means you can colour code different countries depending on their score!
I think this is pretty helpful because it means in one image, you can see where you can travel to and where you can’t.
In this article, I’m going to run through how to code some of the main features required to create this sort of site and it how a machine learning tool makes for a pretty good fit with a data driven web framework like Django.
How to Write Custom Django Commands
One of the problems I had building this site was:
How do you regularly update a Django database with new data on a daily basis and then classify this new data with a machine learning model?
The answer – write a custom command. You can see the Django documentation for this here.
To do this, in your project’s app directory, create a directory titled management and another inside that title commands; both should contain init.py files.
Then create a new file yourcustomcommand.py. The syntax looks like this:
| from django.core.management.base import BaseCommand | |
| import os | |
| """ | |
| Run this with python manage.py yourcustomcommand yourflag'. | |
| """ | |
| class Command(BaseCommand): | |
| data_directory = os.getcwd() + "/corona/data/" | |
| help = ( | |
| "Run a script to retrieve data from UK Gov API and add to the website database" | |
| ) | |
| def add_arguments(self, parser): | |
| # Positional arguments | |
| parser.add_argument("yourflag", nargs="+", type=str) | |
| def handle(self, *args, **options): | |
| def get_travel_data(country): | |
| """ | |
| Your command goes below. | |
| """ |
 by
by You can write your code under the handle function straight off the bad; I had quite a few functions to include here, including classifying text with a Keras model, and wrote them all under the one handle one so they were all called when I ran the command.
To execute the command, you hit:
python manage.py yourcustomcommand yourflag
How to Add Data in a Pandas Dataframe to a Django database
If you’re anything like me, you really like to manage your data with Pandas. In which case, you need a way to get it out of Pandas and into the database your site is running on Django!
Thankfully, there is actually quite a straightforward way to do this. Take a peek at the code below:
| import pandas as pd | |
| from django.core.management.base import BaseCommand | |
| from corona.models import Country | |
| # Read in the csv | |
| outbound_filepath = Command.data_directory + "outbound-graph-data.csv" | |
| outbound = pd.read_csv(outbound_filepath) | |
| outbound_as_dict = outbound.to_dict("records") | |
| # Add these to the database | |
| # Each column should correspond to one your model's attributes as defined in the yourapp/models.py file | |
| model_instances = [ | |
| Country( | |
| name=x["Country"], | |
| corona=x["Coronavirus Information"], | |
| quarantine=x["Quarantine Information"], | |
| date_of_information=x["Date"], | |
| sentiment=x["Travel Sentiment Score"], | |
| ) | |
| for x in outbound_as_dict | |
| ] | |
| Country.objects.bulk_create(model_instances) |
First, you call df.to_dict('records') to turn your Pandas dataframe into a dictionary.
Then, you use the nifty model.objects.bulk_create(model_instances) method to add all this data to your database – and voilà!
How to Show Plotly Graphs in Django
Plotly is a fantastic Python graphing library that very easily allows you to create modern and good looking graphs.
So, how can you use these in Django?
First, create a plots.py file in the yoursite/yourapp directory. Here, write some functions to create your plotly figures using plotly offline and add in some return statements that return plot_div objects.

Then you just need to call this function in your views.py and specify that the plot_div object is the value for the context key.
If that sounds like a mouthful, take a look at the code structure below:

Once all that’s out the way, in the html for the corresponding page of your site you can reference the plotly graph with the code {{ plot_div }}.
How to Add Simple Search Functionality to a Django Website
Last but not least, here’s a pretty rapid overview of how you could create a very basic search function so that users can look at what’s in your database.
First, in your views.py create a get_queryset method as in the gist below.
| from django.views.generic import ListView | |
| import pandas as pd | |
| class SearchResultsView(ListView): | |
| """View class for search page of the site.""" | |
| model = YourModel | |
| template_name = 'search_results.html' | |
| def get_queryset(self): | |
| """View method to retrieve the query information.""" | |
| query = self.request.GET.get('q') # this gets user input from an input tag with attribute name='q' | |
| # Verify the string isn't malicious | |
| if (len(query) > 3) and (len(query) < 30) and all(char.isalpha() or char == ' ' for char in query): | |
| object_list = YourModel.objects.filter( | |
| Q(name__icontains=query, | |
| date_of_information=pd.Timestamp("today").strftime("%Y-%m-%d")) # you can filter the query if you want | |
| ).values() | |
| if object_list: | |
| return object_list |
In whichever website page you want the user to input the search query, write an input tag in the html with a name="q" attribute.
This will then send the user’s input to the "search_results.html" page as detailed in the gist above.
Once you’ve got this input, the next step in the code is to check that it isn’t malicious. In my case, users were only inputting country names so I could rule out any long strings and characters that weren’t alphanumeric.
Then, YourModel.objects.filter() and you can search the database according to the user input with the name__icontains parameter.
To Conclude…
We’ve gone over four powerful Django features that allow you to make the most of the web framework and showcase your machine learning project.
You can write custom commands to do pretty much anything you want.
You can leverage Plotly’s beautiful graphing library and show this in your app.
You can stick to Pandas dataframe structures and use these to populate your web app’s database.
You can add a basic search function to let users search this database.
Happy coding!


