…in under 5 Minutes

If you’re reading this, then you probably know what you’re looking for  . So I’ll get right to it and assume that you’re familiar with what Image Segmentation means, the difference between Semantic Segmentation and Instance Segmentation, and different Segmentation models like U-Net, Mask R-CNN, etc. If not, I highly recommend reading this excellent article on Analytics Vidhya for a comprehensive introduction to the topic, complete with an example in the end using Mask R-CNN.
Most Image Segmentation tutorials online use pre-processed and labeled datasets with both ground truth images and masks generated. This is hardly ever the case in real projects when you want to work on a similar task. I’ve faced this same issue and spent COUNTLESS hours trying to find a simple enough and COMPLETE example while working on an Instance Segmentation project. I couldn’t and hence decided to write my own 
Here’s a simple visualization of what we’ll be doing in this article

VGG Image Annotator (VIA)
VIA is an extremely light annotator with support for both images and videos. You can go through the project’s home page to know more. While using VIA, you have two options: either V2 or V3. I’ll try to explain the differences below:
- V2 is much older but adequate for basic tasks and has a simple interface
- Unlike V2, V3 supports video and audio annotator
- V2 is preferable if your goal is image segmentation with multiple export options like JSON and CSV
- V2 projects are not compatible with V3 projects
I’ll be using V2 for this article. You can download the required files [here](https://www.robots.ox.ac.uk/~vgg/software/via/via_demo.html). Or, if you want to try out VIA online, you can do so here.
How-To
I’ll be using the Kaggle Nuclei Dataset and annotate one of the test images to generate a segmentation mask. Full disclosure, I am NOT a certified Medical Professional, and the annotations I’m making are just for this article’s sake. You can quickly adapt the process to other types of objects as well.
The root folder tree is given below. via.html is the file which we will use to annotate our images. It’s located in the VIA V2 ZIP download link provided above. Place all pictures which are to be annotated in the images folder. maskGen.py is a script to convert the annotations to masks.
├── images
│   └── test_image.png
├── maskGen.py
└── via.html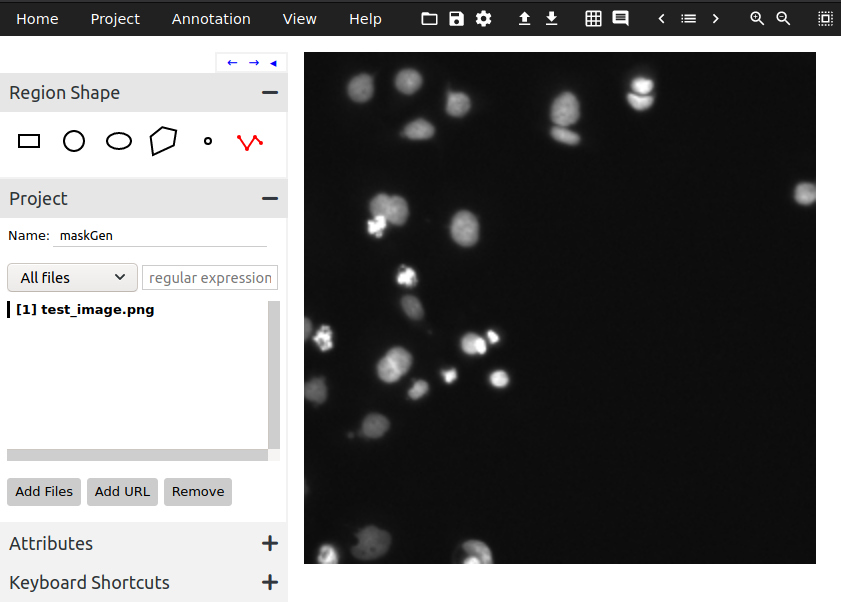
- Open
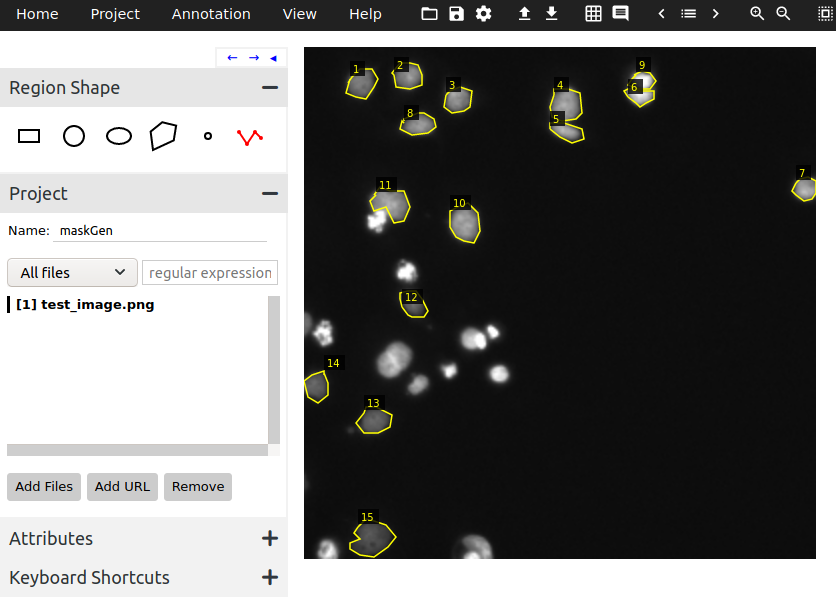
via.html: It will open in your default browser. Under Region Shape, select the Poly-line tool (last option) and give your project a name. Then click on Add Files and select all images that you want to annotate. At this point, your screen should look like Figure 1. - Start Annotating: Click on the border of an object and draw a polygon around the object. You can finish the polygon by pressing Enter, or if you’ve made an error, press Backspace. Repeat this for all objects. After you’re done, your screen should look like Figure 2.
- Export Annotations: After you’re done, click on the Annotation tab on the top and select Export Annotations (as JSON). A JSON file will be saved to your device. Locate this file and transfer it to the root folder as per the tree given above.
- Generating Masks: Now, your root folder should look something like this.
├── images
│   └── test_image.png
├── maskGen_json.json
├── maskGen.py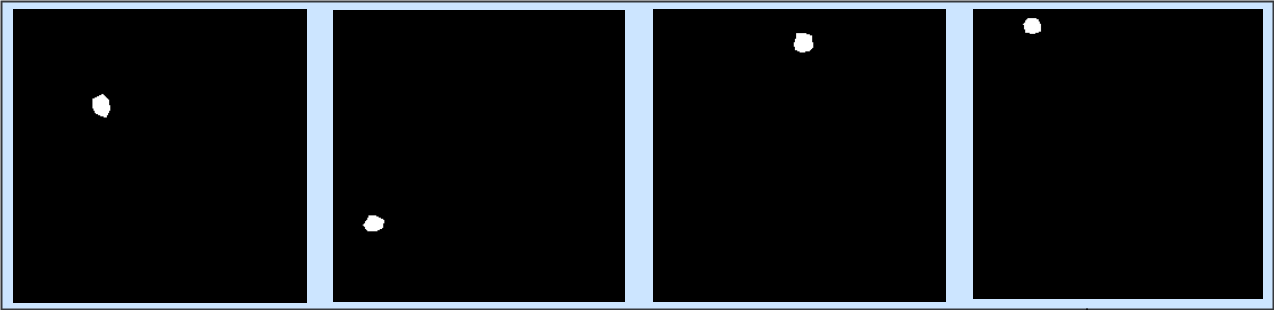
└── via.htmlmaskGen.pyis given in the gist below. It reads the JSON file, remembers the polygon coordinates for each mask object, generates masks, and saves them in .png format. For each image in the images folder, the script creates a new folder with the name of the image, and this folder contains sub-folders of both the original image and generated mask files. Make sure to update the _jsonpath variable to your JSON file’s name and set the mask height and width. A few of the generated masks are shown after the gist.
| import os | |
| import cv2 | |
| import json | |
| import numpy as np | |
| source_folder = os.path.join(os.getcwd(), "images") | |
| json_path = "maskGen_json.json" # Relative to root directory | |
| count = 0 # Count of total images saved | |
| file_bbs = {} # Dictionary containing polygon coordinates for mask | |
| MASK_WIDTH = 256 # Dimensions should match those of ground truth image | |
| MASK_HEIGHT = 256 | |
| # Read JSON file | |
| with open(json_path) as f: | |
| data = json.load(f) | |
| # Extract X and Y coordinates if available and update dictionary | |
| def add_to_dict(data, itr, key, count): | |
| try: | |
| x_points = data[itr]["regions"][count]["shape_attributes"]["all_points_x"] | |
| y_points = data[itr]["regions"][count]["shape_attributes"]["all_points_y"] | |
| except: | |
| print("No BB. Skipping", key) | |
| return | |
| all_points = [] | |
| for i, x in enumerate(x_points): | |
| all_points.append([x, y_points[i]]) | |
| file_bbs[key] = all_points | |
| for itr in data: | |
| file_name_json = data[itr]["filename"] | |
| sub_count = 0 # Contains count of masks for a single ground truth image | |
| if len(data[itr]["regions"]) > 1: | |
| for _ in range(len(data[itr]["regions"])): | |
| key = file_name_json[:-4] + "*" + str(sub_count+1) | |
| add_to_dict(data, itr, key, sub_count) | |
| sub_count += 1 | |
| else: | |
| add_to_dict(data, itr, file_name_json[:-4], 0) | |
| print("\nDict size: ", len(file_bbs)) | |
| for file_name in os.listdir(source_folder): | |
| to_save_folder = os.path.join(source_folder, file_name[:-4]) | |
| image_folder = os.path.join(to_save_folder, "images") | |
| mask_folder = os.path.join(to_save_folder, "masks") | |
| curr_img = os.path.join(source_folder, file_name) | |
| # make folders and copy image to new location | |
| os.mkdir(to_save_folder) | |
| os.mkdir(image_folder) | |
| os.mkdir(mask_folder) | |
| os.rename(curr_img, os.path.join(image_folder, file_name)) | |
| # For each entry in dictionary, generate mask and save in correponding | |
| # folder | |
| for itr in file_bbs: | |
| num_masks = itr.split("*") | |
| to_save_folder = os.path.join(source_folder, num_masks[0]) | |
| mask_folder = os.path.join(to_save_folder, "masks") | |
| mask = np.zeros((MASK_WIDTH, MASK_HEIGHT)) | |
| try: | |
| arr = np.array(file_bbs[itr]) | |
| except: | |
| print("Not found:", itr) | |
| continue | |
| count += 1 | |
| cv2.fillPoly(mask, [arr], color=(255)) | |
| if len(num_masks) > 1: | |
| cv2.imwrite(os.path.join(mask_folder, itr.replace("*", "_") + ".png") , mask) | |
| else: | |
| cv2.imwrite(os.path.join(mask_folder, itr + ".png") , mask) | |
| print("Images saved:", count) |
 by
by If you’ve done everything right, your end root folder tree should look something like this. The number of files in each mask folder corresponds to the number of objects you’ve annotated in the ground truth image.
├── images
│   └── test_image
│       ├── images
│       │   └── test_image.png
│       └── masks
│           ├── test_image_10.png
│           ├── test_image_11.png
│           ├── test_image_12.png
│           ├── test_image_13.png
│           ├── test_image_14.png
│           ├── test_image_15.png
│           ├── test_image_1.png
│           ├── test_image_2.png
│           ├── test_image_3.png
│           ├── test_image_4.png
│           ├── test_image_5.png
│           ├── test_image_6.png
│           ├── test_image_7.png
│           ├── test_image_8.png
│           └── test_image_9.png
├── maskGen_json.json
├── maskGen.py
└── via.html
Conclusion
I hope this article helps you in your projects. Please do reach out for any suggestions/clarifications
You can reach me on: Email, LinkedIn, GitHub


