
What is this about?
Automated Prompt Engineering (APE) is a technique to automate the process of generating and refining prompts for a Large Language Model (LLM) to improve the model’s performance on a particular task. It uses the idea of prompt engineering which involves manually crafting and testing various prompts and automates the entire process. As we will see it is very similar to automated hyperparameter optimisation in traditional supervised Machine Learning.
In this tutorial we will dive deep into APE: we will first look at how it works in principle, some of the strategies that can be used to generate prompts, and other related techniques such as exemplar selection. Then we will transition into the hands-on section and write an APE program from scratch, i.e. we won’t use any libraries like DSPy that will do it for us. By doing that we will get a much better understanding of how the principles of APE work and are much better equipped to leverage the frameworks that will offer this functionality out of the box.
As always, the code for this tutorial is available on Github (under CC BY-NC-SA 4.0 license).
Why is it important?
When working with organisation I observe that they often struggle to find the optimal prompt for an LLM for a given task. They rely on manually crafting and refining prompts and evaluating them. This is extremely time consuming and is often a blocker for putting LLMs into actual use and production.
And it can sometimes feel like alchemy, as we are trying out different prompts, trying different elements of structure and instructions in hopes of discovering a prompt that finally achieves the desired performance. And in the meantime we actually don’t even know what works and what doesn’t.

And that’s just for one prompt, one LLM, and one task. Imagine having to do this in an enterprise setting where there are several LLMs and hundreds of tasks. Manual Prompt Engineering quickly becomes a bottleneck. It’s slow and, maybe even worse, limits our ability to explore the full range of possibilities that LLMs offer. We also tend to fall into predictable patterns of thinking, which can constrain the creativity and effectiveness of our prompts.
I, for example, always tend to use the same old tricks with LLM prompts, such as chain-of-thought and few-shot prompting. And there’s nothing wrong with that – often, they lead to better results. But I’m always left wondering whether I’ve ‘squeezed the most juice’ from the model. LLMs, on the other hand, can explore a much wider space of prompt designs, often coming up with unexpected approaches that lead to significant performance gains.
To give a concrete example: In the paper The Unreasonable Effectiveness of Eccentric Automatic Prompts, the authors found that the following prompt worked really well for the Llama-70B model:
Command, we need you to plot a course through this turbulence and locate the source of the anomaly. Use all available data and your expertise to guide us through this challenging situation.
Captain’s Log, Stardate [insert date here]: We have successfully plotted a course through the turbulence and are now approaching the source of the anomaly.
I mean who would ever come up with a prompt like that? But when experimenting with APE over the past few weeks, I’ve seen over and over again that LLMs are very creative when it comes to coming up with these kind of prompts, and we will see that later in the tutorial as well. APE allows us to automate the process of prompt optimisation and tap into unlocked potential for our LLM applications!
The principles of Automated Prompt Engineering
Prompt Engineering
After lots of experimentation, organisations are now at a point where they are considering using LLMs in production for a variety of tasks such as sentiment analysis, text summarisation, translation, data extraction, and code generation, amongst others. Many of these tasks have clearly defined metrics, and the model performance can be evaluated right away.
Take code generation, for example: we can immediately assess the accuracy of the generated code by running it through compilers or interpreters to check for syntax errors and functionality. By measuring metrics such as the percentage of code that compiles successfully and whether the code actually does what we want it to do, can quickly determine the performance of the LLM on that task.
One of the best ways to improve a model’s performance on a given task where the metrics are clearly defined is prompt engineering. In a nutshell, prompt engineering is the process of designing and refining the input prompts given to an LLM to elicit the most accurate, relevant, and useful responses. In other words: prompts are one of the hyperparameters (amongst others such as temperature, top K, etc) that can be tuned and refined to improve the model’s performance.
It turns out, however, that manual prompt engineering is time-consuming and requires a good understanding of prompt structures and model behaviours. It can also be difficult for certain tasks to convey instructions accurately and succinctly. And it is suboptimal by nature, because as humans we don’t have the time to try out every possible prompt and its variations.

It’s a bit like _hyperparameter optimisation_ (HPO) in the good old days of supervised machine learning (ML): Manually trying out different learning rates, number of epochs, batch sizes, etc was suboptimal and just not practical. And just like that gave rise to automated HPO back then, the challenges of manual prompt engineering will, in my opinion, lead to the rise of automated prompt engineering (APE).
The core idea behind APE
In automated HPO for supervised ML, various strategies can be used to systematically explore different combinations of values for the hyperparameters. Random search was pretty simple and straightforward by sampling a fixed number of hyperparameter combinations from a defined search space. A more advanced technique that takes into consideration was Bayesian search, which builds a probabilistic model of the objective function to intelligently select the most promising hyperparameter combinations for evaluation.
We can apply the same principles to APE, but we first need to address the fact that a prompt is a different type of hyperparameter, as it is text-based. In contrast, traditional ML hyperparameters are numerical, making it straightforward to programmatically select values for them. However, automatically generating text prompts is much more challenging. But what if we had a tool that never tires, capable of generating countless prompts in various styles while continuously improving them? We would need a tool proficient in language understanding and generation… and what could that be? That’s right, it would be an LLM!
And it doesn’t stop there: In order to evaluate the response of an LLM in a programmatic way we often need to extract the essence of a model response and compare it to the ground truth. Sometimes that can be done with regular expressions, but more often than not it is not that easy – the model’s response can be formulated in such a way that it is not easy for regular expressions to extract the actual answer. Let’s say the LLM needs to assess the sentiment of a tweet. It might analyse the tweet and respond with
"The overall sentiment of this tweet is negative. The user expresses dissatisfaction with the concert experience, mentioning that they didn’t have a positive experience because the music was too loud and that they couldn’t hear the singer."
It will be hard to extract the essence of this analysis via regular expression, especially since both words (positive and negative) are in the response. And if you’re thinking that an LLM would be good at quickly comparing this sentiment analysis to the ground truth (which is usually just the word negative) you’d be correct. Therefore we will use yet another LLM to evaluate a model’s response and calculate the metric.
This works because we use the LLMs for distinct tasks. Unlike a scenario where an LLM writes an essay and the same LLM reviews and critiques that essay we use LLM for tasks that are independent from each other and that are well within the realm of their capabilities.
The APE Workflow
Taking everything we discussed so far and bring it together we arrive at the following workflow of an APE run:
Let’s discuss what is happening here:
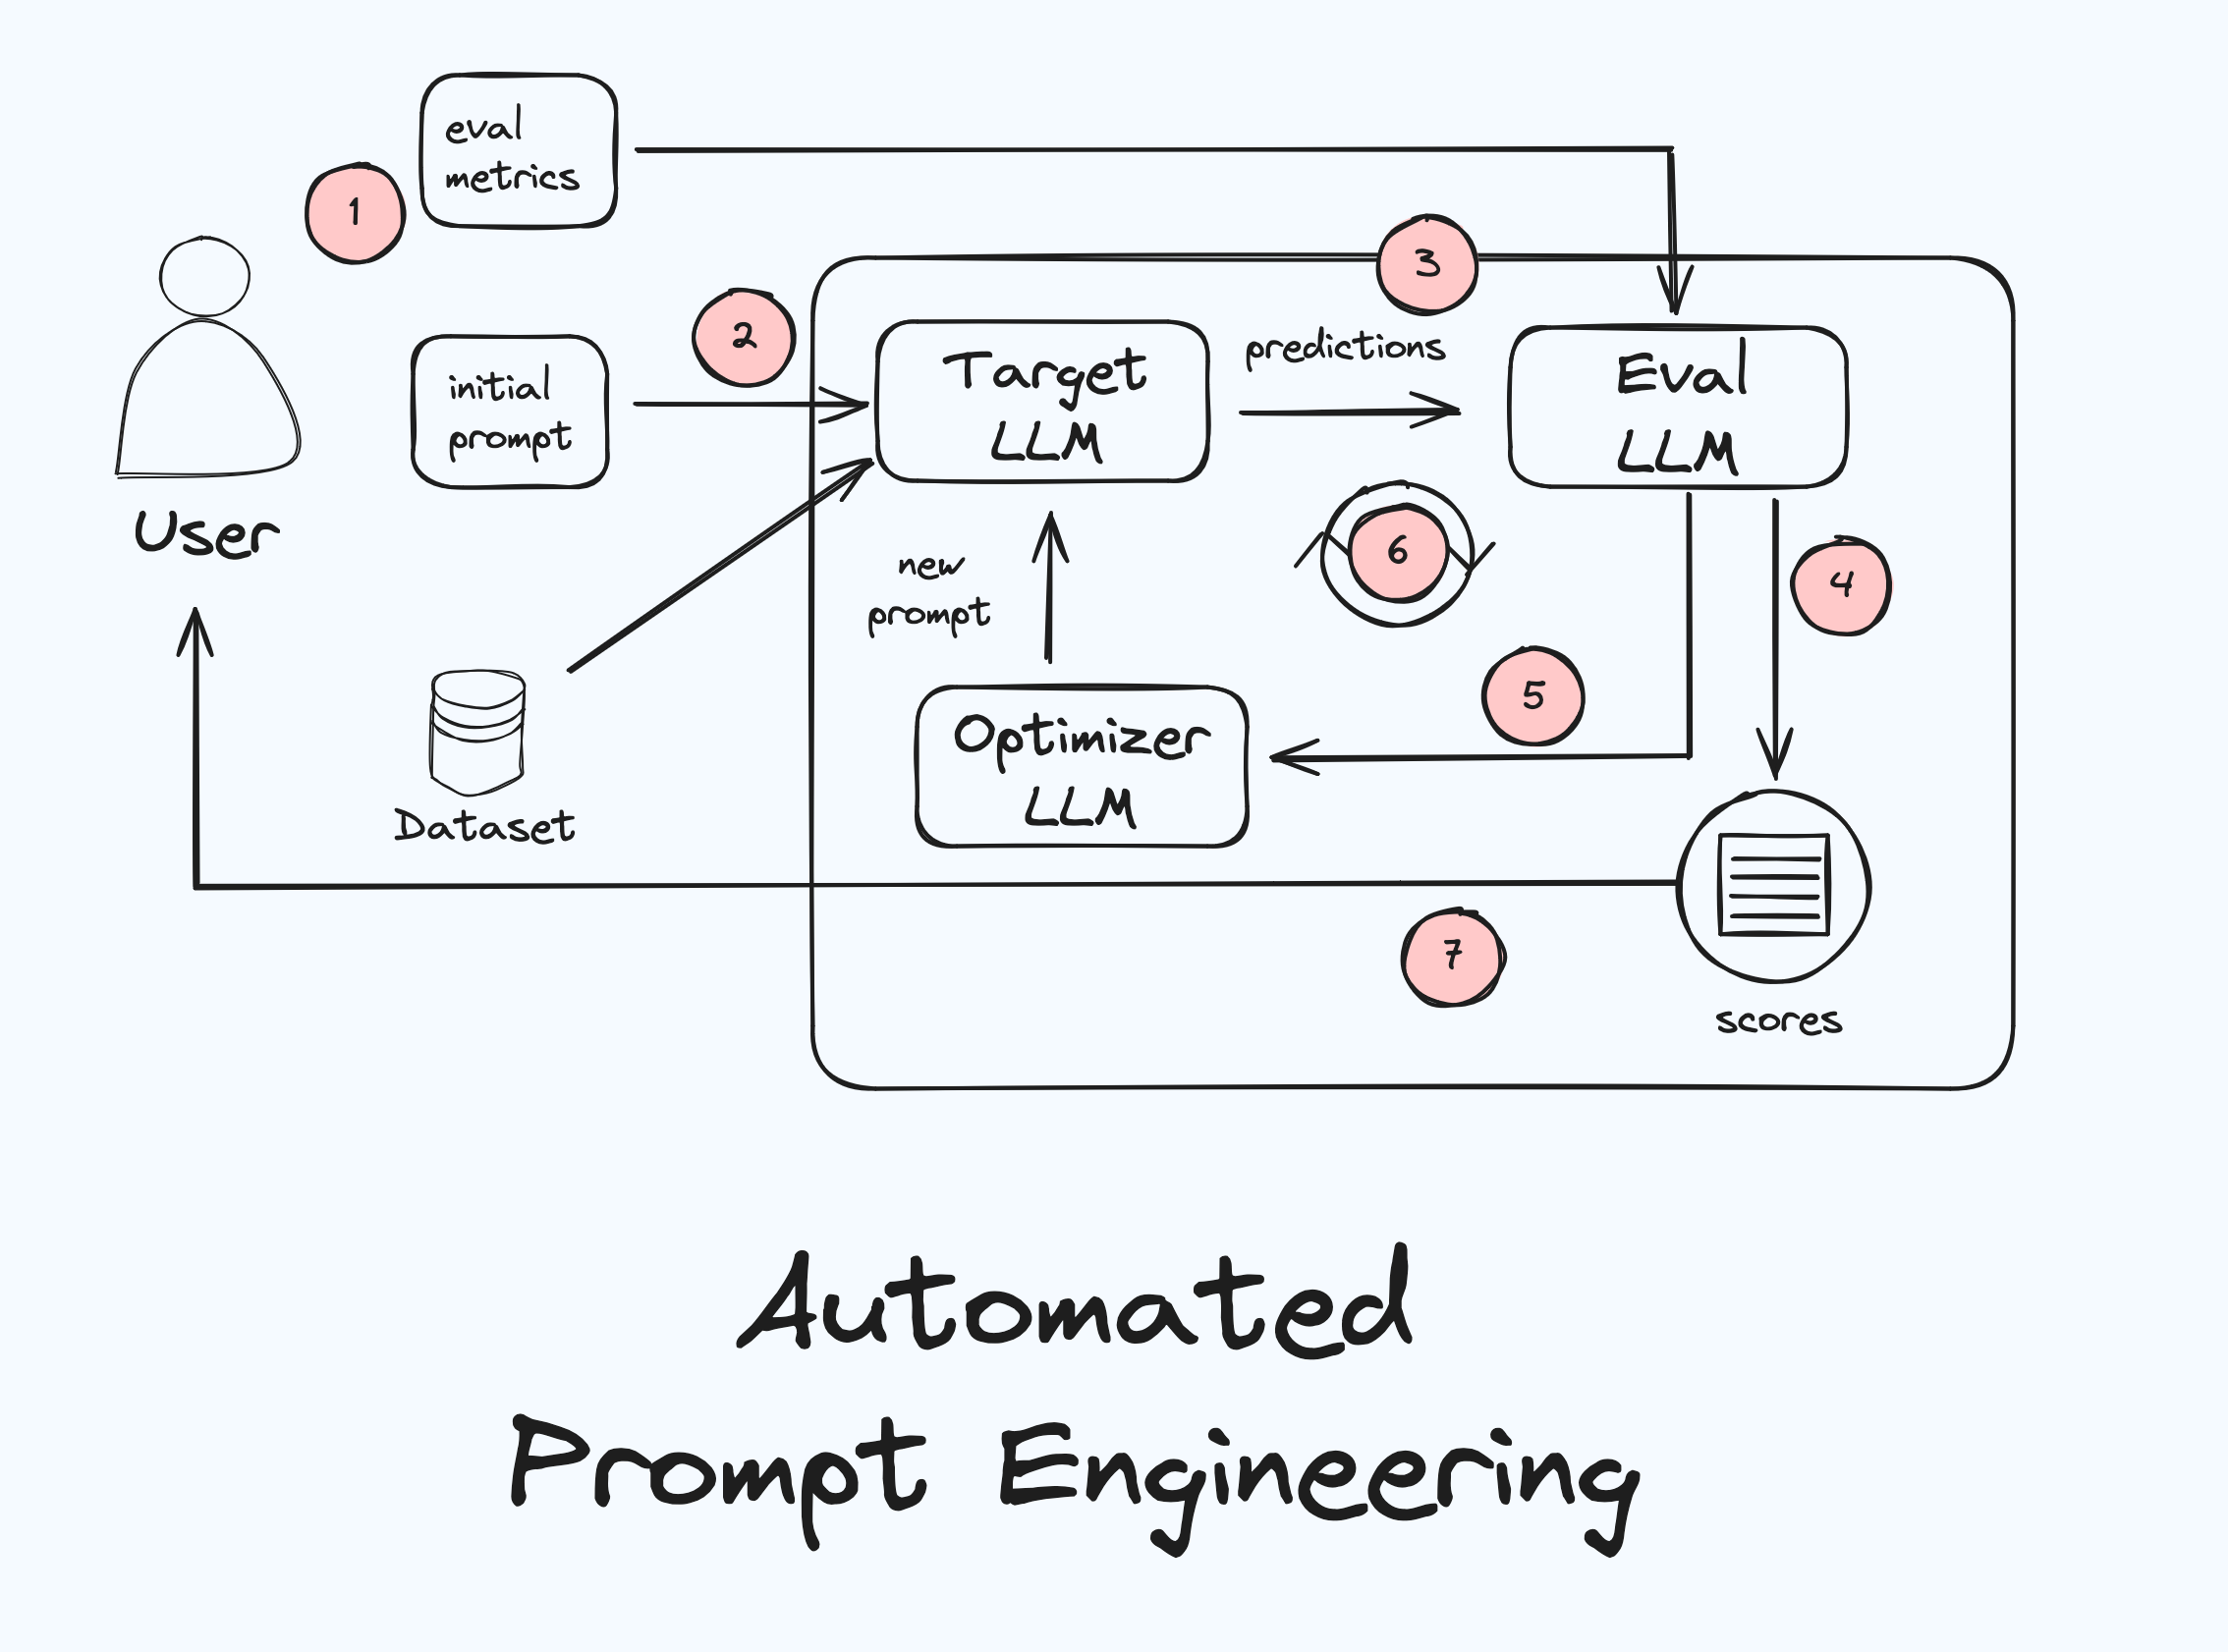
- To get started with APE we need to bring the following ingredients: (1) a labelled dataset representative of the task we want to create an optimised prompt for, (2) an initial prompt, and (3) an evaluation metric that we can hill climb against. This is, again, very similar to HPO in supervised ML, where we would bring a training dataset, initial starting value(s) for hyperparameters, and an evaluation metric.
- Start with initial prompt: We kick of the APE workflow with sending the initial prompt and the dataset to the target LLM, which is the LLM which we want to use in production and for which we want to create an optimised prompt.
- Generate a Response: The LLM will generate responses based on the dataset and the initial prompt. If we had, for example, 10 tweets and the initial prompt was "Identify the sentiment in this tweet" the target LLM will create 10 responses, one sentiment classification for each tweet.
- Evaluate the Response: Because our dataset is labelled we have the ground truth for each tweet. The evaluator LLM will now compare the ground truths against the outputs of the target LLM and determine the performance of the target LLM and store the results.
- Optimise the Prompt: Now the optimiser LLM will come up with a new prompt. Exactly how it does that we will discuss below. But as already discussed, this is analogous to how new values for hyperparameters in are chosen, and their are different strategies for that.
- Repeat Steps 3–5: The process of generating responses, evaluating them, and optimising the prompt is repeated iteratively. With each iteration, the prompt gets refined, leading (hopefully) to better and better responses from the LLM.
- Select the Best Prompt: After a certain number of iterations or when a satisfactory performance level is reached we can stop the workflow. At this point the best-performing prompt (along with the scores of all prompts) will be sent back to the user.
This automated process allows APE to experiment with lots of different prompts within a short amount of time, much faster than any human could.
Strategies for prompt optimisation
Now, let’s dive into the strategies of prompt optimisation and let’s start with the simplest one: random prompt optimisation. Despite its simplicity this strategy can yield surprisingly effective results.
Random prompt optimisation
Like HPO with random search, random prompt optimisation takes a "brute-force" approach. With this strategy we let the optimiser LLM generate a series of random prompts, independent from the prompts and results that came before. The system doesn’t try to learn from previous results; instead it simply explores the wide range of potential prompts randomly.
Optimisation by PROmpting (OPRO)
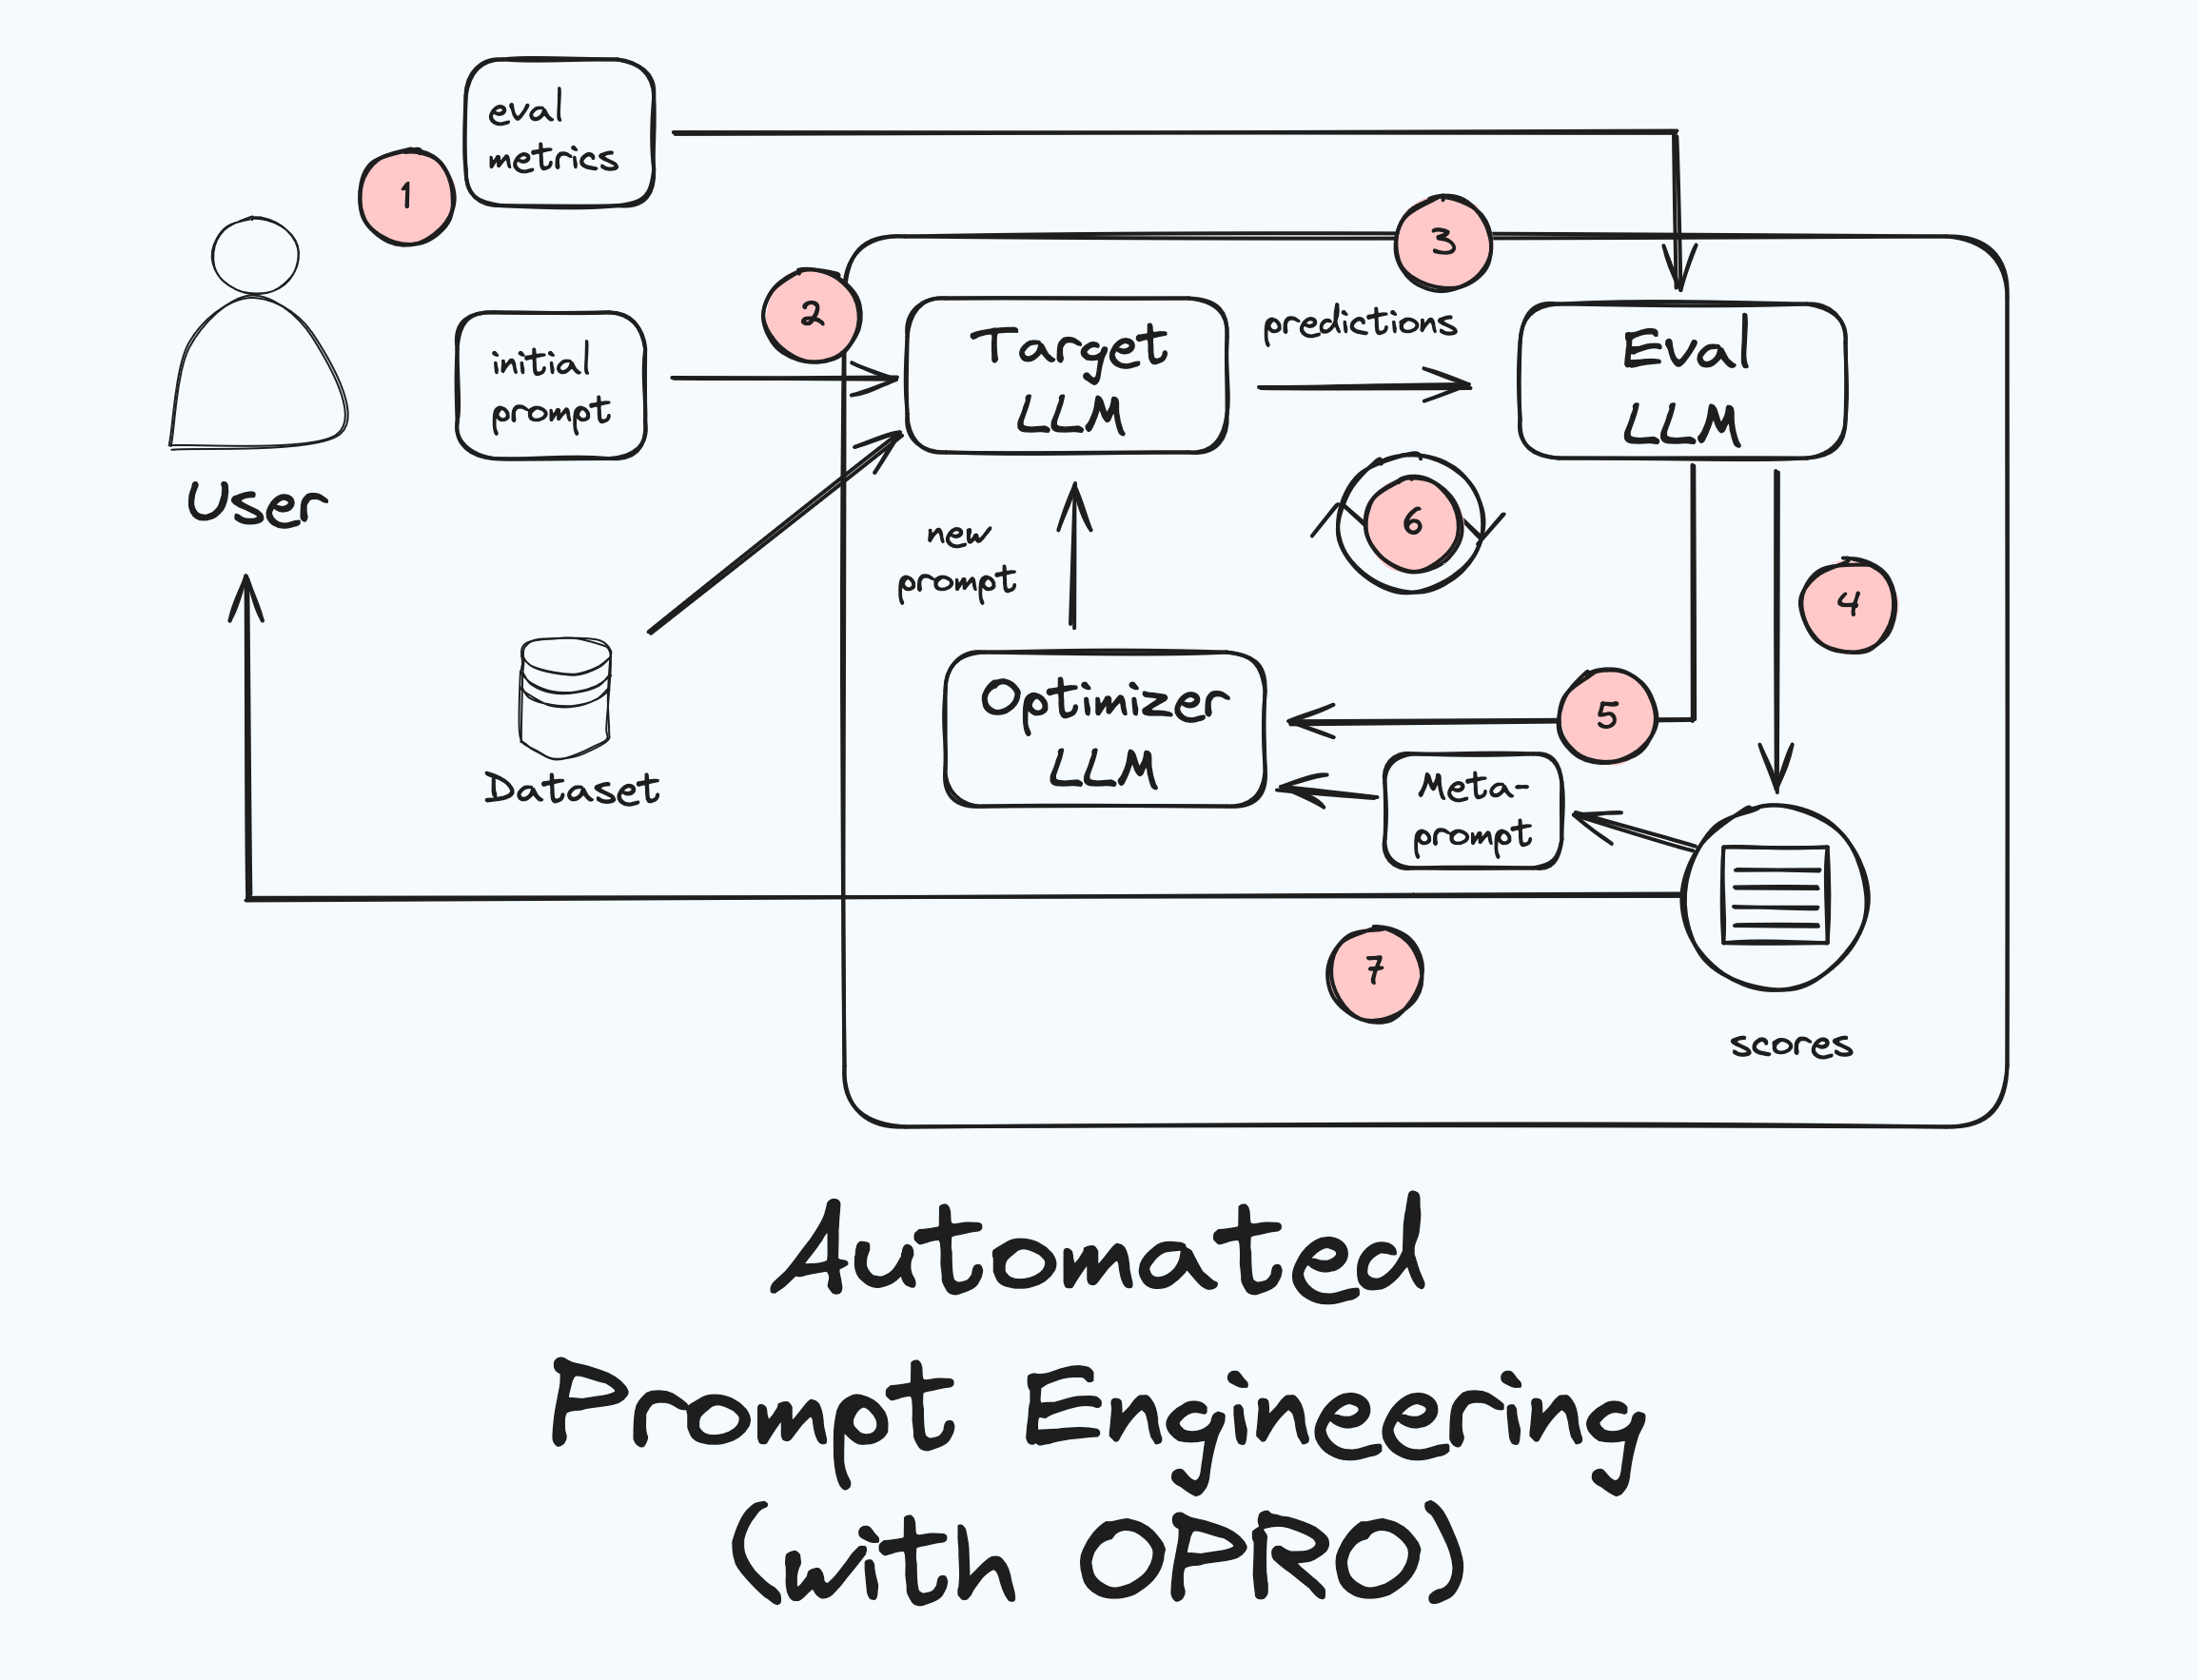
If random prompt optimisation is analogous to random search in HPO, OPRO is analogous to Bayesian search. This strategy was introduced in this paper by Google Deepmind. In OPRO we leverage the results from previous iterations and try actively to hill climb against the evaluation metric. OPRO keeps track of the scores of all previous prompts and sorts this history of prompts based on their performances in an optimisation trajectory, which becomes a valuable source of information, guiding the optimiser LLM towards more effective prompts. If this sounds a bit abstract right now, don’t worry – once we implement this strategy from scratch it becomes clear very quickly.
The key to OPRO is the meta-prompt, which is used to guide the optimiser LLM. This meta-prompt includes not only the usual task description and examples, but also the optimisation trajectory. With this prompt the optimiser LLM can analyse patterns in the optimisation trajectory, identifying the elements of successful prompts and avoiding the pitfalls of unsuccessful ones. This learning process allows the optimiser to generate increasingly more effective prompts over time, iteratively improving the target LLM’s performance.
We have now reviewed all the theoretical concepts necessary to get started with implementing our very own APE workflow from scratch. But before we do that I want to quickly touch two things: (1) Introducing few-shot prompting and its place in APE and (2) existing APE frameworks.
Beyond Prompt Optimisation: A Glimpse into Exemplar Selection
While prompt optimisation plays a crucial role in APE, it’s not the only tool in our toolbox. Before we delve into another powerful technique, let’s take a quick detour to discuss few-shot prompting. As you probably already know, LLMs sometimes need a little nudge in the right direction. Instead of just providing them with instructions and hoping for the best, we can provide them with a few examples of the desired output. This is called few-shot prompting, and it can significantly enhance the LLM’s understanding and performance for the task at hand.
Few-shot prompting can be added to APE via exemplar selection, which aims to find the best few-shot examples for a given task, further enhancing the effectiveness of an optimised prompt. The ides is that once we have found a well-performing optimised prompt through OPRO we can use a few examples to try to further improve the target LLM’s performance. This is where exemplar selection comes in: it systematically tests different sets of examples and keeps track of their performances. And just like prompt optimisation it would automatically determine the best few-shot examples for a given task and a given (optimised) prompt.
This is another area of research with immense potential in the realm of APE, but for the purposes of this blog post, we’ll focus solely on prompt optimisation. I will leave exploring exemplar selection as an exercise for you to improve upon the prompt optimisation.
Existing APE frameworks
You might also be wondering: "If APE is so powerful, are there already tools/libraries/frameworks that can do it for me?" The answer is yes, of course! Libraries like DSPy provide ready-made solutions for implementing prompt optimisation (and exemplar selection) techniques. These libraries handle the complex algorithms behind the scenes, so you can focus on using APE without getting bogged down in the technical details.
But, while these libraries are undoubtedly useful, they often operate as black boxes, hiding the inner workings of the optimisation process. The aim of this blog post and tutorial, however, is to for us to understand what goes on under the hood. And for that, we will get our hands dirty with some coding, and we start right now! 
Implementing APE from scratch
Enough with this pesky theory – let’s get our hands dirty! In this section, we’ll implement the OPRO algorithm from scratch using Python, Vertex AI, and the Gemini 1.5 models. We’ll break down the process step by step, with clear explanations and code snippets along the way. By the end, we’ll have a working OPRO implementation that we can use to optimise our own LLM projects.
The dataset
When we talked about the APE workflow we said we need to provide a dataset which we can use to "train" the optimiser LLM. In order to see some uplift in performance we need to use a dataset/task that is hard for LLMs to get right.
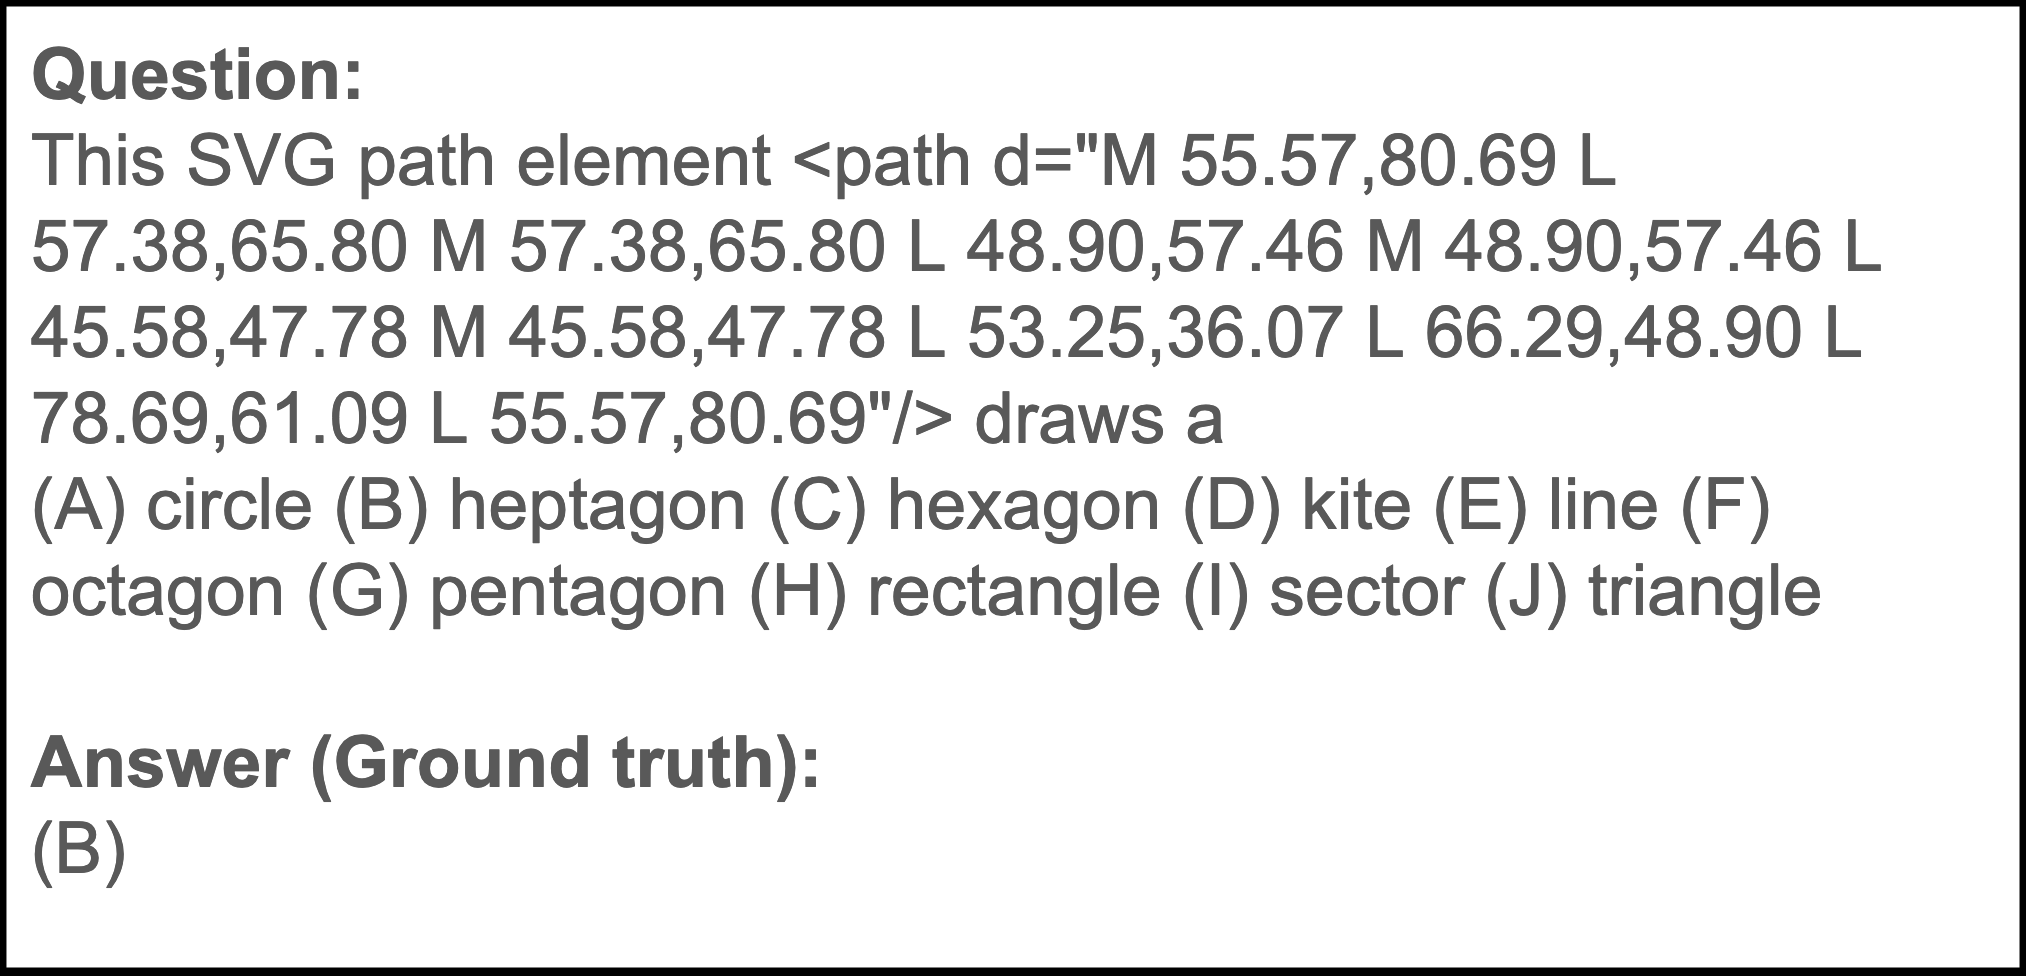
Enter the world of geometric shapes – a domain where LLMs often struggle. Spatial reasoning and the interpretation of abstract visual descriptions don’t come naturally to these models and often they fail at tasks that humans find rather easy. For our implementation we choose the _geometric_shapes_ dataset from the Big-Bench Hard (BBH) benchmark (which is open under the MIT license): Given a full SVG path element containing multiple commands, the LLM must determine the geometric shape that would be generated if one were to execute the full path element. Here is an example:
Preparing the Data: Training and Test Sets
In a typical data science project, we split our data into two sets: a training set used to train our model (or, in this case, optimise our prompts) and a test set used to evaluate the model’s performance on unseen data. This separation ensures that we’re not overfitting to the training data and that our model can generalise to new examples.
For our OPRO implementation, we’ll follow the same principle. We’ll randomly select 100 examples from the geometric shapes dataset to form our training set and another 100 examples for our test set. The code below demonstrates how to do this using the Hugging Face datasets library:
from datasets import load_dataset
import pandas as pd

dataset = load_dataset("lukaemon/bbh", "geometric_shapes", cache_dir="./bbh_nshapes_cache")
data = dataset["test"]
data = data.shuffle(seed=1234)

training = data.select(range(100))
df_train = pd.DataFrame({"question": training["input"], "answer": training["target"]})

test = data.select(range(100, 200))
df_test = pd.DataFrame({"question": test["input"], "answer": test["target"]})

df_train.to_csv("train.csv", index=False)
df_test.to_csv("test.csv", index=False)
This code loads the geometric shapes dataset, shuffles it randomly (using a fixed seed for reproducibility), selects the first 100 examples for training, the next 100 examples for testing, and saves them as CSV files. With our data neatly prepared, we’re ready for the next step: Creating a baseline.
Creating a baseline
Before we explore whether and how much performance increase we can achieve with APE we need to establish a baseline to be able to measure its impact.
We’ll start by evaluating how well our target LLM performs on the training data – the data we’ll use to guide the prompt optimisation process. This will give us a benchmark for comparison and highlight the need for prompt optimisation. Here’s the Python code for running this baseline evaluation, using Vertex AI and the Gemini 1.5-flash model:
import asyncio
import pandas as pd
from prompt_evaluator import PromptEvaluator
from vertexai.generative_models import HarmBlockThreshold, HarmCategory

if __name__ == "__main__":
    df_train = pd.read_csv('test.csv')  # Load your training data

    target_model_name = "gemini-1.5-flash"
    target_model_config = {
        "temperature": 0, "max_output_tokens": 1000
    }
    review_model_name = "gemini-1.5-flash"
    review_model_config = {
        "temperature": 0, "max_output_tokens": 10
    }
    safety_settings = {
        HarmCategory.HARM_CATEGORY_HATE_SPEECH: HarmBlockThreshold.BLOCK_NONE,
        HarmCategory.HARM_CATEGORY_DANGEROUS_CONTENT: HarmBlockThreshold.BLOCK_NONE,
        HarmCategory.HARM_CATEGORY_SEXUALLY_EXPLICIT: HarmBlockThreshold.BLOCK_NONE,
        HarmCategory.HARM_CATEGORY_HARASSMENT: HarmBlockThreshold.BLOCK_NONE,
    }

    review_prompt_template_path = 'review_prompt_template.txt'  # Path to the review prompt text file

    evaluator = PromptEvaluator(
        df_train, target_model_name, target_model_config, review_model_name, review_model_config, safety_settings, review_prompt_template_path
    )

    prompt = input("Please enter the prompt for evaluation: ")
    asyncio.run(evaluator.main(prompt))
This code loads our training data and allows us to input an initial prompt which will be used to generate responses. These model responses are then evaluated by the PromptEvaluator class which calculates the accuracy of the model with this prompt. Here is how the prompt evaluator works in detail:
- Response Generation: The prompt_evaluator takes our prompt and uses it with the target LLM (gemini-1.5-flash in our case) along with the questions from the dataset to generate responses for each question.
- Comparison with Ground Truth: The prompt evaluator the compares each model answer with the corresponding ground truth.
- Accuracy Calculation: The prompt_evaluator counts how many responses match the ground truth and calculates the accuracy.
Below an example of such an evaluation:
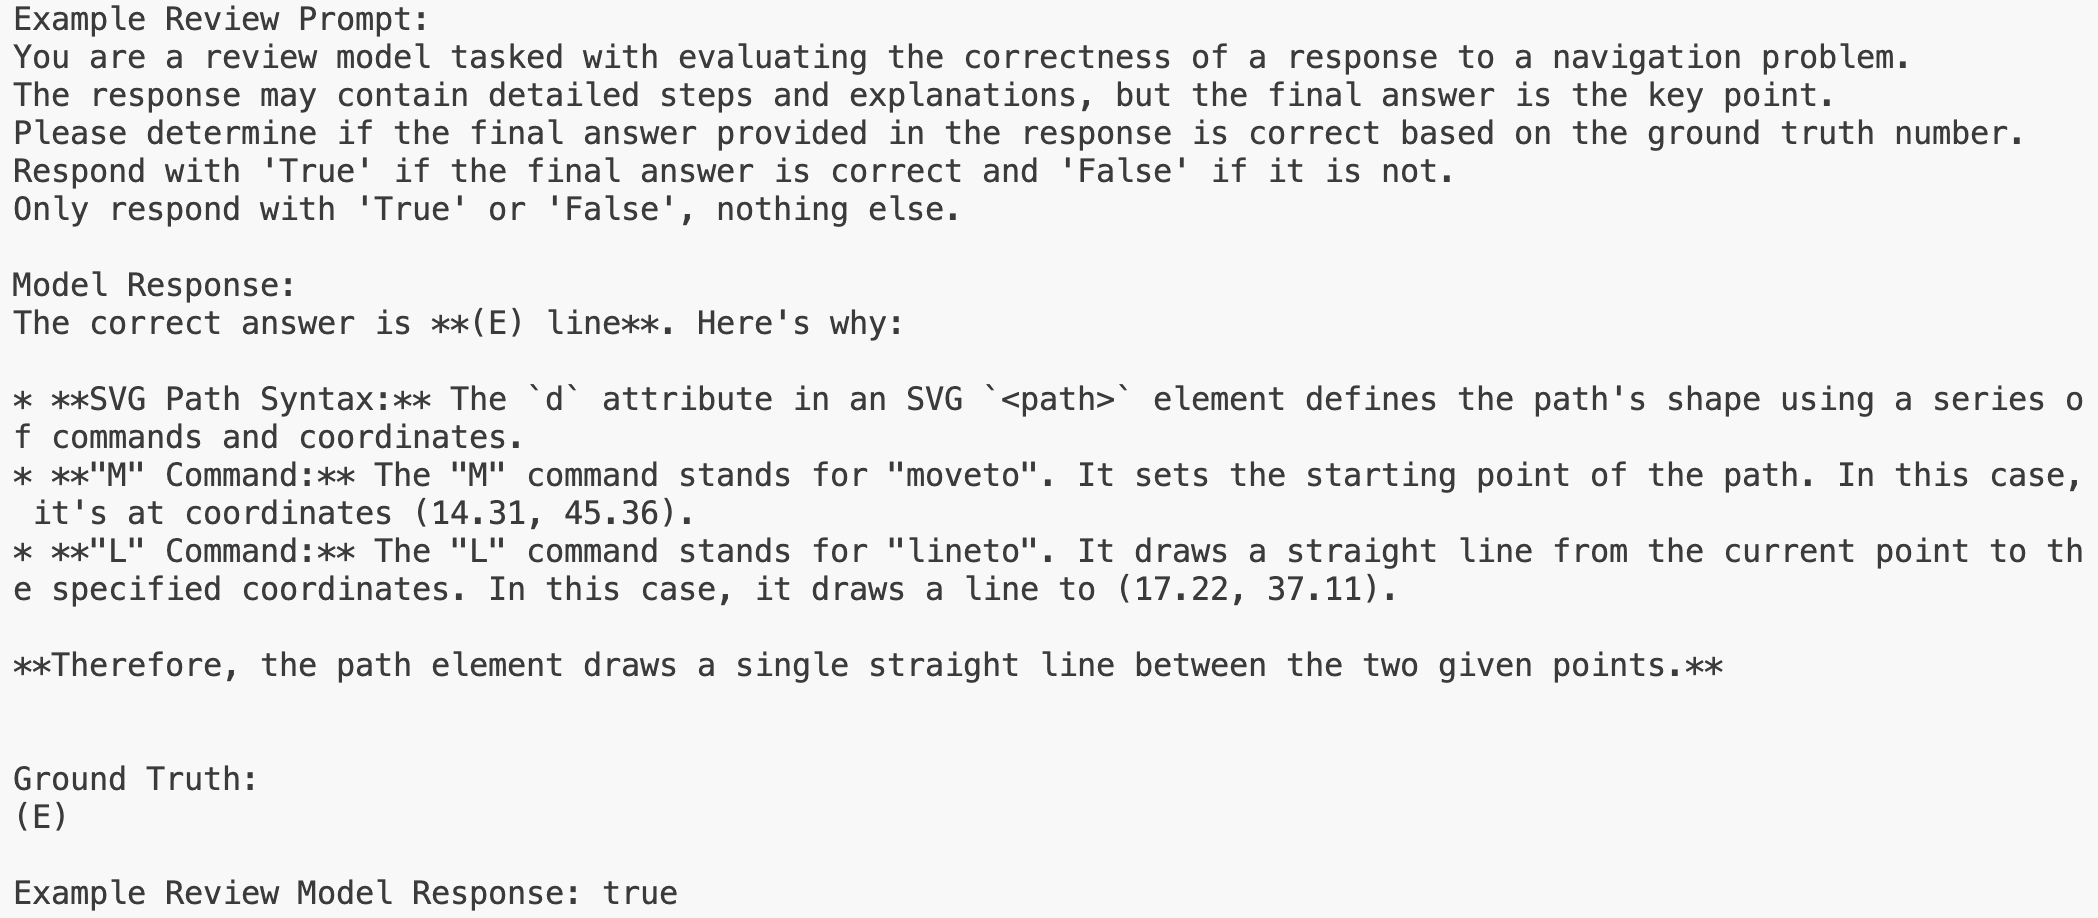
In this case the target model’s response contained the correct answer (E) and the evaluation model compared that response with the ground truth and returned true, indicating that the target LLM solved the task correctly.
Establishing the baseline
Now let’s go ahead and create a baseline for very basic prompt:
"Solve the given problem about geometric shapes."

As we can see the performance is a not great with only 36% accuracy, there should be plenty of room for improvement. Before we use APE, though, let’s try another prompt using a technique that has proven to be quite impactful with LLMs despite only a minimal alteration of the original prompt: chain-of-thought (CoT) reasoning. CoT prompts guide the LLM to break down complex problems into smaller steps, leading to more logical and accurate reasoning.
Our CoT prompt will be:
"Solve the given problem about geometric shapes. Think step by step."

Interesting: the accuracy jumps to 52% on the training data, demonstrating that even a simple add-on like "Think step by step" can significantly enhance the LLM’s performance. Let’s use this improved prompt as our baseline and starting point for APE workflow.
Implementing the OPRO optimiser
So, we already have implemented the evaluation mechanism for the baseline and now we are almost ready to implement the optimiser, which is the missing piece in the puzzle to complete our APE workflow. Let’s do this step by step (pun intended  ):
):
1. Setting the Stage: Models and Configurations
We have already seen that we use Gemini 1.5 Flash as target model. This means that, by the end of this process, we want to deploy 1.5 Flash into production with an optimised prompt. Here is the full list:
- Target LLM: This is the LLM we’re trying to optimise for the geometric shapes task. We’ll use gemini-1.5-flash because it’s fast and cost-effective, making it ideal for real-world applications where speed and efficiency are crucial. We use a temperature of zero because we want to reduce creativity (and possible hallucinations) for this task as much as possible.
- Optimiser LLM: This LLM is responsible for generating and refining the prompts, a task that demands creativity and nuance. We’ll use the more powerful gemini-1.5-pro to ensure we get high-quality and diverse prompt suggestions. We also want this model to be rather creative, which is why we use temperature 0.7.
- Eval LLM: It turns out that comparing a free form answer with a ground truth is a rather straightforward task for LLMs. Because of that we can again use the cost-efficient 1.5 Flash for this task with a temperature of zero.
2. Crafting the Meta-Prompt
As mentioned earlier, the meta-prompt is the guiding mechanism that instructs the optimiser LLM on how to generate effective prompts. It’s like a recipe that combines (1) the optimisation goal, (2) examples of the task, and (3) the history of previous prompts and their performance – the optimisation trajectory.
Here’s the skeleton for the meta-prompt template we’ll be using:
I have some prompts along with their corresponding accuracies. The prompts are arranged in ascending order based on their accuracy, where higher accuracy indicate better quality. {prompt_scores}Each prompt was used together with a problem statement around geometric shapes.
This SVG path element draws a (A) circle (B) heptagon (C) hexagon (D) kite (E) line (F) octagon (G) pentagon (H) rectangle (I) sector (J) triangle (B) Write a new prompt that will achieve an accuracy as high as possible and that is different from the old ones. …
Notice the _{prompt_scores}_ placeholder. This is where the optimisation trajectory will be inserted during runtime. As a reminder: we will sort these prompt-accuracy pairs in ascending order of accuracy, meaning the least effective prompts will appear first, and the most effective ones will be at the end. This helps the optimiser LLM to identify patterns and trends in prompt performance, learning which prompts were less and which were more successful.
3. The OPRO Loop: Generate, Evaluate, Refine
Now we have everything in place and we can let the APE algorithm generate a fixed number of prompts, evaluate them, and refine the prompts based on the meta-prompt and the optimisation trajectory in it.
N.B.: To speed up this process, we will leverage the power of asynchronous programming. This allows us to send multiple requests to the Gemini API simultaneously and process the responses in parallel, rather than waiting for each request to complete one by one.
To use asynchronous programming with the Gemini API, you’ll need to ensure you have an appropriate Queries Per Minute (QPM) limit set in your Vertex AI project settings. Higher QPM limits allow for more parallel requests, further accelerating the evaluation process. Alternatively, we could reduce the number of records in the dataset.
The main logic of the loop is a s follows (details can be found in the code in the GH repo):
for i in range(self.num_prompts + 1):

    if i == 0:
        new_prompt = self.starting_prompt
    else:
        metaprompt = self.update_metaprompt(self.prompt_history, self.metaprompt_template_path)

        # Find the new proposed prompt
        match = re.search(r'[[(.*?)]]', response.text, re.DOTALL)
        if match:
            new_prompt = match.group(1)
        else:
            await aioconsole.aprint("No new prompt found")
            continue

    # Create a subfolder for the prompt
    prompt_folder = self.create_prompt_subfolder(i)

    # Save the prompt in a text file within the subfolder
    prompt_file_path = os.path.join(prompt_folder, 'prompt.txt')
    with open(prompt_file_path, 'w') as f:
        f.write(new_prompt)

    # Use the PromptEvaluator to evaluate the new prompt
    accuracy = await self.prompt_evaluator.evaluate_prompt(new_prompt)

    if i == 0:
        best_accuracy = starting_accuracy = accuracy

    # Store the results
    prompt_accuracies.append((new_prompt, accuracy))

    # Update the best prompt if the current accuracy is higher
    if accuracy > best_accuracy:
        best_accuracy = accuracy
        best_prompt = new_prompt
Sidenote: A peek into the optimiser’s "thought process"
What I found quite fascinating when running this workflow was inspecting the optimiser’s "though process" when trying to come up with new prompts. Just as instructed in the meta-prompt it analyses the previous results and identifies patterns:
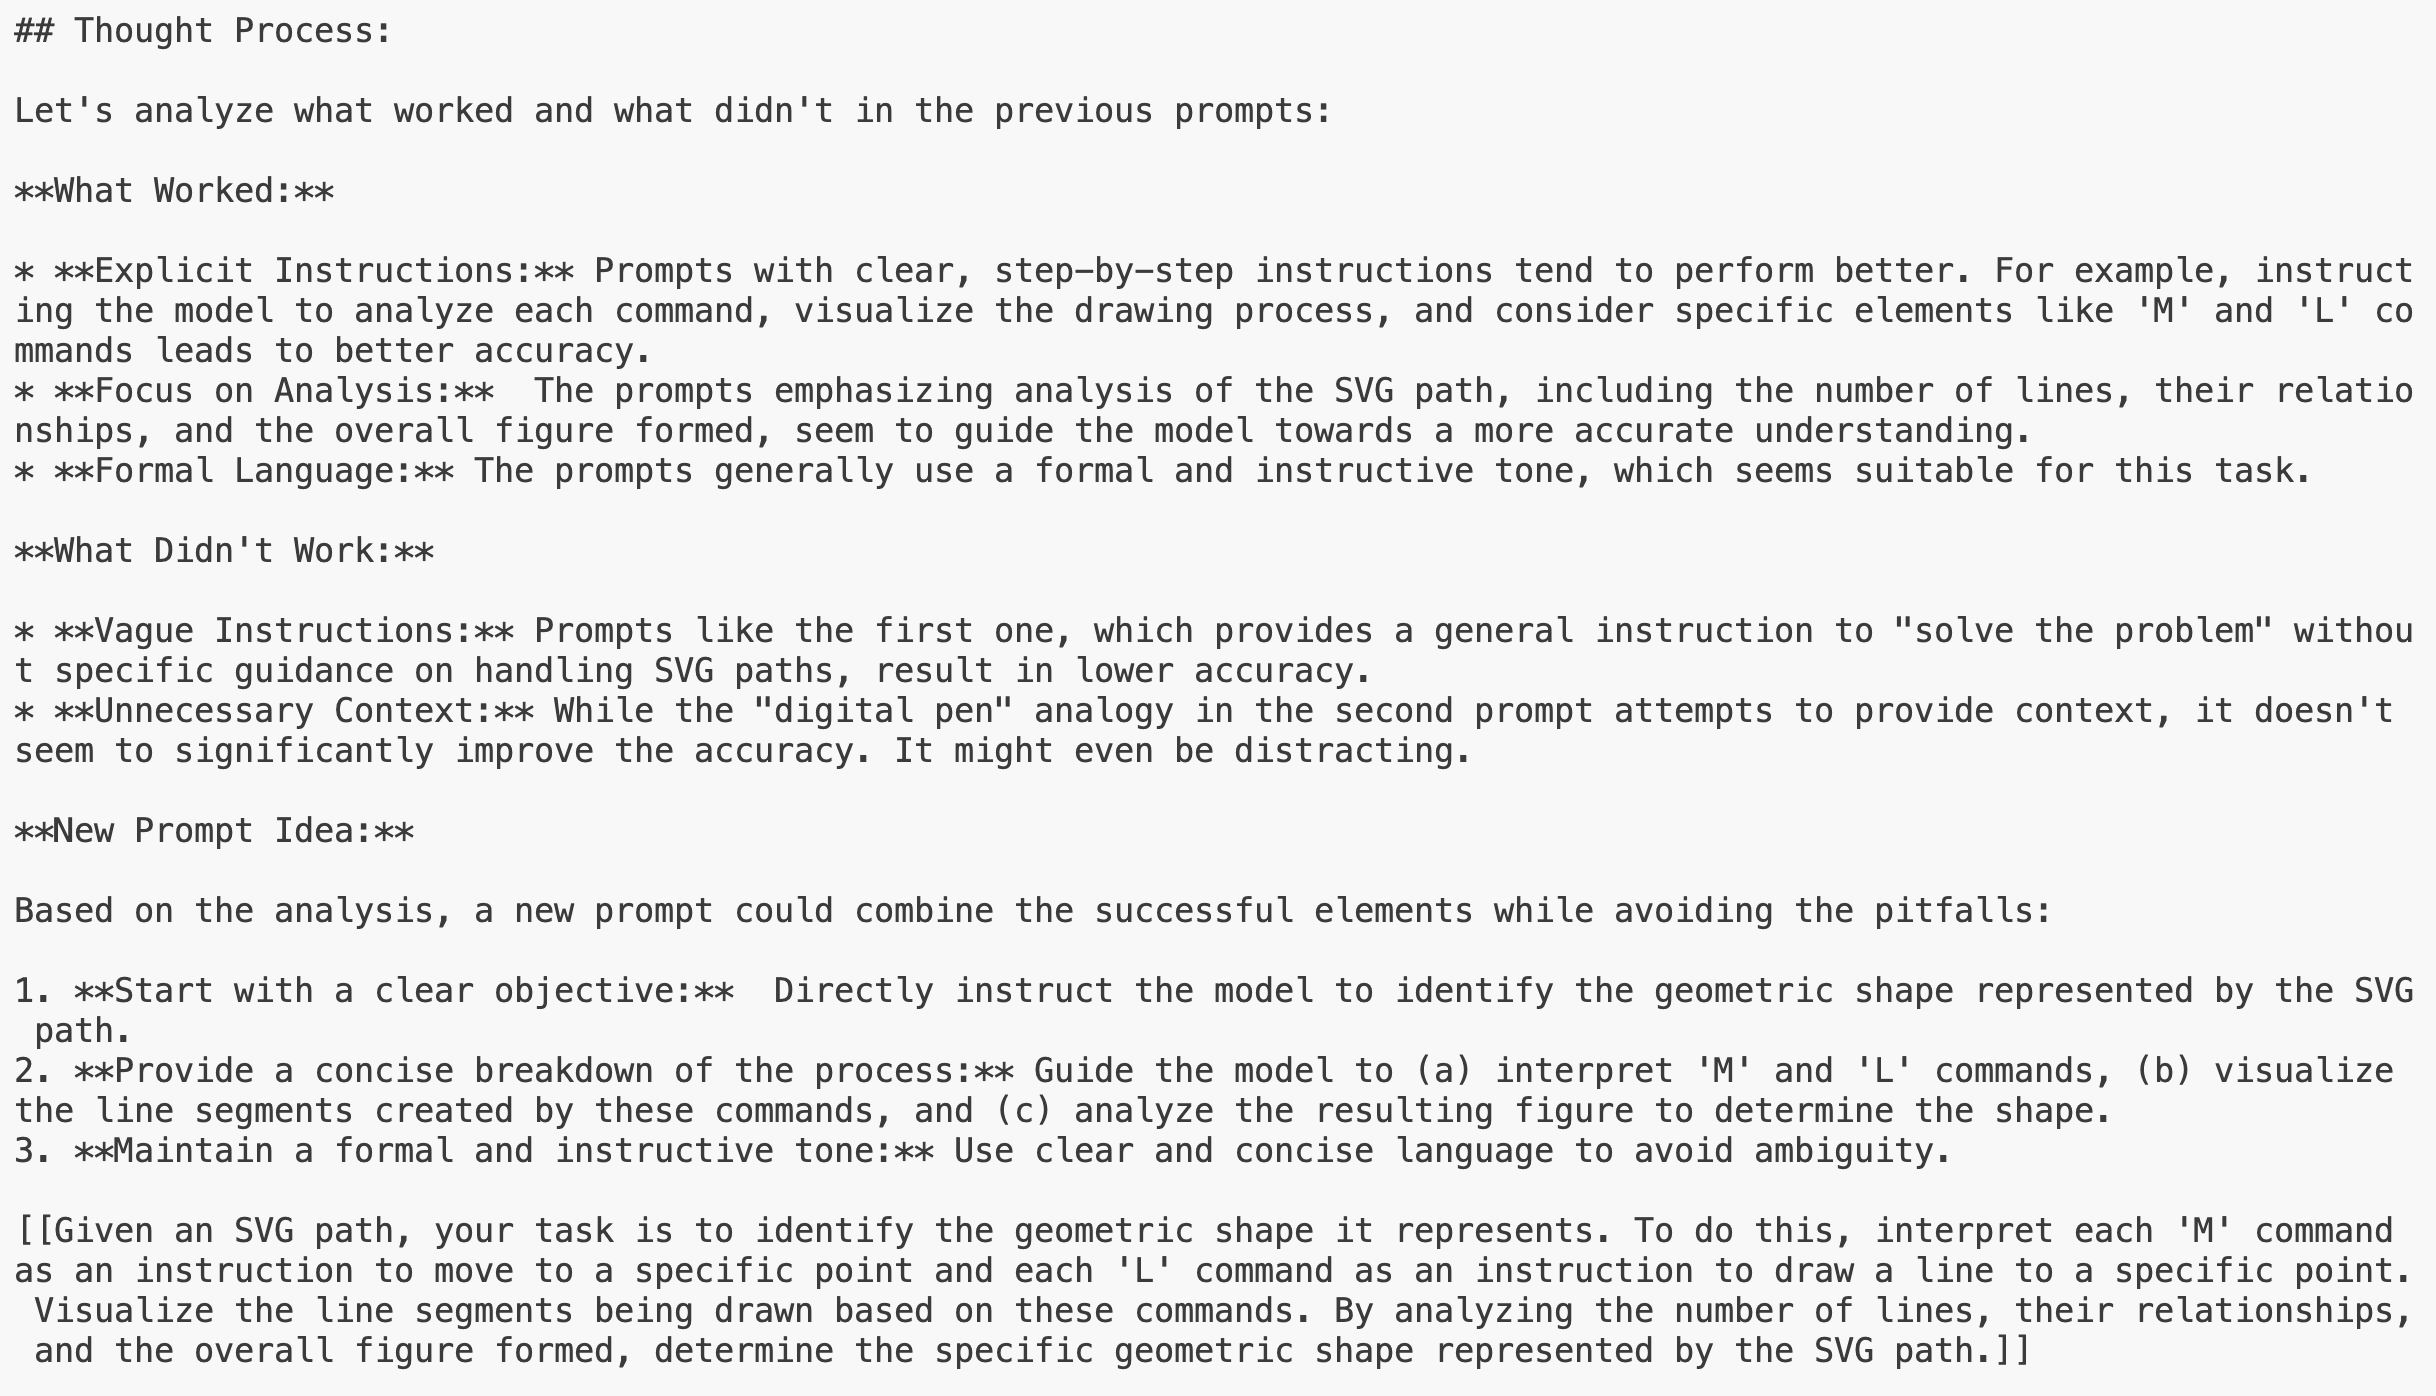
It then proposed a new prompt based on that analysis. The double square brackets around the new prompt serve as a clear delimiter, making it easy for our code to identify and extract the new prompt from the optimiser’s output.
4. Organising the Results
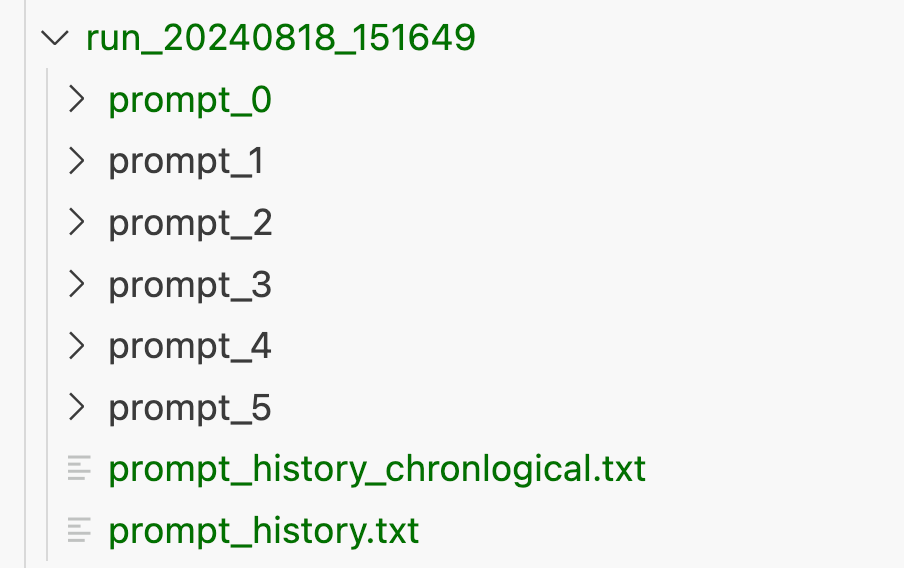
To make it easy to analyse the results of our APE run, our code will create a dedicated folder for each run, organised with timestamps. Within this folder, we will have a subfolder for each generated prompt, named prompt_1, prompt_2, and so on. Let’s peek inside one of these prompt folders:
- prompt.txt: This file contains the plain text of the prompt itself. We can easily open this file to see the exact wording of the prompt.
- evaluation_results.csv: This CSV file holds the detailed evaluation results for the prompt. We find the following columns:
- question: The original question from the training data.
- answer: The correct answer to the question.
- model_response: The response generated by the target LLM when given this prompt.
- is_correct: A boolean value indicating whether the LLM’s response was correct.

By examining these files for each prompt, we can gain insights into how different prompts influence the LLM’s performance. We can analyse the specific questions the LLM got right or wrong, identify patterns in successful prompts, and track the evolution of prompt quality over time.
In addition to these prompt-specific folders, the main run folder will also contain the final results:
- prompt_history.txt: A file listing the prompts in the order they were generated, providing a chronological view of the optimisation process.
- prompt_history_chronological.txt: A file listing the prompts sorted by their accuracy on the training data, allowing you to see the progression of prompt quality.
5. Selecting and testing the best-performing prompt
After completing all iterations of the OPRO loop, we will have a collection of prompts and their associated accuracies, neatly stored in the run folder. At the end of the run, the program will output the best-performing prompt, its accuracy, and the improvement over the starting prompt.
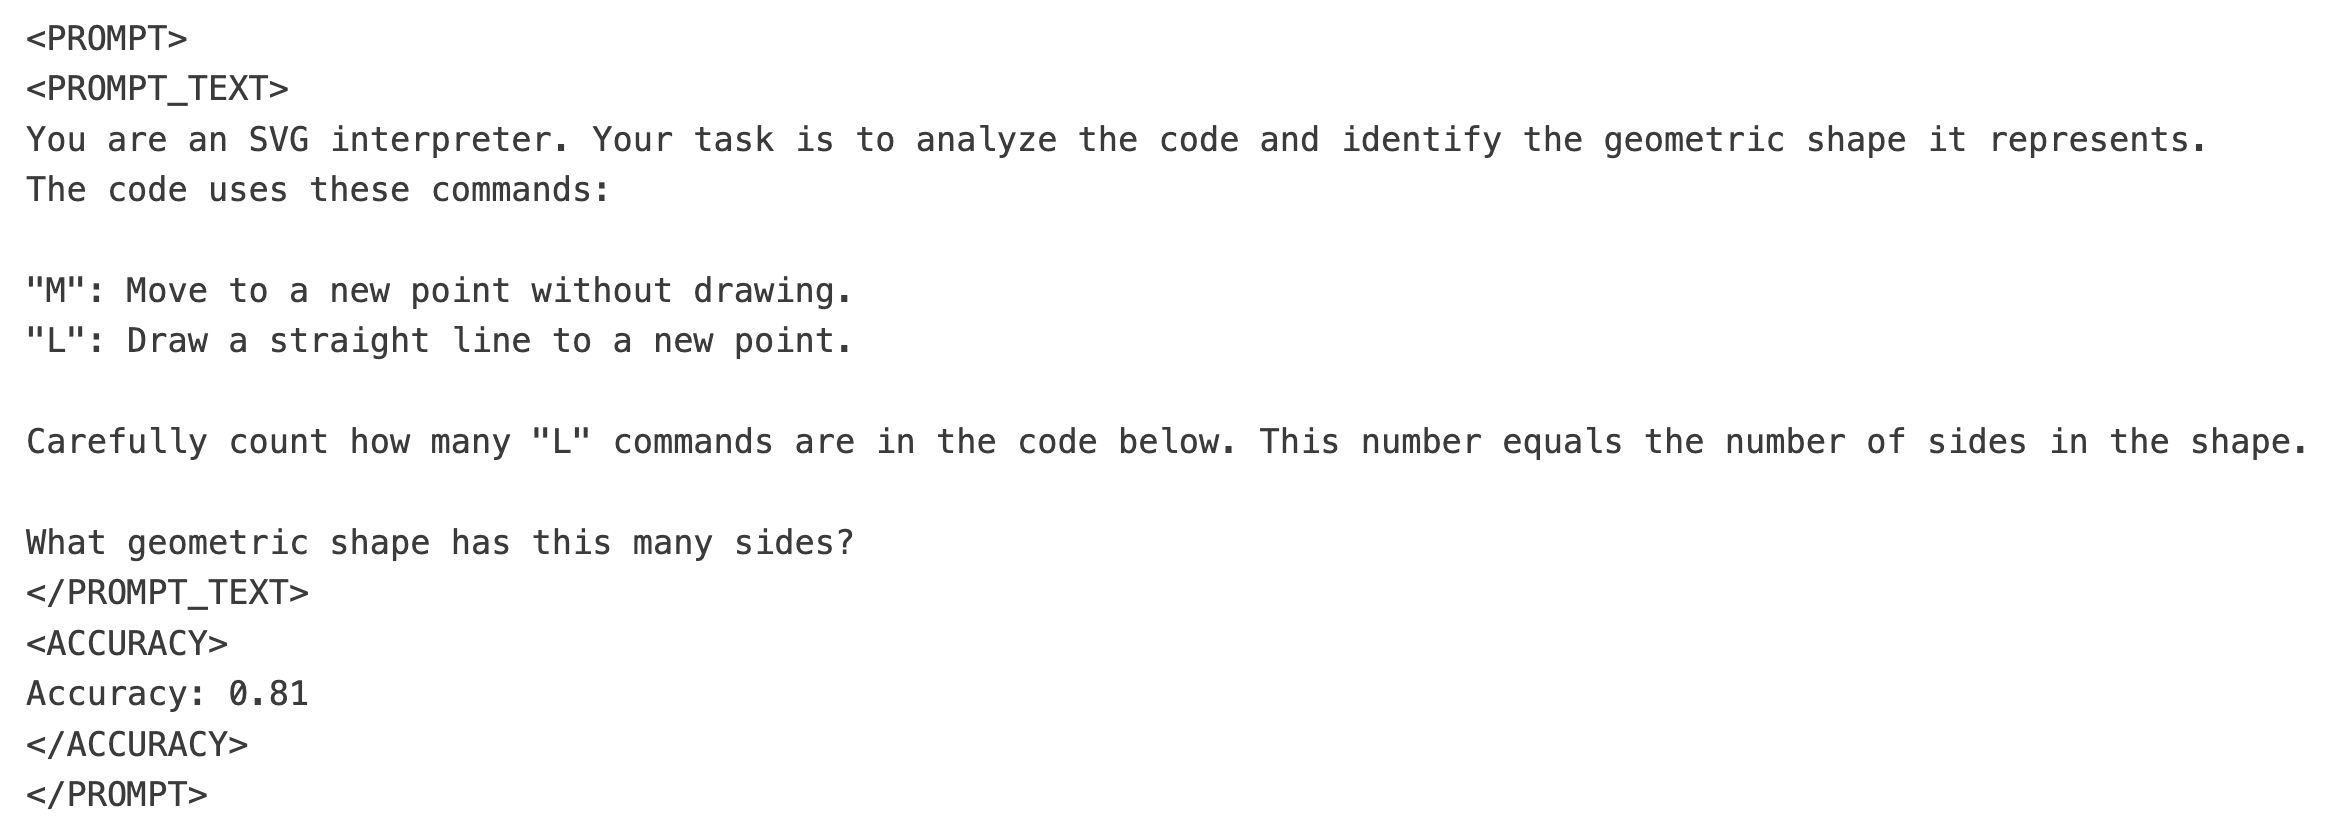
Wow, 81%, that is quite the improvement! And the new prompt is also quite creative, in my opinion: It came up with the idea to count how many "L" commands are in the SVG path and uses that as an indicator for which shape has been drawn!
We can now use this prompt and incorporate it into your LLM workflow. But before we do that there is one more test we should run: Testing this prompt on the unseen test data. This will tell us whether the prompt’s effectiveness generalises beyond the training data.
First we need to establish a baseline on the test data (the baseline we establish above was for the training data):

We achieve 54% accuracy on the test data with our CoT prompt. This will serve as our benchmark for evaluating the effectiveness of our APE run.
Now let’s run our optimised prompt on this test dataset:

We achieved 85%! That is an amazing improvement of 31 percentage points compared to our CoT prompt 
Conclusion
Congratulations! We have successfully discovered a new, better performing prompt for the _geometric_shapes_ dataset. It’s a testament to the power of APE and the effectiveness of the OPRO algorithm.
As we now have see, crafting effective prompts can significantly impact an LLM’s performance, but the manual process of tweaking and experimenting can be time-consuming and difficult to scale. That’s why, in my opinion, APE is starting to emerge as a game-changer, enabling us to harness the power of automation to optimise prompts and unlock the full potential of LLMs.
In this blog post, we’ve explored the core ideas of APE, focusing on a the OPRO strategy – the "Bayesian search" of prompt optimisation. We’ve seen how OPRO uses a meta-prompt that incorporates the optimisation trajectory, allowing the optimiser LLM to learn from past successes and failures and iteratively refine its prompt generation strategy.
But we didn’t stop at theory – we also got practical by implementing an APE workflow from scratch using Vertex AI and Google’s Gemini 1.5 models. By building it ourselves, we gained a deeper understanding of the process and are now well equipped to use APE when deploying LLM workloads into production. Our implementation successfully discovered a new prompt that boosted the accuracy on the challenging _geometric_shapes_ task from a baseline of 49% to an impressive 85% on the unseen test dataset.
Of course, our implementation is just a starting point. There are many ways to enhance it further. You could experiment with different meta-prompt structures, incorporate human feedback into the optimisation process, explore more sophisticated evaluation metrics, or even combine OPRO with other APE techniques like exemplar selection. The possibilities are vast, and the potential for improvement is immense.
Feel free to use the code repository (which is under CC BY-NC-SA 4.0 license) to explore APE and improve upon the current implementation 
Heiko Hotz
 Follow me on Medium and LinkedIn to read more about Generative AI, Machine Learning, and Natural Language Processing.
 If you’re based in London join one of our NLP London Meetups.