Lossy Image Compression From Scratch

When I first got my camera, all photos I shot were in JPEG format. However, once I started looking at photography tutorials and blog posts online, all the serious photographers shoot in raw image format and JPEG is deemed inferior. My JPEG image files are also half or a quarter or less in size compared to raw which makes me believe that the raw format captures a lot more information. But I also wonder: what exactly is missing in JPEG?
In this post I will replicate the lossy part of JPEG compression process in Python using common libraries (mostly just Numpy and Scipy for the actual compression), which includes chroma subsampling, discrete cosine transform, and quantization. JPEG also does a special type of encoding called entropy encoding to make the file smaller but it does not affect the quality of the final image as the compression is lossless. I will not cover entropy encoding here since no information is lost during this stage.
Raw File Preprocessing
A raw image file contains minimally processed data from the sensor of a digital camera and usually it’s about as close to how the camera sensor "sees" as you could get. In order to process and manipulate the raw image data, we will transform the image into a Numpy array.
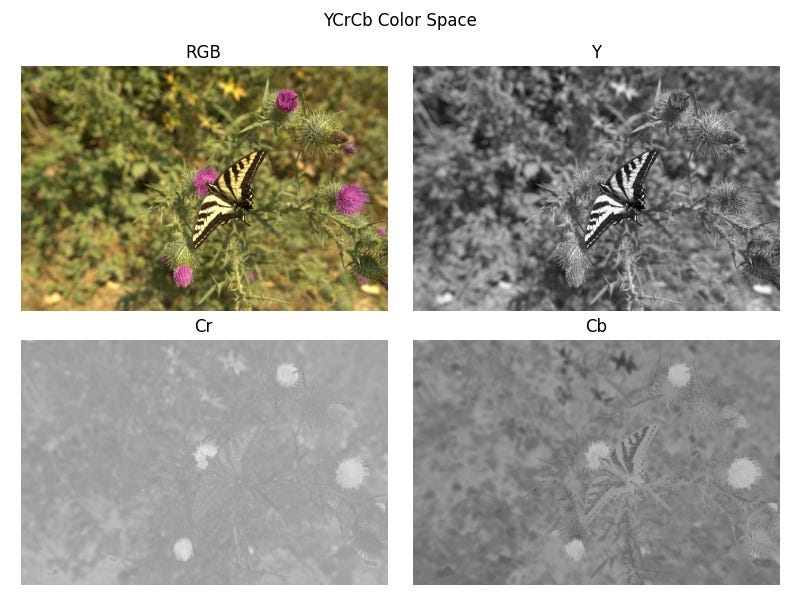
Here, the rawpy library does the heavy-lifting of reading the image along with metadata and postprocesses it into an image array with three color channels (RGB). I then transform the image into YCrCb color space using OpenCV. This particular color space has one luma component (Y) which is the brightness of a pixel and two chroma components (Cr and Cb) which indicate the color. The advantage of using YCrCb over RGB is that we can use different compression levels for the luma and chroma components since our eyes are more sensitive to brightness than color saturation. The pixel values are also centered at 0 in preparation for later computations.
Downsampling
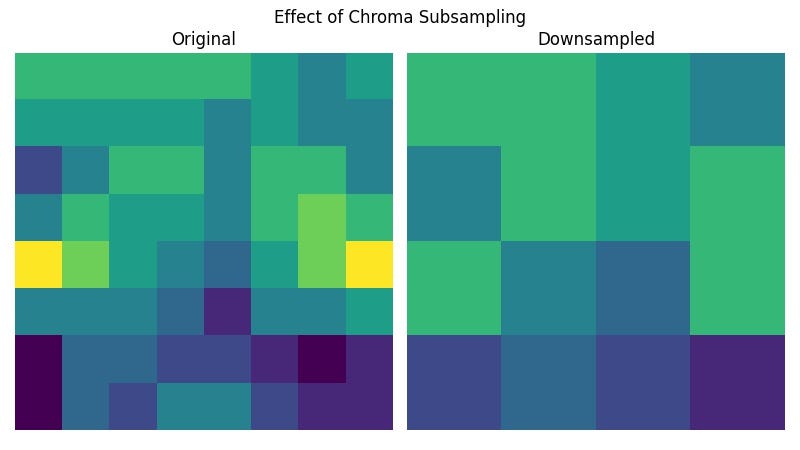
Knowing that we see more details in the brightness channel, we will downsample the two chroma components (also called chroma subsampling) by a factor of 2 in both the horizontal and vertical directions. To do that, we will calculate the average of four adjacent pixels and overwrite them with the average. If you are familiar with pooling in neural networks, this is essentially an average pooling operation with a 2×2 kernel but without reducing the image dimension.
The code above is slow especially with the double loop in the case of downsample ratio of 4:2:0. We can speed it up using Scipy since it’s equivalent to a 2D convolution with strides of 2 (skipping 2 pixels after each element-wise multiplication) and equal kernel weights that sum to 1.
As mentioned above, we will only downsample the chroma components:
Block Splitting
Before going to the next steps, we need to split the image into 8×8 blocks for all channels and apply necessary padding if the dimension is not divisible by 8.
The forward operation split the input image and returns the blocks along with a set of indices for reconstruction later. The backward operation concatenates the blocks back to form an image and removes the padding from the forward pass.
Discrete Cosine Transform and Quantization
How well can you tell shades of green apart? And instead of having 20 shades of green in a photo of a tree, we only use 5 different shades, would you still be able to tell it’s a picture of tree? The same can be said about the variation in brightness, we might not be able to tell the difference if we use fewer levels.
That’s the main motivation for quantization, where we bucket shades of the same color or similar brightness levels together and use only one value to represent the entire bucket. We will do this in frequency domain instead of the spatial domain as a problem that’s hard to solve in one domain might be easier in the other domain. In our case, it’s not always easy to say which shades of red should be grouped together or where we should draw line between orange and yellow.
Discrete Cosine Transform (DCT)
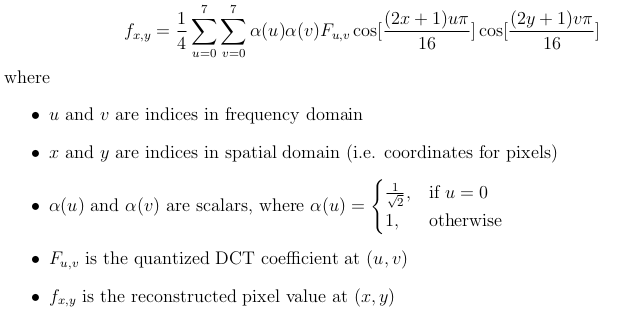
We will use two-dimensional DCT to transform our 8×8 blocks into frequencies. What this means is that we will try to represent the brightness or color block as a sum of various cosine functions. Formally,

Here the input is a 8×8 block from a channel (Y, Cr, or Cb) of the image, and the output is a matrix of DCT coefficients of the same size. We can code this by hand using loops:
And of course, there is a DCT function in Scipy which does the computation more efficiently. The two-dimension version is equivalent to applying DCT along one direction and then applying it again in the other direction.
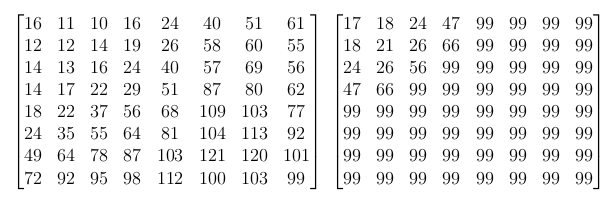
An example block might look like this:
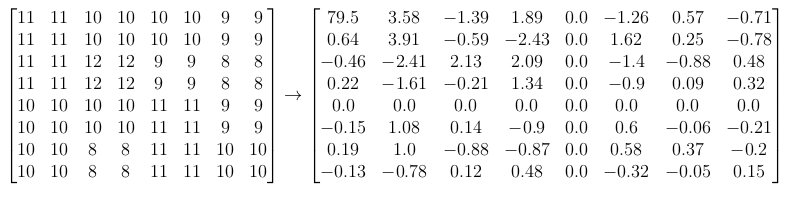
Notice that the first entry (upper top left corner) of the DCT matrix is quite a bit larger than the rest. This is called the DC coefficient which captures the most prominent characteristic of the input block. The other coefficients are called AC coefficients.
Quantization
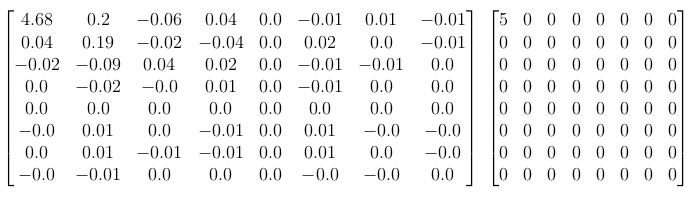
Now that we have a frequency representation of a block, we can group frequencies together and shrink the number of possible signals. To do that, we will divide a block element-wise by a matrix of the same dimension called the quantization matrix, and then round the result to the nearest integer.
Since we are more sensitive to details in the brightness channel than the color channels, we can use separate quantization matrices. The value of a quantization matrix also gets progressively larger the further downright we go. Recall that the DC coefficient is on the upper left corner, dividing that by a smaller number makes it less likely to be 0 when rounded to the nearest integer. On the other hand, dividing by larger values will zero out the higher frequencies. The values in a quantization matrix also controls the compression ratio; if we want greater compression, we can make the values larger so that most of block will be 0 when rounded.
Using the example block (which is from the Cr channel) from above, divided by the chroma quantization matrix and rounded to the nearest integer gives:
In this particular case we actually only keep the DC coefficient of the entire block.
Decoding
We have finished compressing and need to transform those blocks in frequency domain back to an image. To do that, we basically just go through each step in reverse.
First, we multiply the blocks by the corresponding quantization matrix. Notice that we lost some information here because some of the coefficients were rounded to 0. Then we apply the inverse DCT to the blocks to transform them back to spatial domain.
We can leverage the DCT function from Scipy once again, this time specifying the "type" argument to be "3" for Type-III DCT, which is the inverse of (Type-II) DCT.
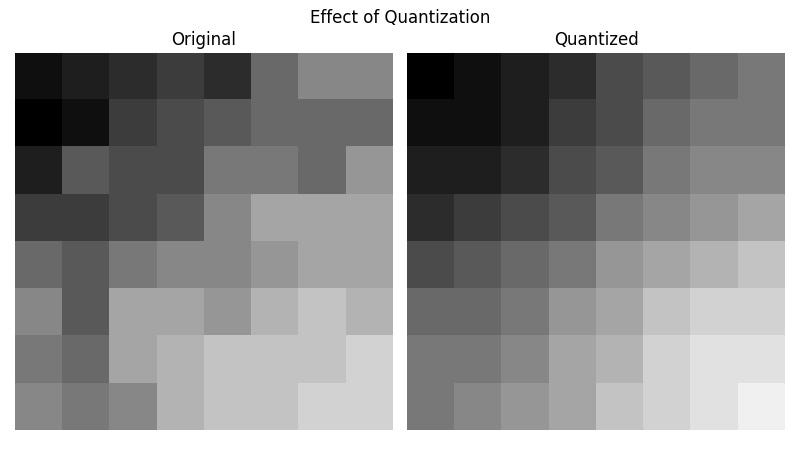
Here is an example of the effect of quantization after multiplying back the quantization matrix and reversing DCT:
Postprocessing
Using the backward operation of the ImageBlock class from the Block Splitting section above, we can re-arrange those compressed blocks back into an image. We also need to undo the centering and transform the image back to RGB color space, then save it as a JPEG file.
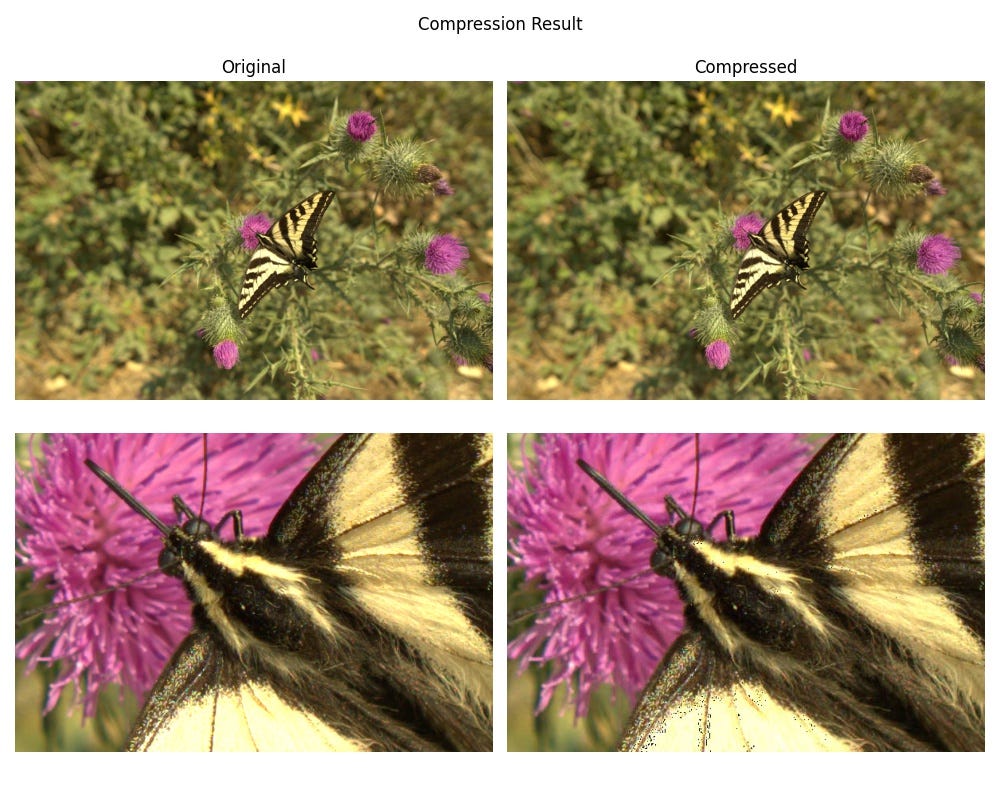
Here are the final results; can you tell the difference?
Entropy Encoding
Just a few words on entropy encoding; this is crucial part of JPEG after quantization where the image data is encoded in a very compact way to make the file smaller. Instead of storing every single value in our image matrix, it only stores the non-zero entries and counts the number of 0’s in between. Because our matrix is sparse after quantization, this is very efficient. In addition, only the bit-representation but not the actual values are written to file. The technique used to represent matrix entries in bits is called Huffman coding and it’s quite tedious to implement (could be a standalone article altogether). Just want to reiterate that this is a type of lossless compression so no information is lost in entropy encoding.
Conclusion
My final JPEG image (with entropy encoding) is just a bit over 1MB in size, which is a lot smaller than what we started with (25MB). Of course, there is a trade-off between file size and image quality but if you have enough megapixels and you are not zooming into the details, the JPEG file looks just fine. At the same time, since SD cards are cheap nowadays and I want to preserve highest quality if someone ever wants life-size prints of my photos, I will continue shooting in raw 🙂
As always, full code on GitHub.


