Using Python Flask and Ajax to Pass Information between the Client and Server
Building a QT-interval calculator

The following provides an example of how we can pass information from the client to the server in a Python Flask application. Firstly demonstrating how data can be sent from the client to the server and processed and then how we can make this more efficient by carrying out the calculation client side and returning the results on the same page using Ajax. To illustrate how this works, the example focuses on creating a simple calculator to work out the compensated QT interval which is part of the EKG/ECG waveform used in medicine. This calculator is an example only and should not be used for medical purposes. It is assumed that the reader has some familiarity with basic HTML, CSS, JavaScript and Python.
The QT-interval
The QT-interval represents the total time for the heart’s ventricles to activate and recover. The QT-interval is measured from the start of the Q wave to the end of the T wave and varies according to the heart rate, it is also slightly longer in women than men.

As the interval is affected by the heart rate (i.e. the higher the rate the shorter the interval) various formulas exist to compensate for this including Bazett’s, Fredericia’s, Hodges and Framingham [1] (referred to as QTc, c for compensated). An increased QT-interval puts patients at risk of sudden cardiac death. This can triggered by certain conditions as well as being drug induced [2].
For the calculator we will use one of the most popular formulas; Bazett’s, which is defined as:

Python Flask
Flask (https://flask.palletsprojects.com/en/2.0.x/) is a micro framework for the web that allows us to build and serve web pages using Python. Flask applications require that apps are structured in a certain way with HTML files being stored in a templates folder and other files (e.g. CSS and JavaScript) stored in a static folder. You can also use sub-directories with larger projects if required to separate out multiple JavaScript/CSS files. In this example created in a folder called Flask demo, we have a static folder containing our style sheet (my-style.css) and a JavaScript file (qtc-calc.js). The templates folder contains the main HTML page for this example called index.html. Outside of these two folders we have the main Flask application in the Python file main.py.

We will start by creating the index.html file. We can add the following code:
<html>
  <head>
    <title>QT-calculator</title>
    <meta charset="UTF-8" />
    <meta name="viewport" content="width=device-width, initial-scale=1.0" />
    <link rel="stylesheet" href="{{ url_for('static', filename='my-style.css') }}”>
    <link href="https://cdn.jsdelivr.net/npm/bootstrap@5.0.1/dist/css/bootstrap.min.css" rel=”stylesheet” integrity=”sha384-+0n0xVW2eSR5OomGNYDnhzAbDsOXxcvSN1TPprVMTNDbiYZCxYbOOl7+AMvyTG2x" crossorigin="anonymous">
  </head>
  <body>
  </body>
</html>
In the head section of the HTML file we have imported Bootstrap (https://getbootstrap.com/docs/5.0/getting-started/introduction/), which provides a free CSS framework to allow us to easily produce more professional looking web content. The biggest difference here is in the way we include our local style sheet. Typically we would load the stylesheet like this:
<link rel="stylesheet" href="my-style.css">To get this to work with Flask we use the url_for function to point to the static folder using the Jinja template engine. You can find out more about Jinja here: https://jinja.palletsprojects.com/en/3.0.x/
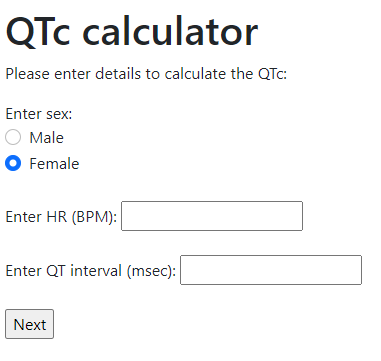
We can now add the following code to the body section of the HTML document which adds some input fields for the user to enter data. This includes some radio options to choose male or female and input fields for the heart rate (beats per minute) and QT-interval (msec).
. . .
<body>
  <div id="calc-container">
    <h1>QTc calculator</h1>
    <p>Please enter details to calculate the QTc:</p>
    <label>Enter sex:</label>
    <div class="form-check">
      <input class="form-check-input" type="radio" name="sex" value="m" id="male-option">
      <label class="form-check-label" for="male-option">
        Male
      </label>
   </div>
   <div class="form-check">
     <input class="form-check-input" type="radio" name="sex" value="f" id="female-option" checked>
     <label class="form-check-label" for="female-option">
       Female
     </label>
   </div>
   <br>
   <label>Enter HR (BPM):</label>
   <input type="number" name="hr">
   <br><br>
   <label>Enter QT interval (msec):</label>
   <input type="number" name="qt">
   </br><br>
   <input type="submit" name="next" value="Next">
  </div>
</body>
Here we make use of some of the Bootstrap styling for the radio buttons. We add values to the name attribute to the various HTML elements that collect data from the user. This is because Flask makes use of this attribute to access form information. The whole calculator is contained in a div called calc-container. We add some padding (10 pixels) to this in our local style sheet to improve the appearance by referencing the id attribute preceded by a hash and adding the padding:
#calc-container {
  padding: 10px;
}
Next we will create the Flask application. First we need to install the Flask module. We can do this using pip in the Python terminal:
pip install FlaskWe can then create a Python file called main.py in the main folder of the app and add the following code:
from flask import Flask, render_template, url_for, requestapp = Flask(__name__)@app.route('/')
def index():
  return render_template('index.html')if __name__ == "__main__":
  app.run(debug=True)
We import a few functions from the flask module, next we create the application and add a function called index that uses the render_template function to render the index.html file stored in the templates folder. We can use the app.route decorator to specify the main route for this page. Finally we run the application in debug mode. When the main.py file is run it runs on the default address/port which renders the index page in the browser.
Running on http://127.0.0.1:5000/ (Press CTRL+C to quit)Which looks like this:
Now we have setup the front-end. We can connect it to the back-end so we can perform the calculation. To send data to the server we can use a form tag. We need to enclose the data we wish to send in the form tag and specify the name of the Python function that will process the data.
Here we wrap the calculator code in the form tag and use the url_for function to send this to the index function in the main.py file for processing using a POST request.
<form action="{{ url_for('index') }}" method="POST">
  <label>Enter sex:</label>
  <div class="form-check">
    <input class="form-check-input" type="radio" name="sex" value="m" id="male-option">
    <label class="form-check-label" for="male-option">
      Male
    </label>
   </div>
   <div class="form-check">
     <input class="form-check-input" type="radio" name="sex" value="f" id="female-option" checked>
     <label class="form-check-label" for="female-option">
       Female
     </label>
   </div>
   <br>
   <label>Enter HR (BPM):</label>
   <input type="number" name="hr">
   <br><br>
   <label>Enter QT interval (msec):</label>
   <input type="number" name="qt">
   </br><br>
   <input type="submit" name="next" value="Next">
</form>
The Hyper Text Transfer Protocol (HTTP) supports several methods, the most commonly used of which being the POST and GET methods. We can then modify the index function to deal with this data. We will add the GET and POST methods to the app.route decorator. Next we can check for the POST method and capture the form data using request.form. This will be stored in a Python variable called form. We then pass this form data to a new function to calculate the QTc and return the result to index.html file in a variable called QTc_result.
@app.route('/', methods=['GET', 'POST'])
def index():
  QTc_result = False
  if request.method == 'POST':
    form = request.form
    QTc_result = calculate_qtc(form)  return render_template('index.html', QTc_result=QTc_result)
Next we need to create a function to actually carry out the calculation.
def calculate_qtc(form):
  sex = request.form['sex']
  heart_rate = int(request.form['hr'])
  qt_int = int(request.form['qt'])

  qt_seconds = qt_int / 1000
  rr_interval = (6000 / heart_rate)
  QTc = qt_seconds / math.sqrt(rr_interval)
  formated_QTc = round((QTc * 1000) * 10, 0)  if (formated_QTc > 440 and sex == 'm') or (formated_QTc > 460 and sex == 'f'):
    prolonged = True
  else:
    prolonged = Falsereturn (formated_QTc, prolonged)
We can get at the data entered in the HTML input fields by using the HTML elements name attribute as a dictionary key. We can cast the numerical data into integers for the calculation. Next we carry out the actual calculation applying the Bazett formula. We need to import the math module to use the sqrt function for the square root part of the formula. We check the result against the normal values for males and females respectively and set the prolonged variable to true or false accordingly. Finally we return the QTc and the prolonged variables in a tuple.
Finally we can update the index.html file to deal with the results. We can add the following code just under the closing form tag.
<br><br>
{% if QTc_result %}
<h2>Results</h2>
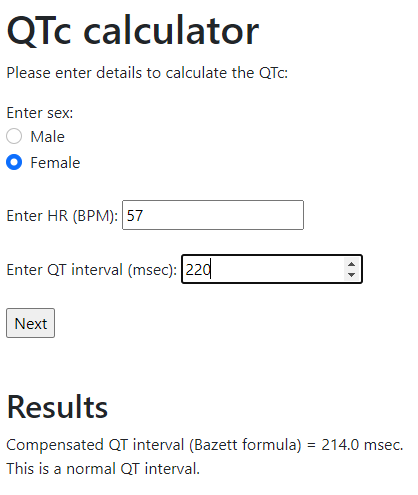
<p>Compensated QT interval (Bazett formula) = {{QTc_result[0]}} msec.
<br>
{% if QTc_result[1] %}
This is a prolonged QT interval.
{%else%}
This is a normal QT interval.
{% endif %}
{% endif %}Here we check if there are any results to show. If so we output the QTc (the first element of the tuple) and if the interval is prolonged or not (the second element of the tuple). Flask variables can be displayed in HTML by wrapping them in the double braces ({{ }}). Now when we enter data into the input fields and click the next button we get the following output:
The full code for the index.html file can be seen below:
<!DOCTYPE html>
<html>
  <head>
  <title>QT-calculator</title>
  <meta charset="UTF-8" />
  <meta name="viewport" content="width=device-width, initial-scale=1.0" />
  <link rel="stylesheet" href="{{ url_for('static', filename='my-style.css') }}">
  <link href="https://cdn.jsdelivr.net/npm/bootstrap@5.0.1/dist/css/bootstrap.min.css" rel="stylesheet" integrity="sha384-+0n0xVW2eSR5OomGNYDnhzAbDsOXxcvSN1TPprVMTNDbiYZCxYbOOl7+AMvyTG2x" crossorigin="anonymous">
  </head>
  <body>
    <div id="calc-container">
      <h1>QTc calculator</h1>
      <p>Please enter details to calculate the QTc:</p>

      <form action="{{ url_for('index') }}" method="POST">
        <label>Enter sex:</label>
        <div class="form-check">
          <input class="form-check-input" type="radio" name="sex" value="m" id="male-option">
          <label class="form-check-label" for="male-option">
            Male
          </label>
        </div>
        <div class="form-check">
          <input class="form-check-input" type="radio" name="sex" value="f" id="female-option" checked>
          <label class="form-check-label" for="female-option">
            Female
          </label>
        </div>
        <br>
        <label>Enter HR (BPM):</label>
        <input type="number" name="hr">
        <br><br>
        <label>Enter QT interval (msec):</label>
        <input type="number" name="qt">
        </br><br>
        <input type="submit" name="next" value="Next">
     </form>
     <br><br>
     {% if QTc_result %}
       <h2>Results</h2>
       <p>Compensated QT interval (Bazett formula) = {{QTc_result[0]}} msec.
       <br>
       {% if QTc_result[1] %}
         This is a prolonged QT interval.
       {%else%}
         This is a normal QT interval.
       {% endif %}
    {% endif %}
   </div>
 </body>
</html>
The full code for the main.py file:
import math
from flask import Flask, render_template, url_for, requestapp = Flask(__name__)@app.route('/', methods=['GET', 'POST'])
def index():
  QTc_result = False
  if request.method == 'POST':
    form = request.form
    QTc_result = calculate_qtc(form)  return render_template('index.html', QTc_result=QTc_result)def calculate_qtc(form):
  sex = request.form['sex']
  heart_rate = int(request.form['hr'])
  qt_int = int(request.form['qt'])

  qt_seconds = qt_int / 1000
  rr_interval = (6000 / heart_rate)
  QTc = qt_seconds / math.sqrt(rr_interval)
  formated_QTc = round((QTc * 1000) * 10, 0)  if (formated_QTc > 440 and sex == 'm') or (formated_QTc > 460 and sex == 'f'):
    prolonged = True
  else:
    prolonged = False  return (formated_QTc, prolonged)if __name__ == "__main__":
  app.run(debug=True)
Using Ajax requests
This works, and we can successfully send data from the front-end to the back-end for processing. We should ask ourselves however if it is necessary to send this information to the back-end in the first instance. We could after all have created a function in JavaScript to perform the calculation. This would have been much more efficient than increasing traffic to and from the server. The main reason we would usually consider sending information to a back-end is because we would typically want to store this data in a database or access a database and return specific results to the front end.
The calculation we are applying here is obviously trivial and doesn’t require much computational power. This would however be a very different story if you were running an intensive machine learning algorithm for example. If possible it would be better to carry out the calculation client-side and just return the results of the computation to the server to write to a database.
Let’s modify the existing code to perform the calculation with JavaScript, client-side rather in server-side with Python. We can also use Ajax to handle the user input rather than rendering a template. After carrying out the calculation client-side we will then pass the user input and results to the server to store in a database.
Ajax (Asynchronous JavaScript and XML) is used to send/retrieve data asynchronously in the background of an application without having to reload the entire page. This is often used when we want to just update part of an existing page without directing users to a new page or re-loading the existing page. The existing form method is useful when a user fills in a form, for example buying a product. They enter their details which are passed to the server for processing and then are redirected to a new page telling them the transaction was successful (or not). Ajax is a better approach for tools like interactive data dashboards and calculators that need to keep updating part of a page rather than sending users to new page/reloading.
To modify the code to use Ajax, we need to first remove the form tag. We can then add an onclick event to the next button that will launch a JavaScript function called calculateQTc.
<label>Enter sex:</label>
<div class="form-check">
  <input class="form-check-input" type="radio" name="sex" value="m" id="male-option">
  <label class="form-check-label" for="male-option">
    Male
  </label>
</div>
<div class="form-check">
  <input class="form-check-input" type="radio" name="sex" value="f" id="female-option" checked>
  <label class="form-check-label" for="female-option">
    Female
 </label>
</div>
<br>
<label>Enter HR (BPM):</label>
<input type="number" name="hr" id="hr">
<br><br>
<label>Enter QT interval (msec):</label>
<input type="number" name="qt" id="qt">
</br><br>
<input type="submit" name="next" value="Next" onclick="calculateQTc();">
Next we will add a div element to display the results. Here we will add some span elements with id attributes to add the results to, calling them qtc and prolonged.
<br><br>
<div id="qtc-results">
  <h2>Results</h2>
  <p>Compensated QT interval (Bazett formula) = <span id="qtc"></span> msec.
  <br>
  <p><span id="prolonged"></span></p>
</div>
Finally we will give the containing div an id and make it invisible hiding the results by default. To do this we set the display style of the div element to none in the CSS file.
#qtc-results {
  display: none;
}
We can now implement the function to calculate the QTc with JavaScript instead of with Python so it is carried out client-side. We can create a JavaScript file called qt-calc.js and add the following code:
function calculateQTc() {
  var prolonged;
  var heartRate = parseInt(document.getElementById("hr").value);
  var qtInt = parseInt(document.getElementById("qt").value);
  var sex = document.getElementsByName("sex");
  var qtcResult = document.getElementById("qtc");
  var prolongedResult = document.getElementById("prolonged");
  var resultsContainer = document.getElementById("qtc-results");
}
Here we use the document.getElementById function to access elements by their id attribute (by providing the id value in quotes). We also use the parseInt function to cast the data into integer format for the calculation where appropriate in much the same way we did in Python. The exception to this is where we use the document.getElementByName for the sex radio buttons. When the function is called we will want to show the result so next we make the results div visible by setting the display style to block.
resultsContainer.style.display = "block";Next we use a for loop to find the selected (checked) radio button (male or female) storing the value “m” or “f” in a variable called selectedSex.
for(var i=0; i<sex.length; i++) {
  if(sex[i].checked) var selectedSex = sex[i].value;
}
Next we can add the calculation itself. The only main difference here is we use the JavaScript standard math library for the square root and rounding. Finally we update the HTML span element with the result.
qtSeconds = qtInt / 1000;
rrInterval = (6000 / heartRate);
QTc = qtSeconds / Math.sqrt(rrInterval);
formatedQTc = Math.round((QTc * 1000) * 10, 0);
qtcResult.innerHTML = formatedQTc;
The final part of the function involves working out if the QTc is prolonged or not, updating the HTML results field and storing the prolonged status in a variable called prolonged.
if((formatedQTc > 440 && selectedSex == 'm') ||
  (formatedQTc > 460 && selectedSex == 'f')) {
    prolongedResult.innerHTML = "This is a prolonged QT interval";
    prolonged = "Prolonged QT";
}
else{
  prolongedResult.innerHTML = "This is a normal QT interval";
  prolonged = "Normal QT";
}
Finally we need to load the JavaScript file into the HTML document in the head section.
<script src="{{ url_for('static', filename='qtc-calc.js') }}"></script>Ajax allows us to update parts of a web page asynchronously with small amounts of data as an alternative to reloading and rendering an entire page.
An easy way to do this is to use the ajax method from the jQuery JavaScript library. You can download this directly and include it in your web pages as a local resource or you can connect to this using a CDN (Content Delivery Network) by including the following line of code in the head section of your HTML document.
<script src="https://ajax.googleapis.com/ajax/libs/jquery/3.5.1/jquery.min.js">
</script>
We can then modify the JavaScript code to implement the jQuery ajax method. First we can store the data we want to pass back to the server in an array. Here we add key/value pairs as JavaScript objects to the array called server_data.
var server_data = [
  {"QTc": formatedQTc},
  {"prolonged": prolonged},
  {"HR": heartRate},
  {"QT": qtInt},
  {"Sex": selectedSex}
];
Next we can create the ajax request. The jQuery library uses the dollar ($) sign to define a selector and then specify an action. Here we define the type as a POST request. The url maps to route decorator for a particular function in Python that should process the request. Data sent to a server should be a string (text data) so we can use the JSON.stringify function to convert JSON (JavaScript Object Notation) into string format for transfer to the server.
$.ajax({
type: "POST",
url: "/process_qtc",
data: JSON.stringify(server_data),
contentType: "application/json",
dataType: 'json'
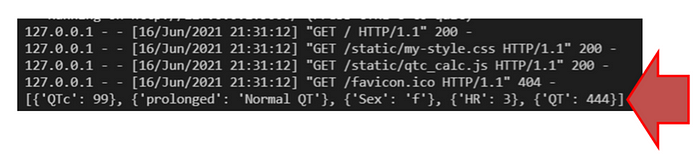
});We then need to update the Python file to process the ajax request. We need to import jsonify from flask. We can also remove the original function for calculating the QT interval and amend the index function to just render the index HTML file. Here we use the request.get_json function to get the data and store it in a Python variable called qtc_data. For now we will output the data to the console and return an object with the key and value: processed and true back to the front end.
from flask import Flask, render_template, url_for, request, jsonifyapp = Flask(__name__)@app.route('/')
def index():
  return render_template('index.html')@app.route('/process_qtc', methods=['POST', 'GET'])
def process_qt_calculation():
  if request.method == "POST":
    qtc_data = request.get_json()
    print(qtc_data)

 results = {'processed': 'true'}
 return jsonify(results)if __name__ == "__main__":
  app.run(debug=True)
The printed data returned from the client can be seen in the console.
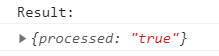
Returning to the JavaScript function we can add a success function to process the data returned from the Python function:
$.ajax({
  type: "POST",
  url: "/process_qtc",
  data: JSON.stringify(server_data),
  contentType: "application/json",
  dataType: 'json',
  success: function(result) {
    console.log("Result:");
    console.log(result);
  }
});
We can use the console.log function to output the results returned when the request is completed successfully. If we view the console in the web browser, we can see the expected output.
Adding a database
As mentioned earlier one of the main reasons we would want to return data to the server is to store or retrieve data from a database. In this final part we will add an SQLite database to the application to store the results entered and return the number of items saved in the database.
First we need to add a couple of modules. We will use the SQLAlchemy module to manage the database, os to set the path of the database relative to the Flask app and the datetime to add a timestamp for each item stored in the database. Finally we also need to import session from the flask module.
import os
from flask import Flask, render_template, url_for, request, jsonify, session
from flask_sqlalchemy import SQLAlchemy
from datetime import datetime
We can use the os (operating system) module to find the main Python file and use this to add the database, which we will call qtdata.db to the same folder that the main.py Python file is located in. First we will get the path to current file and store this in a variable called basedir (base directory).
basedir = os.path.abspath(os.path.dirname(__file__))Next we will add the database file to this location and set these database parameters using the apps configuration:
app.config['SQLALCHEMY_DATABASE_URI'] = 'sqlite:///' + os.path.join(basedir, 'qtdata.db')
app.config['SQLALCHEMY_COMMIT_ON_TEARDOWN'] = True
Next, we can bind the database instance to our specific application:
db = SQLAlchemy(app)Object Relational Mapping (ORM) can be used to map a Python class to a table in the SQLite database. Here we can define variables that relate to the column names in the table. We will call the table qt_data and use the db.Column function to define the name of the fields (columns) in the table and each columns related data type. For example, the following code defines a Python variable called QTc that refers to a column name (of the same name) in the table. The data type is defined as an integer using db.Integer. We can define other data types as required, such as floating point values, character values, strings and so on. For example:
QTc = db.Column('QTc', db.Integer)Here we define the class (Store_QTc_data), the table name and then the columns:
class Store_QTc_data(db.Model):
  __tablename__ = 'qt_data'
  id = db.Column('id', db.Integer, primary_key = True)
  timestamp = db.Column('timestamp', db.DateTime)
  QTc = db.Column('QTc', db.Integer)
  prolonged = db.Column('prolonged', db.String(50))
  heart_rate = db.Column('heart rate', db.Integer)
  QT = db.Column('QT', db.Integer)
  sex = db.Column('sex', db.CHAR)
In addition to the QT data, we have an id column which defines the primary key (a unique identifier for each record) and a timestamp that will store the date and time the record was written to the database. Finally we can add an initialisation method to allow us to pass in values for these fields:
class Store_QTc_data(db.Model):
  __tablename__ = 'qt_data'
  id = db.Column('id', db.Integer, primary_key = True)
  timestamp = db.Column('timestamp', db.DateTime)
  QTc = db.Column('QTc', db.Integer)
  prolonged = db.Column('prolonged', db.String(50))
  heart_rate = db.Column('heart rate', db.Integer)
  QT = db.Column('QT', db.Integer)
  sex = db.Column('sex', db.CHAR)  def __init__(self, QTc, prolonged, heart_rate, QT, sex):
   self.QTc = QTc
   self.prolonged = prolonged
   self.timestamp = datetime.now()
   self.heart_rate = heart_rate
   self.QT = QT
   self.sex = sex
We can now update the index function to create the database if doesn’t already exist:
@app.route('/')
def index():
  if not os.path.exists(os.path.join(basedir, 'qtdata.db')):
    db.create_all()return render_template('index.html')
Next we can update the process_qt_calculation function to write the data to the database. We can use the db.session.add function and pass in the Store_QTc_data class with the data sent from the front-end using ajax. We then follow this by the db.session.commit function to write these changes to the database.
@app.route('/process_qtc', methods=['POST', 'GET'])
def process_qt_calculation():
  if request.method == "POST":
    qtc_data = request.get_json()
    db.session.add(Store_QTc_data(qtc_data[0]['QTc'], qtc_data[1]['prolonged'], qtc_data[2]['HR'], qtc_data[3]['QT'], qtc_data[4]['Sex']))
    db.session.commit() results = {'processed': 'true'}
 return jsonify(results)
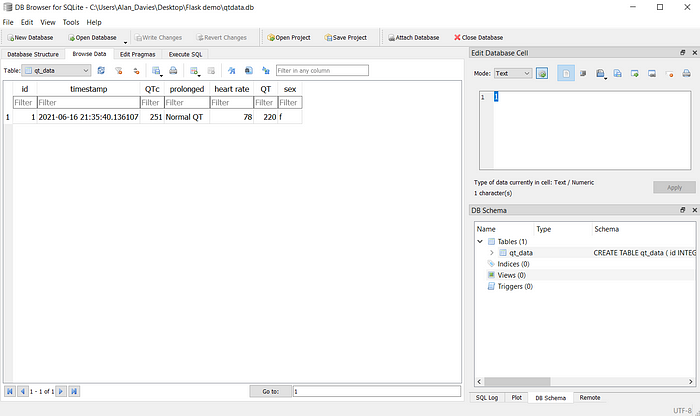
If we then add some data to the calculator and click next, the data is written to the database. If we open the database (using something like the DB Browser for SQLite https://sqlitebrowser.org/ ) you can see the data has been successfully added to the database.
Finally we will modify the results to return the number items in the database and display this in the HTML document. We can use the count function to find the number of records in the database and modify our results variable to send this back to the ajax function.
rows = db.session.query(Store_QTc_data).count()We can then display the number of records in the database along with the results of the calculation. We will add a span element to display the number of records as part of a message with the id num-rows.
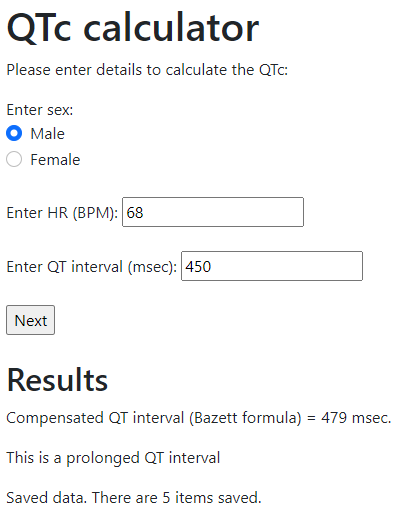
<div id="qtc-results">
  <h2>Results</h2>
  <p>Compensated QT interval (Bazett formula) = <span id="qtc"></span> msec.
  <br>
  <p><span id="prolonged"></span></p>
  <p>Saved data. There are <span id="num-rows"></span> items saved.   </p>
</div>
Finally we will change the console.log to update the span element when the request is processed successfully.
$.ajax({
  type: "POST",
  url: "/process_qtc",
  data: JSON.stringify(server_data),
  contentType: "application/json",
  dataType: 'json',
  success: function(result) {
    numRows.innerHTML = result.rows;
  }
});
This is what the final calculator looks like when data is entered:
The final code for the Python, HTML and JavaScript files can be seen here:
<!DOCTYPE html>
<html>
  <head>
  <title>QT-calculator</title>
  <meta charset="UTF-8" />
  <meta name="viewport" content="width=device-width, initial-scale=1.0" />
  <link rel="stylesheet" href="{{ url_for('static', filename='my-style.css') }}”>
  <link href="https://cdn.jsdelivr.net/npm/bootstrap@5.0.1/dist/css/bootstrap.min.css" rel="stylesheet" integrity="sha384-+0n0xVW2eSR5OomGNYDnhzAbDsOXxcvSN1TPprVMTNDbiYZCxYbOOl7+AMvyTG2x" crossorigin="anonymous">
  <script src="{{ url_for('static', filename='qtc-calc.js') }}"></script>
  <script src="https://ajax.googleapis.com/ajax/libs/jquery/3.5.1/jquery.min.js"></script>
  </head>
  <body>
    <div id="calc-container">
      <h1>QTc calculator</h1>
      <p>Please enter details to calculate the QTc:</p>
      <label>Enter sex:</label>
      <div class="form-check">
        <input class="form-check-input" type="radio" name="sex" value="m" id="male-option">
        <label class="form-check-label" for="male-option">
          Male
        </label>
      </div>
      <div class="form-check">
        <input class="form-check-input" type="radio" name="sex" value="f" id="female-option" checked>
        <label class="form-check-label" for="female-option">
          Female
        </label>
     </div>
     <br>
     <label>Enter HR (BPM):</label>
     <input type="number" name="hr" id="hr">
     <br><br>
     <label>Enter QT interval (msec):</label>
     <input type="number" name="qt" id="qt">
     </br><br>
     <input type="submit" name="next" value="Next" onclick="calculateQTc();">

     <br><br>
     <div id="qtc-results">
     <h2>Results</h2>
     <p>Compensated QT interval (Bazett formula) = <span id="qtc">   </span> msec.
     <br>
     <p><span id="prolonged"></span></p>
     <p>Saved data. There are <span id="num-rows"></span> items saved.</p>
     </div>
    </div>
  </body>
</html>
JavaScript file:
function calculateQTc() {
  var prolonged;
  var heartRate = parseInt(document.getElementById("hr").value);
  var qtInt = parseInt(document.getElementById("qt").value);
  var sex = document.getElementsByName("sex");
  var qtcResult = document.getElementById("qtc");
  var prolongedResult = document.getElementById("prolonged");
  var resultsContainer = document.getElementById("qtc-results");
  var numRows = document.getElementById("num-rows");  resultsContainer.style.display = "block";  for(var i=0; i<sex.length; i++) {
    if(sex[i].checked) var selectedSex = sex[i].value;
  }  qtSeconds = qtInt / 1000;
  rrInterval = (6000 / heartRate);
  QTc = qtSeconds / Math.sqrt(rrInterval);
  formatedQTc = Math.round((QTc * 1000) * 10, 0);
  qtcResult.innerHTML = formatedQTc;  if((formatedQTc > 440 && selectedSex == 'm') ||
     (formatedQTc > 460 && selectedSex == 'f')) {
    prolongedResult.innerHTML = "This is a prolonged QT interval";
    prolonged = "Prolonged QT";
  }
  else{
    prolongedResult.innerHTML = "This is a normal QT interval";
    prolonged = "Normal QT";
  } var server_data = [
  {"QTc": formatedQTc},
  {"prolonged": prolonged},
  {"HR": heartRate},
  {"QT": qtInt},
  {"Sex": selectedSex}
 ]; $.ajax({
   type: "POST",
   url: "/process_qtc",
   data: JSON.stringify(server_data),
   contentType: "application/json",
   dataType: 'json',
   success: function(result) {
     numRows.innerHTML = result.rows;
   }
 });
}
Python file:
import os
from flask import Flask, render_template, url_for, request, jsonify, session
from flask_sqlalchemy import SQLAlchemy
from datetime import datetimebasedir = os.path.abspath(os.path.dirname(__file__))
app = Flask(__name__)app.config['SQLALCHEMY_DATABASE_URI'] = 'sqlite:///' + os.path.join(basedir, 'qtdata.db')
app.config['SQLALCHEMY_COMMIT_ON_TEARDOWN'] = Truedb = SQLAlchemy(app)class Store_QTc_data(db.Model):
  __tablename__ = 'qt_data’
  id = db.Column('id', db.Integer, primary_key = True)
  timestamp = db.Column('timestamp', db.DateTime)
  QTc = db.Column('QTc', db.Integer)
  prolonged = db.Column('prolonged', db.String(50))
  heart_rate = db.Column('heart rate', db.Integer)
  QT = db.Column('QT', db.Integer)
  sex = db.Column('sex', db.CHAR)def __init__(self, QTc, prolonged, heart_rate, QT, sex):
  self.QTc = QTc
  self.prolonged = prolonged
  self.timestamp = datetime.now()
  self.heart_rate = heart_rate
  self.QT = QT
  self.sex = sex@app.route('/')
def index():
  if not os.path.exists(os.path.join(basedir, 'qtdata.db')):
    db.create_all()  return render_template('index.html')@app.route('/process_qtc', methods=['POST', 'GET'])
def process_qt_calculation():
  if request.method == "POST":
    qtc_data = request.get_json()
    db.session.add(Store_QTc_data(qtc_data[0]['QTc'], qtc_data[1]['prolonged'], qtc_data[2]['HR'], qtc_data[3]['QT'], qtc_data[4]['Sex']))
    db.session.commit()
    rows = db.session.query(Store_QTc_data).count()  results = {'rows': rows}
  return jsonify(results)if __name__ == "__main__":
  app.run(debug=True)
In summary, we need to consider when to return data to the server for processing, which method to use, and when this can best be achieved client-side instead to make best use of resources. Sometimes we want to return data, process it and direct the user to a new page. On other occasions we want to pass information back and forth on the same page. To achieve this we can use ajax to rapidly pass objects back and forth between client and server on the same page. As tools like interactive dashboards become more popular for conveying information to users, data scientists should be aware of some of the different options available for passing data between the client and server and when to apply them for the desired outcomes.
References
[1] Davies, A, Scott, A (2015) Starting to Read ECGs: A Comprehensive Guide to Theory and Practice. Springer: London
[2] Alahmadi, A, Davies, A, Royle, J, Jay, C (2021) An explainable algorithm for detecting drug-induced QT-prolongation at risk of torsades de pointes (TdP) regardless of heart rate and T-wave morphology. Computers in Biology and Medicine. 131(1):104281