Transfer learning using pytorch — Part 1
Ever wondered why ML models have to learn every time from scratch . What if the models can use knowledge learnt from recognising cats, dogs ,fish ,cars , bus and many more to identify a distracted car driver or to identify plant disease .In transfer learning we use a pre trained neural network in extracting features and training a new model for a particular use case. Not sure what it is.. just wait till the end of the blog.
Why PyTorch
There are many frameworks like Keras , Tensoflow , Theano ,Torch, Deeplearning.4J , etc which can be used for deep learning . Out all these my favourite is Keras on top of Tensorflow. Keras works great for a lot of mature architectures like CNN, feed forward neural network , Lstm for time series but it becomes bit tricky when you try to implement new architectures which are complex in nature. Since Keras was built in a nice modular fashion it lacks flexibility . Pytorch which is a new entrant ,provides us tools to build various deep learning models in object oriented fashion thus providing a lot of flexibility . A lot of the difficult architectures are being implemented in PyTorch recently. So I started exploring PyTorch and in this blog we will go through how easy it is to build a state of art of classifier with a very small dataset and in a few lines of code.
We will build a classifier for detecting ants and bees using the following steps.
- Download the dataset from here.

2. Data augmentation.
3. Downloading pre trained resnet model (Transfer learning).
4. Training the model on the dataset .
5. How to decay the learning rate for every nth epoch.
Download dataset :
Download the dataset from the above link . It contains 224 images in the training dataset and 153 images in the validation dataset.
Data augmentation :
Data augmentation is a process where you make changes to existing photos like adjusting the colors , flipping it horizontally or vertically , scaling , cropping and many more. Pytorch provides a very useful library called torchvision.transforms which provides a lot of methods which helps to apply data augmentation. transforms comes with a compose method which takes a list of transformation.
data_transforms = {    'train': transforms.Compose([
        transforms.RandomSizedCrop(224),
        transforms.RandomHorizontalFlip(),
        transforms.ToTensor(),
        transforms.Normalize([0.485, 0.456, 0.406], [0.229, 0.224, 0.225])
    ]),
    'val': transforms.Compose([
        transforms.Scale(256),
        transforms.CenterCrop(224),
        transforms.ToTensor(),
        transforms.Normalize([0.485, 0.456, 0.406], [0.229, 0.224, 0.225])
    ]),
}
Transfer Learning :
We will use a model called ResNet from Microsoft which won the ImageNet competition in 2015. It showed how deep networks can be made possible. Lets not get into the complexity of the ResNet. We will download the model and most of the modern deep learning frameworks makes loading a model easier. The ResNet model compromises of a bunch of ResNet blocks(Combination of convolution and identity block) and a fully connected layer. The model is trained on Imagenet dataset on 1000 categories , we will remove the last fully connected layer and add a new fully connected layer which outputs 2 categories which tells the probability of the image being Ant or Bee.
model_conv = torchvision.models.resnet18(pretrained=True)
for param in model_conv.parameters():    ----> 1
    param.requires_grad = False

# Parameters of newly constructed modules have requires_grad=True by default
num_ftrs = model_conv.fc.in_features
model_conv.fc = nn.Linear(num_ftrs, 2)   ----> 2if use_gpu:
    model_conv = model_conv.cuda()       ----> 3
- We tell the model not to learn or modify the weights / parameters of the model.
- Then we add a new fully connected layer to the existing model to train our model to classify 2 categories.
- If you have a gpu .cuda() executes the model in GPU.
Our model is ready and we need to pass the data to train.
Training Model :
For training model we need a couple of more things apart from the model like:
- PyTorch Variable : A variable wraps pytorch tensor .It contains data and the gradient associated with the data.
- Loss Function : It helps in calculating how good is our model. We will be using categorical cross entropy here.
- Optimizer : We will use SGD to optimise our weights with the gradients. In our case we update the weights of only the last layer.
- Forward propagation : This is the simplest part where we pass our data through the model.
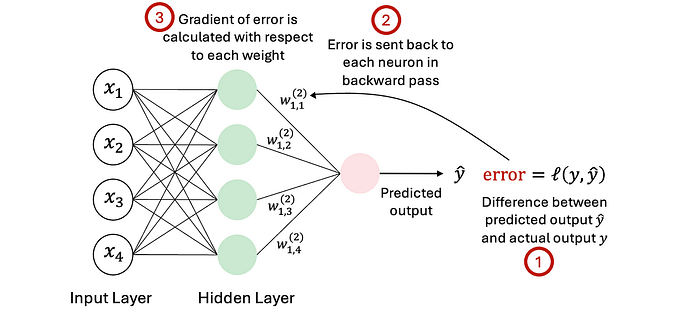
- Backward propagation : This is the key for modern deep learning networks where all the magic happens. Where the optimizer starts calculating how much the weights need to be updated in order to reduce the loss or improve the accuracy. In most modern frameworks this is automated , so we can focus on building cool applications backed by deep learning.
if use_gpu:
    inputs, labels = Variable(inputs.cuda()), Variable(labels.cuda()) --> 1
else:
    inputs, labels = Variable(inputs), Variable(labels)criterion = nn.CrossEntropyLoss() --> 2# Observe that all parameters are being optimized
optimizer_ft = optim.SGD(model_ft.parameters(), lr=0.001, momentum=0.9) -->3# zero the parameter gradients
optimizer.zero_grad()# forward
outputs = model(inputs) --> 4
loss = criterion(outputs, labels)# backward + optimize only if in training phase
if phase == 'train': --> 5
    loss.backward()
    optimizer.step()
Decaying Learning Rate :
Most of the times we start with a higher learning rate so that we can reduce the loss faster and then after a few epochs you would like to reduce it so that the learning becoming slower. I found this function from pytorch tutorials very useful.
def lr_scheduler(optimizer, epoch, init_lr=0.001, lr_decay_epoch=7):
    """Decay learning rate by a factor of 0.1 every lr_decay_epoch epochs."""
    lr = init_lr * (0.1**(epoch // lr_decay_epoch))

    if epoch % lr_decay_epoch == 0:
        print('LR is set to {}'.format(lr))

    for param_group in optimizer.param_groups:
        param_group['lr'] = lr

    return optimizer
We are reducing the learning rate for every nth epoch , in the above example 7 with 0.1 . decay_rate is configurable. Even on a smaller dataset we can achieve state of art results using this approach.
Wanted to try transfer learning on your dataset using pytorch , the code resides here.
Interested in learning Deep learning do not forget to checkout the amazing MOOC Deep learning for coders by Jeremy Howard .
In the next part we will discuss different tricks how to make transfer learning much faster using VGG . And compare how it performs in PyTorch and Tensorflow.


