Training Keras Models using the Rust TensorFlow Bindings
How to create a Keras-Model and use it in Rust for training and prediction

Rust has become increasingly popular. Its safe execution and super fast runtime, combined with a strong community support, have made it an attractive alternative to languages like C. With little overhead it is possible to run Rust in production on micro-devices and, in the context of Edge Computing, might be a good choice when deploying Neural Networks at Edge.
While there are many examples available to use pre-trained TensorFlow models with the Rust bindings or the TensorFlow-C API, there is little or none available on how to actually train models directly in Rust. Therefore in this brief tutorial I will outline a way to do so.
For this demonstration we will create a very simple model, that merely receives a tensor with two elements and a single value as a target. The idea is simply for the model to learn to add those two values together.

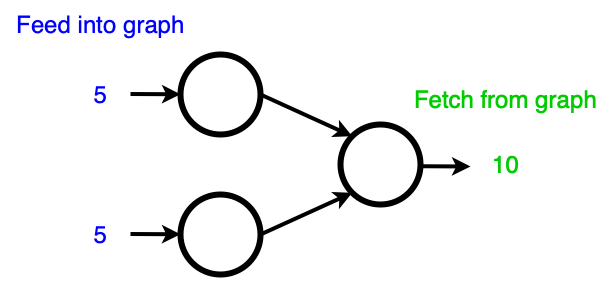
It is important to understand that internally TensorFlow stores models as graphs, just like the one in the image above. This representation of graphs will be used by the binding, so it will be really different from using models with Python.
Create a custom Keras-Model
As a first step we need to create a class that inherits from the keras.Model class. In this class we will specify three methods. The required __init__() method, the call() function, which will be used to make predictions and the train() function, which will be used for training.
Note that we add the @tf.function decorator to the call and train functions. This is so that they will be stored as graphs. By default TensorFlow in Python runs in eager execution, for use in the bindings however we need graphs.
Any instance of this newly created custom_model class will be able to use all of the known Keras functions, such as fit(), predict() or compile(). We will now create an instance of custom_model and compile it.
Before saving the model to use it in Rust we have to assign the custom functions we created. Otherwise we won’t be able to access them later when operating on the graph. Therefore we have to get concrete functions. Concrete functions in TensorFlow are a unique representation of a function as a graph, where the inputs and outputs are exactly defind. To create such a concrete function we specify the inputs and outputs (shape and datatype), so that one graph will be created for each function. Because Python supports polymorphism (several datatypes), there would be a new graph for every possible input in different shape or datatype. This is referred to as tracing. To prevent tracing we create concrete functions, so the input and output characteristics are defined and one unique graph representation can be saved, which only accepts a specific input and always returns the same specified output. These concrete functions can then be saved with the graph itself and accessed with the bindings.
Here we specify the concrete inputs the function will have as TensorSpecs. This assigns the inputs and outputs of the functions a concrete shape and datatype and one graph representation matching these specifications is created. We give the input nodes a name so that we will be able to access them from the Rust environment. Note that the training input is comprised of a tuple of two tenors, one for the input and one for the target, which will be used for the training step.
Next we save the model using the keras save() method. Here we specify the signatures, assigning each a unique name to access them from Rust.
This way the functions are saved with the model and will be accessible with the associated names from the dictionary we passed to the save() method.
Accessing the model with the bindings and training it
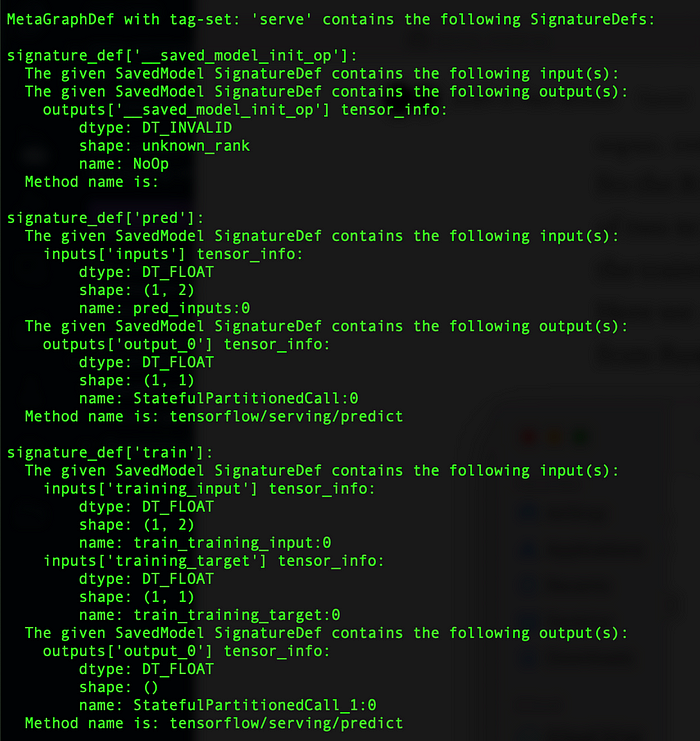
After running the Python code the model will be saved and can then be loaded as a graph in Rust. The way the bindings work is that we will feed variables into the graph, run it and the fetch variables from output nodes (functions here are also graphs that have output nodes). However we don’t know the output nodes names of our functions since they were assigned by Keras. Remember that we gave the inputs names when creating the concrete functions. Therefor we already know the names of the input nodes. Unfortunately to the best of my knowledge there is no way to name the output nodes. They will get names assigned automatically, but those names will stay the same after the architecture is defined. So we only need to retrieve the names once. One way to get the output names is by using the saved_model_cli command in the terminal.

The (partial) output of the command looks the following:

For both our sigantures pred and train you can find the name of the output node. In this case both are named output_0. Now we have all the information necessary to use the model in Rust.
We will create two tensors, one as the training input and one as the training target and just run one training step. For that we create two tensors.
Next we load the model as a graph from the path it was saved in.
This is loaded as a bundle, on which we will create a session.
Now we load the signature of the training computation from the graph.
After doing that we can get the inputs and outputs from the signature using the names we used for the inputs and the names we retrieved with the saved_model_cli command for the outputs. From those we create input- and output operations respectively.
These operations are representing nodes in a graph which represents a computation that produces an output.
After setting these things up we are ready to run the computation. As I said earlier we are gonna feed the graph the inputs into its input nodes and fetch the output from the output nodes. The way to do this is by using a SessionRunArgs object.
The input tensors are added by specifying the operation they are used with. In other words in which node to feed them. After that a fetch request is made, where we use another operation to specify which node will return the result.

Now we can run the session. This will perform the computation on the graph.
The result will now be stored in the SessionRunArgs object. All that’s left is to retrieve it.
In this case we made the training function return the loss. We could’ve return any or even no value at all there. Because the output of more than one value is possible we have to index the result. Here we take the value at index zero simply because there is only one value present.
And this wraps up one training step. Of course this was a very simple demonstration, but my goal was to just show a way to train TensorFlow models in general, so I ought to keep it as simple as possible.
For completeness, here is the code to make a prediction with our model. As you can see it is pretty similar to the training.
All the code can be found at https://github.com/Grimmp/RustTensorFlowTraining
I hope this tutorial was helpful to understand how it is possible to train TensorFlow models in Rust.

