Teaching Cars To Drive Using Deep Learning — Steering Angle Prediction
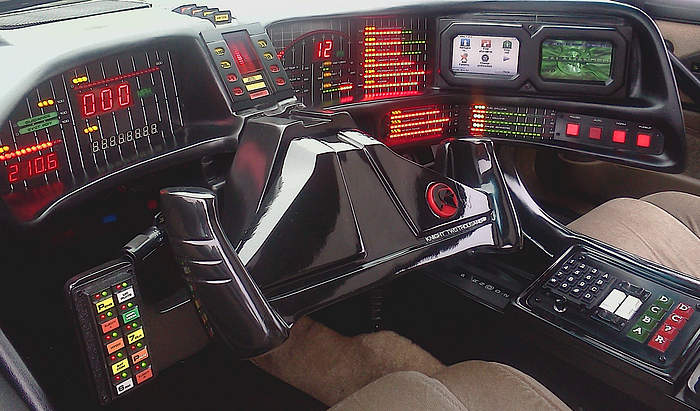
This is project 3 of Term 1 of the Udacity Self-Driving Car Engineer Nanodegree. You can find all code related to this project on github. You can also read my posts on previous projects:
Over the recent years, and more particularly since the success of the Darpa Grand Challenge competitions a decade ago, the race towards the development of fully autonomous vehicles has accelerated tremendously. Many components make up an autonomous vehicle, and some of its most critical ones are the sensors and AI software that powers it. Moreover, with the increase in computational capabilities, we are now able to train complex and deep neural networks that are able to learn crucial details, visual and beyond, and become the brain of the car, understanding the vehicle’s environment and deciding on the next decisions to take.
In this writeup, we are going to cover how we can train a deep learning model to predict steering wheel angles and help a virtual car drive itself in a simulator. The model is created using Keras, relying on Tensorflow as the backend.
Project Setup
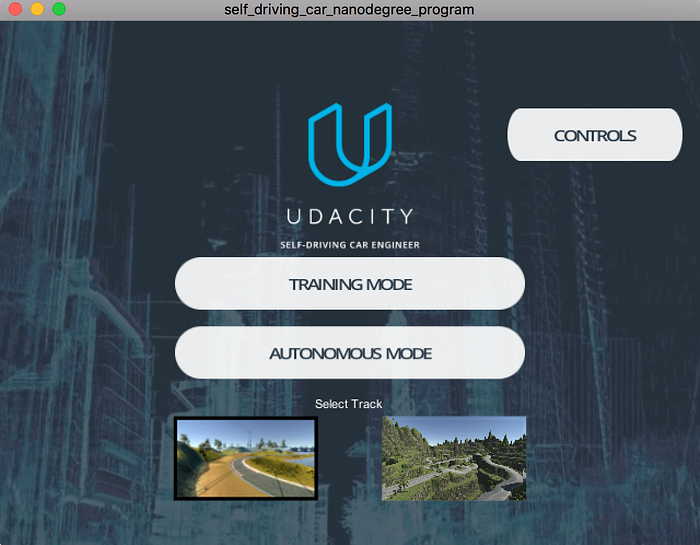
As part of this project, we are provided a simulator, written with Unity, that comes in two modes:
- Training Mode: we manually drive the vehicle and collect data
- Autonomous Mode: the vehicle drives itself based on a model trained from the collected data
The data log is saved in a csv file and contains the path to the images as well as steering wheel angle, throttle and speed. We are only concerned with the steering wheel angle and the images for this project.
As can be seen in the image below, the simulator contains 2 track. The track on the right (track 2) is much more difficult than track 1 as it contains slopes and sharp turns.
This project was in fact inspired by the paper “End To End Learning For Self Driving Cars” by researchers at NVIDIA, who managed to get a car to drive autonomously by training a convolutional neural network to predict steering wheel angles based on steering angle data and images captured by three cameras (left, center, right) mounted in front of the car. The trained model is able to accurately steer the car using only the center camera. The diagram below shows the process used to create such an efficient model.
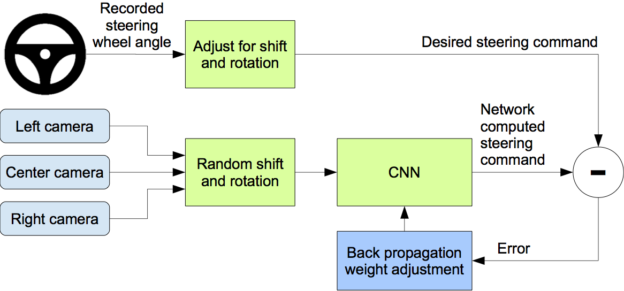
Unlike NVIDIA, who were doing real-world autonomous driving, we are going to teach our car to drive in the simulator. However, the same principles should apply. We are further bolstered in this claim thanks to the recent coverage on how simulations play a critical role in the development of self-driving technology for companies such as Waymo.
Datasets
We ended up using 4 datasets:
- Udacity’s dataset on track 1
- A manually created dataset on track 1 (we name it Standard dataset)
- Another manually created dataset on track 1 where we drive close to the bounds and recover to teach the model how to avoid going out of bounds — in the real world this would be called reckless or drink driving
- A manually created dataset on track 2
Note that in all our manually created datasets, we drive in both directions to help our model generalise.
Dataset Exploration
However, upon analysing the steering angles captured across our datasets, we quickly realised we had a problem: the data is greatly imbalanced, with an overwhelming number of steering wheel data being neutral (i.e. 0). This means, that unless we take corrective measures, our model will be biased to driving straight.
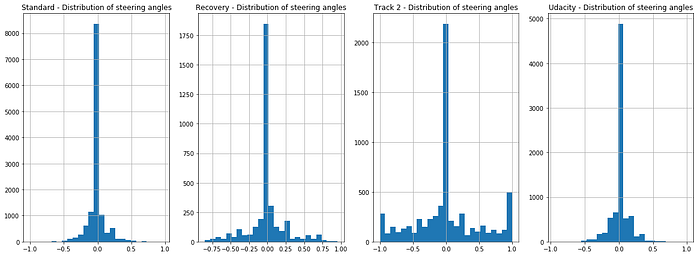
Notice however, that the data on track 2 shows a lot more variability with many sharp turns, as we would expect from such a track. There is still a strong bias towards driving straight though, even in this case.
Dataset Split
In the end, we decided to create an ensemble training dataset composed of the Udacity dataset, our Recovery dataset, and our dataset from track 2. We decided to use the Standard dataset from track 1 as the validation set.
frames = [recovery_csv, udacity_csv, track2_csv]
ensemble_csv = pd.concat(frames)
validation_csv = standard_csv
This helped us start with close to 55K training images and potentially 44K validation ones.
Data Augmentation
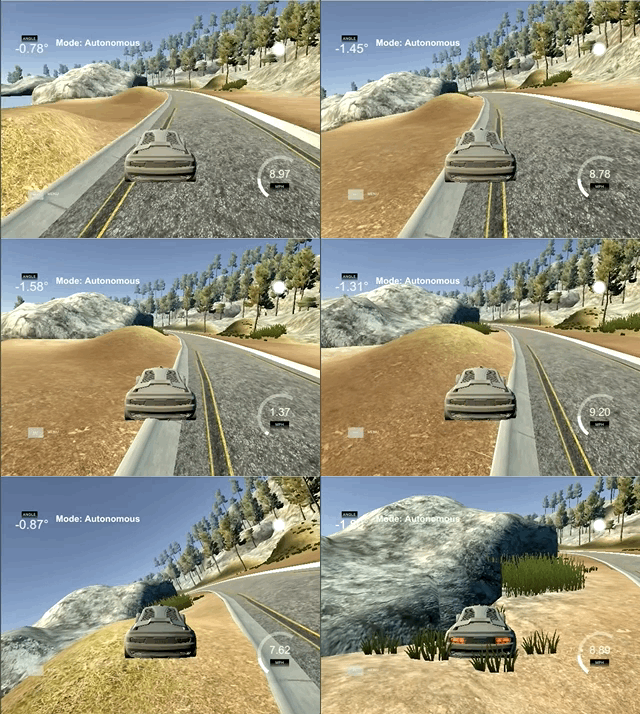
We have a good number of data points, but sadly as most of the them show the car driving with a neutral steering wheel angle, our car would tend to drive itself in a straight line. The example below shows our first model with no balancing of the training dataset:
Moreover, on the tracks there are also shadows which could throw the model into confusion. The model would also need to learn to steer correctly whether the car is on the left or right side of the road. Therefore, we must find a way to artificially increase and vary our images and steering angles. We turn to data augmentation techniques for this purpose.
Camera And Steering Angle Calibration
First of all, we add a steering angle calibration offset to images captured by either left or right cameras:
- for the left camera we want the car to steer to the right (positive offset)
- for the right camera we want the car to steer to the left (negative offset)
st_angle_names = ["Center", "Left", "Right"]
st_angle_calibrations = [0, 0.25, -0.25]
The values above are empirically chosen.
Image Horizontal Flip
Since we want our car to be able to steer itself regardless of its position on the road, we apply a horizontal flip to a proportion of images, and naturally invert the original steering angle:
def fliph_image(img):
    """
    Returns a horizontally flipped image
    """
    return cv2.flip(img, 1)
Darken Image
Since some parts of our tracks are much darker, due to shadows or otherwise, we also darken a proportion of our images by multiplying all RGB color channels by a scalar randomly picked from a range:
def change_image_brightness_rgb(img, s_low=0.2, s_high=0.75):
    """
    Changes the image brightness by multiplying all RGB values by the same scalacar in [s_low, s_high).
    Returns the brightness adjusted image in RGB format.
    """
    img = img.astype(np.float32)
    s = np.random.uniform(s_low, s_high)
    img[:,:,:] *= s
    np.clip(img, 0, 255)
    return  img.astype(np.uint8)
Random Shadow
Since we sometimes have patches of the track covered by a shadow, we also have to train our model to recognise them and not be spooked by them.
def add_random_shadow(img, w_low=0.6, w_high=0.85):
    """
    Overlays supplied image with a random shadow polygon
    The weight range (i.e. darkness) of the shadow can be configured via the interval [w_low, w_high)
    """
    cols, rows = (img.shape[0], img.shape[1])

    top_y = np.random.random_sample() * rows
    bottom_y = np.random.random_sample() * rows
    bottom_y_right = bottom_y + np.random.random_sample() * (rows - bottom_y)
    top_y_right = top_y + np.random.random_sample() * (rows - top_y)
    if np.random.random_sample() <= 0.5:
        bottom_y_right = bottom_y - np.random.random_sample() * (bottom_y)
        top_y_right = top_y - np.random.random_sample() * (top_y)
    poly = np.asarray([[ [top_y,0], [bottom_y, cols], [bottom_y_right, cols], [top_y_right,0]]], dtype=np.int32)

    mask_weight = np.random.uniform(w_low, w_high)
    origin_weight = 1 - mask_weight

    mask = np.copy(img).astype(np.int32)
    cv2.fillPoly(mask, poly, (0, 0, 0))
    #masked_image = cv2.bitwise_and(img, mask)

    return cv2.addWeighted(img.astype(np.int32), origin_weight, mask, mask_weight, 0).astype(np.uint8)

Shift Image Left/Right/Up/Down
To combat the high number of neutral angles, and provide more variety to the dataset, we apply random shifts to the image, and add a given offset to the steering angle for every pixel shifted laterally. In our case we empirically settled on adding (or subtracting) 0.0035 for every pixel shifted to the left or right. Shifting the image up/down should cause the model to believe it is on the upward/downward slope. From experimentation, we believe that these lateral shifts are possibly the most important augmentations needed to get the car to drive properly.
# Read more about it here: http://docs.opencv.org/3.0-beta/doc/py_tutorials/py_imgproc/py_geometric_transformations/py_geometric_transformations.html
def translate_image(img, st_angle, low_x_range, high_x_range, low_y_range, high_y_range, delta_st_angle_per_px):
    """
    Shifts the image right, left, up or down.
    When performing a lateral shift, a delta proportional to the pixel shifts is added to the current steering angle
    """
    rows, cols = (img.shape[0], img.shape[1])
    translation_x = np.random.randint(low_x_range, high_x_range)
    translation_y = np.random.randint(low_y_range, high_y_range)

    st_angle += translation_x * delta_st_angle_per_px    translation_matrix = np.float32([[1, 0, translation_x],[0, 1, translation_y]])
    img = cv2.warpAffine(img, translation_matrix, (cols, rows))

    return img, st_angle

Image Augmentation Pipeline
Our image augmentation function is straightforward: each supplied image goes through a series of augmentations, each occurring with a probability p between 0 and 1. All the code of augmenting the image is delegated to the appropriate augmenter function presented above.
def augment_image(img, st_angle, p=1.0):
    """
    Augment a given image, by applying a series of transformations, with a probability p.
    The steering angle may also be modified.
    Returns the tuple (augmented_image, new_steering_angle)
    """
    aug_img = img

    if np.random.random_sample() <= p:
        aug_img = fliph_image(aug_img)
        st_angle = -st_angle

    if np.random.random_sample() <= p:
        aug_img = change_image_brightness_rgb(aug_img)

    if np.random.random_sample() <= p:
        aug_img = add_random_shadow(aug_img, w_low=0.45)

    if np.random.random_sample() <= p:
        aug_img, st_angle = translate_image(aug_img, st_angle, -60, 61, -20, 21, 0.35/100.0)

    return aug_img, st_angle
Keras Image Generator
Since we are generating new and augmented images on the fly as we train the model, we create a Keras generator to produce new images at each batch:
def generate_images(df, target_dimensions, img_types, st_column, st_angle_calibrations, batch_size=100, shuffle=True,
                    data_aug_pct=0.8, aug_likelihood=0.5, st_angle_threshold=0.05, neutral_drop_pct=0.25):
    """
    Generates images whose paths and steering angle are stored in the supplied dataframe object df
    Returns the tuple (batch,steering_angles)
    """
    # e.g. 160x320x3 for target_dimensions
    batch = np.zeros((batch_size, target_dimensions[0],  target_dimensions[1],  target_dimensions[2]), dtype=np.float32)
    steering_angles = np.zeros(batch_size)
    df_len = len(df)

    while True:
        k = 0
        while k < batch_size:
            idx = np.random.randint(0, df_len)                   for img_t, st_calib in zip(img_types, st_angle_calibrations):
                if k >= batch_size:
                    break

                row = df.iloc[idx]
                st_angle = row[st_column]

                # Drop neutral-ish steering angle images with some probability
                if abs(st_angle) < st_angle_threshold and np.random.random_sample() <= neutral_drop_pct :
                    continue

                st_angle += st_calib
                img_type_path = row[img_t]
                img = read_img(img_type_path)

                # Resize image

                img, st_angle = augment_image(img, st_angle, p=aug_likelihood) if np.random.random_sample() <= data_aug_pct else (img, st_angle)
                batch[k] = img
                steering_angles[k] = st_angle
                k += 1

        yield batch, np.clip(steering_angles, -1, 1)
Note that we have the ability to drop a proportion of neutral angles, as well as keeping (i.e. not augmenting) a proportion of images at each batch.
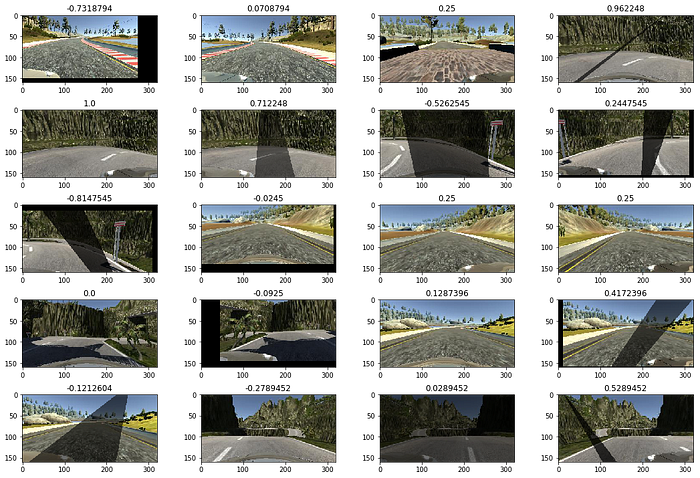
The following shows a small portion of augmented images from a batch:
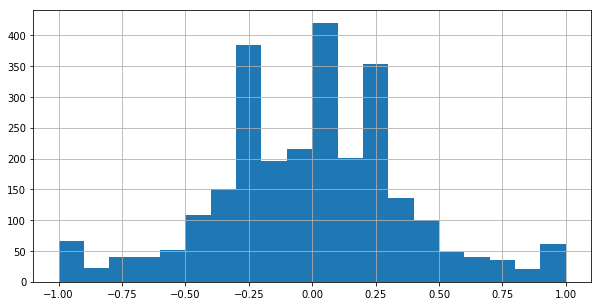
Moreover, the accompanying histogram of steering angles of those augmented images shows much more balance:
Model
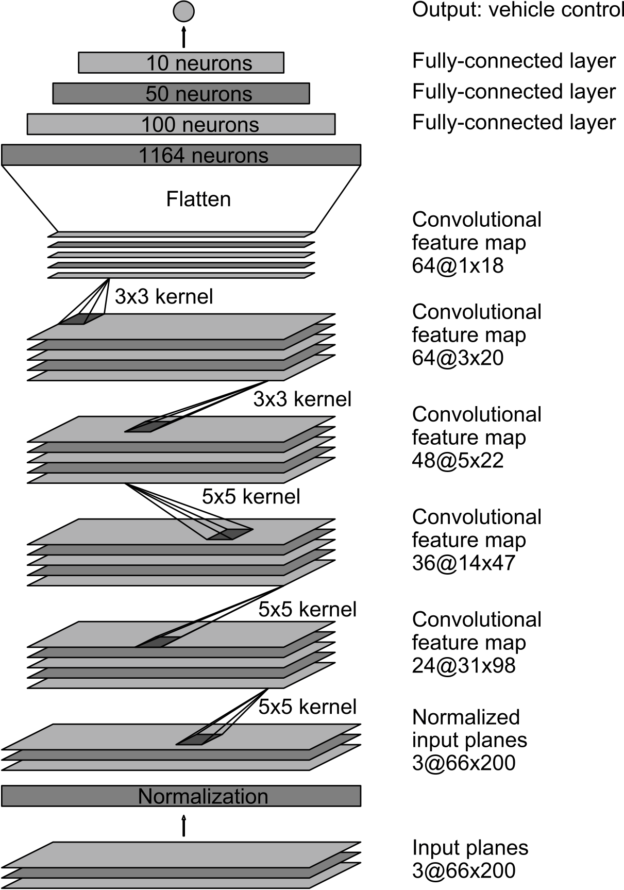
We initially tried a variant of the VGG architecture, with less layers and no transfer learning, but struggled to get satisfying results. Ultimately, we settled on the architecture used in the NVIDIA paper as it gave us the best results:
Model Tweaks
However, we added some slight tweaks to the model:
- We crop the top of the images so as to exclude the horizon (it does not play a role in immediately determining the steering angle)
- We resize the images to 66x200 in the model, as one the early layers, to take advantage of the GPU
- We apply BatchNormalization after each activation function for faster convergence
- The second dense layer has output size 200 instead of 100
Model Architecture
The full architecture of the model is as follows:
- Input image is 160x320 (height x width format)
- Image is vertically cropped at the top, by removing half of the height (80 pixels), resulting in an image of 80x320
- Cropped image is normalized, to make sure the mean of our pixel distribution is 0
- Cropped image is resized to 66x200, using Tensorflow’s tf.image.resize_images
- We apply a series of 3 of 5x5 convolutional layers, using a stride of 2x2. Each convolutional layer is followed by a BatchNormalization operation to improve convergence. The respective depth of each layer is 24, 36 and 48 as we go deeper into the network
- We apply a 2 consecutive 3x3 convolutional layers, with a depth of 64. Each convolutional layer is immediately followed by a BatchNormalization operation
- We flatten the input at this stage and enter the fully connected phase
- We apply a series of fully connected layers, of gradually decreasing sizes: 1164, 200, 50 and 10
- The output layer is obviously of size 1, since we predict only one variable, the steering wheel angle.
Activations And Regularization
The activation function used across all layers, bar the last one, is ReLU. We tried ELU as well but got better results with ReLU + BatchNormalization. We use the Mean Squared Error activation for the output layer since this is a regression problem, not a classification one.
As stated in the previous section, we employed BatchNormalization to hasten convergence. We did try some degree of Dropout but did not find any noticeable difference. We believe the fact that we are generating new images at every batch and discarding some of the neutral angle images help in reducing overfitting. Moreover, we did not apply any MaxPool operation to our NVIDIA network (although we tried on the VGG inspired one) as it would have required significant changes in the architecture since we would have reduced dimensionality much earlier. Moreover, we did not have the time to experiment with L2 regularisation, but plan to try it in the future.
Training And Results
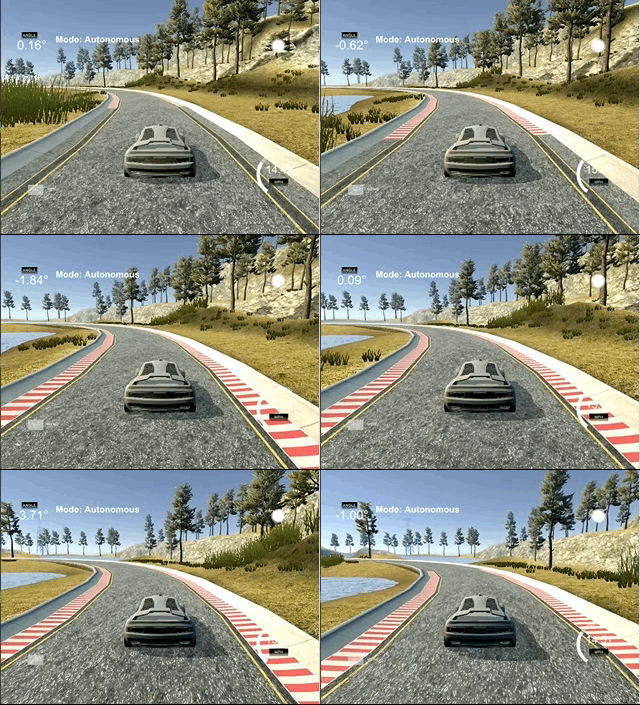
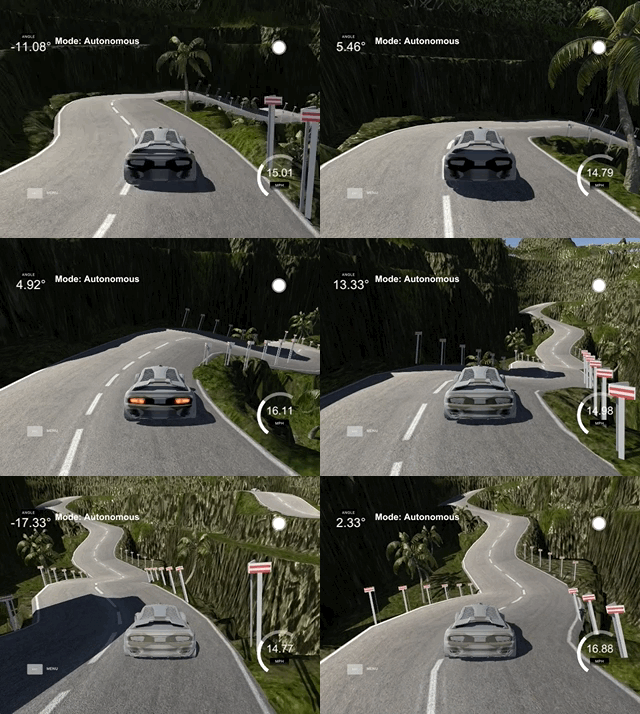
We trained the model using Adam as the optimizer and a learning rate of 0.001. After much, tweaking of parameters, and experimentation of multiple models, we ended up with one that is able power our virtual car to drive autonomously on both tracks.
We can see how the vehicle effectively manages to drive down a steep slope on track 2.
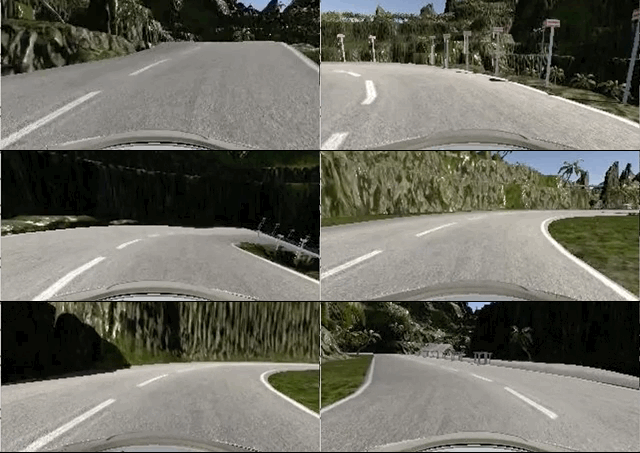
We also show what the front camera sees when driving autonomously on track 2. We can see how the car tries to stick to the lane and not go in the middle, as we ourselves strived to drive on only one side of the road during our data collection phase. This shows the model has indeed learned to stay within its lane.
Video
To top it all up, I even created a video montage for you, using Tron Legacy’s The Grid as background music. Enjoy!
Conclusion
We have shown that it is possible to create a model that reliably predicts steering wheel angles for a vehicle using a deep neural network and a plethora of data augmentation techniques. While we have obtained encouraging results, we would like in the future to explore the following:
- Take into account speed and throttle in the model
- Get the car to drive faster than 15–20MPH
- Experiment with models based VGG/ResNets/Inception via transfer learning
- Use Recurrent Neural Networks like in this paper from people using the Udacity dataset
- Read the Learning A Driving Simulator paper by comma.ai and attempt to implement their model
- Experiment with Reinforcement Learning
As can be seen, there are many areas we could explore to push this project further and obtain even more convincing results. One of the most important learnings from this project is that DATA IS KING: without all those images and steering angles, along with their potentially infinite augmentations, we would not have been able to build a robust enough model.
From a personal perspective, I have tremendously enjoyed this project, the hardest so far, as it enabled me to gain more practical experience of hyper-parameter tweaking, data augmentation, and dataset balancing among other important concepts. I feel my intuition of neural network architectures has deepened as well.
Acknowledgements
I would also like to thank my Udacity mentor Dylan for his support and sound advice, as well as the Udacity students before my cohort who explained how they approached this project via blog posts. I was inspired by reading their posts: they definitely helped me in developing a stronger grasp of the concepts needed to successfully complete this project.
Thanks for reading this post. I hope you found it useful. I’m now building a new startup called EnVsion! At EnVsion, we’re creating the central repository for UX researchers and product teams to unlock the insights from their user interview videos. And of course we use AI for this ;).
If you’re a UX researcher or product manager feeling overwhelmed with all your video calls with users and customers, then EnVsion is for you!
You also can follow me on Twitter.

