Smart bird watcher — Customizing pre-trained AI models to detect birds of interest
With the fast-paced growth of AI-based frameworks and technologies to detect, classify, and predict a wide range of subjects, one can expect it to be easier for developers to bring their own ideas to the reality. However, as there are many options available, it is a time consuming process to decide which one fits the needs and where to start when it comes to your exciting and novel ideas. Here, I hope I can layout a step by step tutorial on a project that each piece of it can be used/replaced with different frameworks to serve as a starting point.
I enjoy planting almost everything, from orange to avocado seed in our small balcony. Recently, I noticed our balcony attracted two bird species:
- Hummingbirds who just come and check out the balcony for a couple of seconds and I love to know when they are around to enjoy watching them and possibly take a nice shot from them (oh! checkout my Instagram :D)
- and Blue jay birds, who enjoy digging, hiding, and harvesting different things in my pots, take a couple of souvenirs, and usually leave a mess behind. So, I also love to know when they are around to let them know who is the boss of the balcony! :D
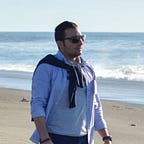
After a couple of failed attempts, I came up with the idea of a smart bird watcher that can notify me, somehow, when either of these two birds of interest are around. The diagram below is how I imagined this system:

So for those who might be interested in such a system, I put together this hands on tutorial, where I’m going to cover different elements of this smart bird watcher system, with specific yet general enough components that can be re-used for many of similar ideas. This system has the following components:
- Detection model: I utilize pre-trained detection models (e.g., MobileNet-SSD) to boost my efforts on developing a specific detection model (focusing on two specific birds — hummingbirds and blue-jay)
- Input data: a sensor that provides the input from the environment. I have used an Intel RealSense (given its ability to sense the depth) as well as a Logitech webcam (C525 model) — Don’t have a webcam? no worries, you can feed video files to the models instead.
- Processing hardware: In this tutorial, I have used Intel AI devKit (on Amazon), which generously is provided by Intel through Student Ambassador Program. (learn more about the program here, you can get yours, too!) Or you can consider having a Neural Compute Stick if you are using your Raspberry PI for this tutorial which are the elements shown in the above figure.
“This blog post made as part of the Intel® Student
Ambassador competition.”

Having all the necessary elements, I divide the steps required to build this system as follows:
- Reading data from the webcam
- Loading a pre-trained model and apply it on the frames of step 1
- Making the system voice-command enabled (just to take it to the next level :D )
- Re-training the model to meet my needs (specifically to help it detect which of the birds it sees)
In the following sections, I’m going to explain each of the above steps in details. If you scroll down, or look at the size of scroll bar on the right size, you might be scared! But… it is easy… Just don’t look down…
0. Before we start — Source code
Before we start, I would suggest to start a new Ubuntu virtual machine in your system, have python and pip installed on it and start this tutorial. As without them, you can not replicate the steps or you might mess with your working environment.
- Download the virtual box >here<
2. Download the Ubuntu “Desktop” image from here (make sure to choose a mirror close to your location to have maximum speed >Mirror lists< )
3. Create a new Virtual Machine:
— let its hard drive be more than 15GB if you can afford it
— increase the number of cpu cores as much as you can for the virtual machine from machine>settings>system>processor menu.
and then install Ubuntu on it. At the end, open a terminal (ctrl+alt+t) and install the required packages:
sudo apt-get update
sudo apt-get upgradesudo apt-get install -y git python3.6 python3-pip vim tree portaudio19-dev python-pyaudio python3-pyaudio
NOTE: before you continue, I suggest you make a copy from the hard drive file of your virtual machine, just in case you want to start over fresh, you won’t have to go through installing Ubuntu, updating it and install those packages again!
4. Then, create a folder, I call it BirdWatcher, this will be our working directory now on:
cd ~/Documents/
mkdir BirdWatcher
cd BirdWatcher
git clone https://github.com/soja-soja/AIBirdWatching.gitcd AIBirdWatching
pip3 install -r requirements.txt
You can find the source codes for this tutorial here in my git repository as well.
Easy way — not recommended: I have put together a script that will install and configure all necessary packages and make it faster and easier for you, all you have to do is to run it as follows: (not really recommended)
cd ~/Documents/BirdWatcher/AIBirdWatching/chmod +x setup.sh./setup.sh
Harder — but rewarding and recommended: you can follow the rest of the tutorial to understand what each step does.
1. Reading data from the webcam in python
This step is the easiest step, assuming that you have python and open-cv installed in your system and the webcam attached, you just need the following lines of codes to stream the data from your webcam:
cd ~/Documents/BirdWatcher/AIBirdWatching/gists/
python3 webcam.pyIn the code, we open a connection to the webcam, read the first and then all other frames from the webcam, show them until user press “escape” key on the keyboard. To successfully detach from the webcam, we first release the webcam and then close the connection.
Just to have some fun with the frames, you can add text and draw on the frames as follows:
cd ~/Documents/BirdWatcher/AIBirdWatching/gists/
python3 webcam_edit1.py
in which I have defined a new function (drawOnFrames), in its 5 first lines I specify where on the frame I want to draw, the color, and the font, then using cv2.rectangle I draw a box on the frame and using cv2.putText I write a message with a random color. Then I call this function in the loop I had before just before showing the frame, this way I will have a drawing on my frames with random color:

2. loading a pre-trained model
In this step, we download a pre-trained model and apply it to detect objects on the stream of images from the webcam (output of step 1).
There are many pre-trained models available specifically for object detection, you can and you are encouraged to try them, check their accuracy and processing time so you find the one that fits your needs. Here, we focus on MobileNet-SSD network with 21 general classes (e.g., bird, person, car, …).
In order to apply the model on the frames that we were getting from the webcam, we need the model weights and configuration, so the following files: > deploy.prototxt< and > mobilenet_iter_73000.caffemodel<) get them using:
cd ~/Documents/BirdWatcher/
git clone https://github.com/chuanqi305/MobileNet-SSD.gitcd ~/Documents/BirdWatcher/AIBirdWatching/gists/
python3 apply_SSD.py
where we first load the model in the first 18 lines, then we define a function in which we apply the model, decide which predictions have enough confidence and then using the drawing skills we learned earlier, we show the results on the screen. The output will be something like the following:

Done! Already funny and rewarding project. Here you can try different thresholds to make sure the model is not thinking loud and reporting anything it finds with low confidence level and decide how you want to present the detected elements.
3. Voice-command enabled
After a while, I thought what if I ask the system “what do you see?” and it replies back “I see a bird with 90% confidence”. It would be cool, right? Let’s make it happen then.
To implement the above scenario, we need two modules:
1) a voice to text module to listen the command “what do you see” and convert it to a text and
2) text to voice to read out the detection objects (model’s output)
For the first module, we need the following:
cd ~/Documents/BirdWatcher/AIBirdWatching/gists/
python3 text_to_voice.pyand for the second module, we consider these codes:
cd ~/Documents/BirdWatcher/AIBirdWatching/gists/
python3 voice_to_text.pyThe above codes are pretty much self-explanatory, but if you need more explanation or any clarification, please let me know in the comments.
4. Re-training a pre-trained model
We will go through this process in depth. To re-train a pre-trained model, you will go through the following steps:
- Data collection for training and testing and Labeling the collected data
- Re-training the model using the labeled collected data
The question here is that what should I do and where should I start? I give you a couple of hints…
4.1. Data collection and labeling
To collect a new training dataset, you can probably can rely on publicly available datasets >check out this list<. For example, for my purpose, I could have used the Caltech Birds 200 dataset. Such datasets provide the images and the labels for you, so they cover the first 2 steps, however, you might need to do some pre-processing to make sure the labels are in the folder structure and file structure that you need.
If for any reason you want to manually collect your own dataset, the other option, is to download a couple of images related to my labels (hummingbird and Blue jay) from Google images. I took the second option, as I might not be able to find a dataset for my future projects (say you want to detect your Roomba in the next project!).
To do so, I used this repo. It is capable and well-documented, you have the option for CLI and python in-line usage. Install it as follows:
cd ~/Documents/BirdWatcher/
git clone https://github.com/hardikvasa/google-images-download.gitcd google-images-download && sudo python3 setup.py install
using a command like the following, I got 10 images for each bird:
mkdir ~/Documents/BirdWatcher/DownloadedImages/googleimagesdownload --keywords "hummingbird" --limit 10 -o ~/Documents/BirdWatcher/DownloadedImages/
Note: if you want to download more than 99 images, then you are forced to use chromeDriver which you can download it using the bellow code (or from >here<) and pass the address to the code: (for more examples click here)
cd ~/Downloads
wget https://chromedriver.storage.googleapis.com/78.0.3904.105/chromedriver_linux64.zipunzip chromedriver_linux64.zipgoogleimagesdownload --keywords "hummingbird" --limit 100 --chromedriver ~/Downloads/chromedriver --format jpg -o ~/Documents/BirdWatcher/DownloadedImages/googleimagesdownload --keywords "blue jay" --limit 100 --chromedriver ~/Downloads/chromedriver --format jpg -o ~/Documents/BirdWatcher/DownloadedImages/
NOTE: If the last two commands finished quickly, check the folder or the output and make sure images are downloaded! Sometimes you need to run the last two commands multiple times (1 or 2 usually) to download the images, due to connection issues, google rate limit, etc..
Next, we need to label the images. I have used the LabelIMG (find it >here<).
sudo apt-get install -y pyqt5-dev-toolscd ~/Documents/BirdWatcher
git clone https://github.com/tzutalin/labelImg.gitcd labelImgsudo pip3 install -r requirements/requirements-linux-python3.txt
make qt5py3# Then run as follows:
python3 labelImg.py ../DownloadedImages/hummingbird/ ../AIBirdWatching/BirdWatcher/pre_defined_labels.txt# and then:
python3 labelImg.py "../DownloadedImages/blue jay/" ../AIBirdWatching/BirdWatcher/pre_defined_labels.txt
The last two commands will open all the files in “hummingbird” and “blue jay” directories, make sure to open and label all files for each group of images separately and using pre-defiend labels that will be shown after you draw a box. Here are the keyboard shortcuts you will need:
Press w so the box maker will become active, then create a box around the subject, select the label, then press space to save the label file. Press d to go to the next image, or a to go back. Although it is an easy process, but soon you will need a cop of coffee and a couple of breaks to finish the process.

4.2. Re-training a pre-trained model
Now, a round of applause for theeeeee “re-training step”!
I found >this< tutorial useful and amazing, however, as I faced a couple of issues as I was going through it and thought you might like another narration as well, I summarize the steps I’ve done as I was going through that tutorial.
We re-train the model in the following steps:
- put the files in the right structure
we will make the following structure:

cd ~/Documents/BirdWatchermkdir MyDataset
mkdir MyDataset/bird_dataset
mkdir MyDataset/bird_dataset/Images
mkdir MyDataset/bird_dataset/Labels
mkdir MyDataset/bird_dataset/Videos
mkdir MyDataset/bird_dataset/Structure
Then copy all images into the Images directory and Labels (*.xml files) into the Labels folder:
cd ~/Documents/BirdWatcher/DownloadedImages/
# where the images you have downloaded and labeled are...cp */*.jpg ~/Documents/BirdWatcher/MyDataset/bird_dataset/Images/
cp */*.xml ~/Documents/BirdWatcher/MyDataset/bird_dataset/Labels/
Now create the list of files for training and testing given the small number of training data points, I’m using all for training and all for testing, you can add more photos per label and split it into 80 and 20% for training and testing, respectively, either by removing lines from the files or editing the python file:
cd ~/Documents/BirdWatcher/AIBirdWatching/gists/
python3 trainval_creator.pycp ~/Documents/BirdWatcher/AIBirdWatching/BirdWatcher/MyDataset/bird_dataset/labelmap.prototxt ~/Documents/BirdWatcher/MyDataset/bird_dataset/
The above code will make two files trainval.txt and test.txt into the MyDataset/bird_dataset/Structure:

2. download the caffe and the documentation from >here<
cd ~/Documents/BirdWatcher/git clone --branch ssd --depth 1 https://github.com/weiliu89/caffe.git## or get INTEL OPTIMIZED CAFFE
# git clone https://github.com/intel/caffe.git
## in that case do the following:
# sudo apt-get install -y python3-venv# python3 -m venv env
# source env/bin/activate
# caffe/scripts/prepare_env.sh
cd caffe
export CAFFE_ROOT=$(pwd)# add this in your ~/.bashrc so you dont have to do this after each restart or system shutdown:echo  export CAFFE_ROOT=$(pwd) >> ~/.bashrc
Then, before you proceed, we need to install caffe. You mainly need the following commands — warning: it will take some time (~30 min).
(or you can follow the instruction of installing caffe from >here<)
# for CPU:
sudo apt install -y caffe-cpu# for GPU:
#sudo apt install caffe-cudasudo apt-get install -y build-essential cmake git pkg-config libprotobuf-dev libleveldb-dev libsnappy-dev libhdf5-serial-dev protobuf-compiler libatlas-base-dev libgflags-dev libgoogle-glog-dev liblmdb-dev  python3-dev python-numpy python-scipy libopencv-dev liblapack-dev liblapack3 libopenblas-base libopenblas-dev # libjasper-dev
sudo apt-get install -y --no-install-recommends libboost-all-devcd /usr/lib/x86_64-linux-gnusudo ln -s libhdf5_serial.so.100.0.1 libhdf5.so
sudo ln -s libhdf5_serial_hl.so.100.0.0 libhdf5_hl.soexport PATH_HDF5=/usr/include/hdf5/serial/cd ~/Documents/BirdWatcher/caffecd python
export PYTHONPATH="/usr/lib/python3.6:$(pwd)"export CPATH="/usr/include/hdf5/serial/"
# find the path using the following:
#find /usr -iname "*hdf5.h*"echo export PYTHONPATH=/usr/lib/python3.6:$(pwd) >> ~/.bashrc
echo export CPATH="/usr/include/hdf5/serial/" >> ~/.bashrc
Now, use the following commands to edit the Makefile.config file. There are a bunch of items that you have to change, which depends on your system configuration. We will copy from an already adjusted config file that I have put together:
cd ~/Documents/BirdWatcher/caffe/cp ~/Documents/BirdWatcher/AIBirdWatching/BirdWatcher/caffe/Makefile.config ~/Documents/BirdWatcher/caffe/Makefile.config
Or if you want to edit it yourself:
vim Makefile.config# make required changes to reflect your system environment and
# then ctrl+v to paste and then press escape and type ":x"
# to save the file and exit
And…. Here is where the fun stuff begins :D and by fun I mean ERRORS!
cd ~/Documents/BirdWatcher/caffe/make all
make py
The main issues that I had where resolved by installing the missing packages, or renaming the .so libraries that it was looking (e.g., it was looking for X.1.0.1.so and I have X.1.4.so , so I either found them or renamed the file to match what the caffe is looking for — I know… I know… but it works).
# For example:# Find the path (I call it PATHX) using the following command:
#find / -name "libhdf5_serial_hl.so"#and then do the following:# cd PATHX
# sudo ln -s libhdf5_serial_hl.so.100.0.0 libhdf5_hl.so
I have tried to redo the tutorial over and over on a fresh Ubuntu machine to make sure you will face minimum number of errors though. However, if you are reading it a minute later, one package might be updated and the break the whole process! So be patient and ready…
Now, all we have is a working caffe framework. Let’s get back to the model stuff. Download the pre-trained model from here:
First, we copy a >File< into the /caffe/data/ folder:
mkdir ~/Documents/BirdWatcher/caffe/data/CustomDatasetcp ~/Documents/BirdWatcher/AIBirdWatching/BirdWatcher/caffe/data/CustomDataset/create_data.sh ~/Documents/BirdWatcher/caffe/data/CustomDataset
Give the file that we just created execution permission and then run it:
cd ~/Documents/BirdWatcher/caffe/data/CustomDatasetchmod +x create_data.sh
./create_data.sh
That will create new files and folder in our dataset folder, check them out:
cd ~/Documents/BirdWatcher/MyDataset/bird_dataset/
tree ./
Now clone MobileNet-SSD into the folder /caffe/examples folder and create a couple of soft link to items we’ve created before:
cd ~/Documents/BirdWatcher/caffe/examples
git clone --depth 1 https://github.com/chuanqi305/MobileNet-SSD
cd MobileNet-SSDln -s ~/Documents/BirdWatcher/MyDataset/bird_dataset/bird_dataset/lmdb/bird_dataset_trainval_lmdb/ trainval_lmdbln -s ~/Documents/BirdWatcher/MyDataset/bird_dataset/bird_dataset/lmdb/bird_dataset_test_lmdb/ test_lmdbln -s ~/Documents/BirdWatcher/MyDataset/bird_dataset/labelmap.prototxt labelmap.prototxtcp ~/Documents/BirdWatcher/AIBirdWatching/BirdWatcher/caffe/examples/MobileNet-SSD/solver_test.prototxt ~/Documents/BirdWatcher/caffe/examples/MobileNet-SSD/cp ~/Documents/BirdWatcher/AIBirdWatching/BirdWatcher/caffe/examples/MobileNet-SSD/solver_train.prototxt ~/Documents/BirdWatcher/caffe/examples/MobileNet-SSD/cp ~/Documents/BirdWatcher/AIBirdWatching/BirdWatcher/caffe/examples/MobileNet-SSD/train.sh ~/Documents/BirdWatcher/caffe/examples/MobileNet-SSD/cp ~/Documents/BirdWatcher/AIBirdWatching/BirdWatcher/caffe/examples/MobileNet-SSD/merge_bn.py ~/Documents/BirdWatcher/caffe/examples/MobileNet-SSD/cp ~/Documents/BirdWatcher/AIBirdWatching/BirdWatcher/caffe/src/caffe/util/math_functions.cpp ~/Documents/BirdWatcher/caffe/src/caffe/util/
Now we use the below command to generate the “ training prototxt”. It needs the number of class as argument. Do make sure you count the background as a class. In our case, we have 3:
cd ~/Documents/BirdWatcher/caffe/examples/MobileNet-SSD./gen_model.sh 3
expect no output though! After running it successfully, the prototxt for deploy, train, and test should be created in the example/ folder:
ls -al ~/Documents/BirdWatcher/caffe/examples/MobileNet-SSD/example
Are you ready? We want to start training with the following command:
cd ~/Documents/BirdWatcher/caffe/examples/MobileNet-SSD./train.sh
Every 1000 steps or when you stop a training using CTRL+C, caffe will automatically save a snapshot at the “snapshot/” folder.
To resume training at a specific checkpoint, instead of the line that starts with “-weights=…” use the following line in your train.sh:
#../../build/tools/caffe train -solver="solver_train.prototxt" \#-snapshot snapshot/mobilenet_iter_1000.solverstate \
edit “1000” to reflect the last epoch where you stopped your training at. Not sure? look at the
Last step… I promise! We will generate the model for deployment and boom! To do that, use the file name of the snapshot you have in the /snapshot/ folder and then run the following command:
cd ~/Documents/BirdWatcher/caffe/examples/MobileNet-SSDpython3 merge_bn.py snapshot/$(ls snapshot|grep caffemodel| tail -n 1)# for example:
# python3 merge_bin.py 'snapshot/mobilenet_iter_2242.caffemodel'
Testing the re-trained model
Now, you need to provide your re-trained model as the input model and apply it to the stream of frames from the webcam:
cd ~/Documents/BirdWatcher/AIBirdWatching/gists/python3 Run.py -mc "~/Documents/BirdWatcher/caffe/examples/MobileNet-SSD/MobileNetSSD_birds_soja.caffemodel" -p "~/Documents/BirdWatcher/caffe/examples/MobileNet-SSD/example/MobileNetSSD_deploy.prototxt"
Still, not getting the results you are looking for? follow the next section…
Improving the results
depending on the amount of time you set for training, quality and quantity of your training data per label, you might end up with a model that is not satisfying. But after all of these efforts… it is frustrating not to push it forward!
One workaround I can share with you is that the general model you have is able to label the elements as broad categories: car, bird, … and our re-trained model is good at labeling specific bird species. Got it, right?
So what if we consider a hybrid two level model; we apply the MobileNet-SSD model to the frames and we look for a bird, when we find any, we apply the second model to determine which species it is! boOoM! The idea would be like:
This way we can improve the accuracy and show off our work :D Run the code again with an extra argument “-d hybrid” and “-mb” that points to the 73000 iteration of MobileNet-SSD:
python3 Run.py -mc "~/Documents/BirdWatcher/caffe/examples/MobileNet-SSD/MobileNetSSD_birds_soja.caffemodel" -p "~/Documents/BirdWatcher/caffe/examples/MobileNet-SSD/example/MobileNetSSD_deploy.prototxt" -d hybrid -mb "~/Documents/BirdWatcher/caffe/examples/MobileNet-SSD/mobilenet_iter_73000.caffemodel"CPU’s great, but we have VPU as well!
Now, in order to run the model on VPU (MYRIAD in our AI dev kit), we have to convert the caffe model into an [optimized] version that can be used by the Intel OpenVINO inference engine.
- First, you need to install OpenVINO toolkit, installation guide [for Linux][for windows].
2. Go to <INSTALL_DIR>/deployment_tools/model_optimizer directory.
3. Use the mo_caffe.py script to simply convert a model with the path to the input model .caffemodel file:
python3 mo_caffe.py --input_model MobileNetSSD_birds_soja.caffemodel --input_proto MobileNetSSD_SOJA_deploy.prototxt -o ../soja/ --data_type FP16
in the above line of code, we provide the input model (*.caffemodel) and the proto file (*.prototxt), we specify the output directory which if we don’t it will be put next to the mo_caffe.py and finally as it is noted in the openVINO documentation we use FP16 as we are going to use it on MYRIAD (a VPU):
Remember, if you’re using a GPU, FPGA, or VPU (MYRIAD and HDDL) device, use an FP16 model. If you’re using a CPU or GPU, use a FP32 model.
Now, we have the files we need to run the model on Inference Engine. Let’s plug it in:
And that’s it!
In my setting, using MYRIAD, the inference time goes down from 0.04–0.06 to around 0.026-0.03 second that is 130% (14%) improvement in best (worst) case, leaving room for applying more complex models on the fly.
python3 Run.py -d MYRIAD -m "<YOUR_OPENVINO_INSTALL_DIR>/deployment_tools/soja/MobileNetSSD_birds_soja.xml"
How may I adapt this project for my own project??
well, you know how to do it, simply change all labels to your objects of interest. To do so, decide on the objects that you want your model track them, then:
- download images for them
- label the images
- copy them in the right directory structure
- edit the following file to reflect your classes:
~/Documents/BirdWatcher/MyDataset/bird_dataset/labelmap.prototxt - run “
./gen_model.sh 3” with the right number of classes (#objects +1) - edit class names in the “Run.py”
That’s it! I’ll be glad to hear about your projects…
EXTRA: Raspberry PI + NEURAL COMPUTE STICK — Cheap but effective
You can also get a Neural Compute Stick if you are using your Raspberry PI for this tutorial.
The following resources will get you started if you decide to take this path:
> Deploy our pre-trained model on Neural compute stick
(scroll to the last section)
> Neural Compute Stick starting guide