How to Write Conditional Statements in R: Four Methods
Learn powerful ways to go beyond if-else statements and level up your R code
You won’t get far in programming without conditional statements.
Conditional statements execute code based on the result of a true-or-false condition. They’re an essential part of coding, and this is especially true in R. Whether you’re using R for data analysis, machine learning, software development, or something else, conditional statements have infinite uses.
But, most beginners in R don’t realize that there are many ways to write them. Many people learn basic if-else statements and stop there. But, there are often neater, more efficient ways to write conditional statements. Advanced R programmers know each of these techniques and when to use them. So, how can you learn to do the same?
In this article, we’ll take a look at four different ways to write conditional statements in R. We’ll also cover the strengths and limitations of each technique, and when to use each one.
How to write an if-else statement in R
The most straightforward way of writing conditional statements in R is by using the if and else keywords. This will be most familiar if you already know another programming language, and it’s often the technique that new R users learn first.
A standard if statement in R looks like this:
if (condition) {
  # Code to execute
}
Here, condition is a logical expression that returns either TRUE or FALSE. If the condition returns TRUE, any code inside the curly braces is executed. If it returns FALSE, the code inside the brackets is not executed, and R moves on to the next line of code in the script.
To see how this works in practice, we can take the following example.
age <- 25

if (age >= 18) {
  age_group <- "adult"
}
Here, we have a variable that contains an age. The if statement then evaluates whether the value of age is greater than or equal to 18. This is true in this case, so the variable age_group takes a value of “adult”.
This is an easy way of checking a simple condition and doing something if it’s true. But what if we want our statement to run some code if the condition is false?
If else statements are an extension of the basic if statement. To understand them, we can add to our previous example.
if (age >= 18) {
  age_group <- "adult"
} else {
  age_group <- "child"
}
This code works just like the last example, with one exception. Instead of moving on when the condition is FALSE, the code inside the curly brackets after else gets executed. This means that if age is greater than or equal to 18, age_groupis assigned a value of “adult”. If not, age_group is set to “child”.
If-else statements are a straightforward way of controlling the code in an R script. They’re easily understood, can be extended to take many conditions, and can execute complex code that’s many lines long.
But, if-else statements can take up a lot of space. For simple expressions like the one above, there are other ways of doing exactly the same operation without using five lines of code.
In fact, it’s possible to write if-else statements using one line of code.
Inline conditional statements in R
Inline conditional statements are a neat way of expressing “if-else” logic in a single line of code. There are a couple of ways to write them.
Inline if else statement
First, it’s possible to write a simple inline statement using the if and else keywords. This takes the form below:
age_group <- if (age >= 18) "adult" else "child"This statement works the same way as the previous example. The only difference is that now, we’ve condensed the phrasing to fit on one line. If the condition is TRUE, the value of age_group gets updated to whatever is before the else keyword — in this case, “adult”. If it were FALSE, age_group would be assigned whatever comes after else.
The big difference here is that we now assign the result of the whole conditional statement to the variable age_group. This improves on the repetitive phrasing in the standard if-else example, where we had to write this assignment twice.
Base-R ifelse function
If you prefer, you can use the ifelse function instead. The code below uses this function to execute the same logic as the previous examples.
age_group <- ifelse(age >= 18, "adult", "child")The ifelse function takes three arguments. First, comes the condition, then a value to return if the condition is true, and a value to return if the condition is false.
This is a clean, straightforward way of writing a short conditional statement. It also has another advantage; it’s vectorized.
Vectorization is an important concept in R. If a function is vectorized, it automatically applies to multiple values instead of just one. To see an example with the ifelse function, let’s assign more values to our variable age, and run the code again.
age <- c(16, 45, 23, 82)

age_group <- ifelse(age >= 18, "adult", "child")
# Returns "child" "adult" "adult" "adult"
The ifelse function automatically evaluates all the values in age, returning a sequence of corresponding outputs. This makes ifelse a clean way of evaluating lots of simple conditions without needing slow, messy loops.
Conditional indexing in R
Although ifelse can evaluate many inputs easily, there are other ways to do this.
Indexing allows R programmers to access specific parts of a data structure that contains many values. For example, if we wanted to get the third element in the vector age from the last example, we could index age with 3 inside square brackets:
age <- c(16, 45, 23, 82)

age
# Returns 16, 45, 23, 82

age[3]
# Returns 23
It’s most common to use numbers to index values with certain positions, like in the code above. But, many beginner R programmers don’t know that you can also use logical conditions when indexing. This opens up all sorts of possibilities.
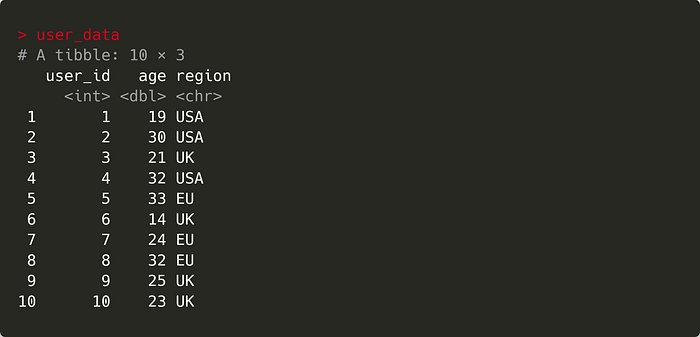
Let’s create some example data to illustrate some of these options. This includes some information about users, such as age, as in the previous examples. But, rather than being stored in a vector, each user’s information is stored row-wise in a tibble. This is the kind of data structure you’d be likely to see if dealing with user data in a professional setting, so it’s useful to know how to apply conditional logic to it.
set.seed(123)

user_data <- tibble(
  user_id = 1:10,
  age = floor(runif(10, min = 13, max = 35)),
  region = sample(c("UK", "USA", "EU"), 10, replace = TRUE)
)
Tibbles and data frames are made up of vectors, which means we can index them in the same way. This allows us to do all sorts of things.
Extracting values in a column based on a condition
Here’s some code that extracts any values of the user_id column where the user’s age is under 18.
user_data$user_id[user_data$age < 18]
# Returns 6
Replacing values in a column based on a condition
Here’s how to recode all the “UK” rows in the region column as “EU”.
user_data$region[user_data$region == "UK"] <- "EU"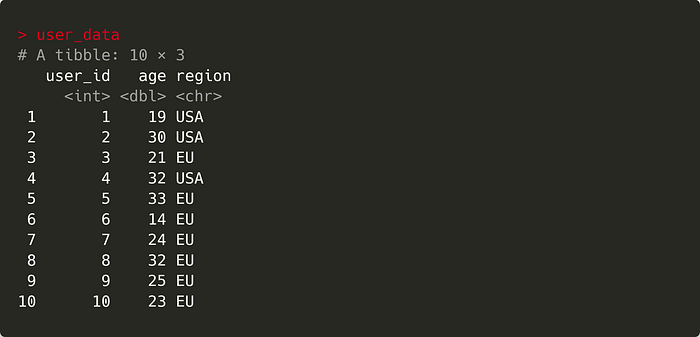
Filtering a dataset with conditional indexing
We can even use conditional subsetting to filter the whole dataset. Here’s a method of filtering all the rows where the region is “USA”. Note that after the logical condition here, we include a comma to tell R that we’re indexing by row. If we wanted to filter by column, we could add a condition after the comma.
user_data[user_data$region == "USA",]
These are just a few applications of conditional indexing in R. If you need to do a quick conditional operation on data, chances are there’s a one-line solution for it using this method.
Tidyverse case_when function
The case_when function is from the tidyverse family of packages. It’s another way of applying conditional statements across a set of many values and is once again useful when working with datasets.
We can use the data from the last example to show how to create a new column based on conditional statements with case_when.
user_data %>%
  mutate(drinking_age = case_when(region == "USA" & age >= 21 ~ TRUE,
                                  region == "EU" & age >= 18 ~ TRUE,
                                  .default = FALSE))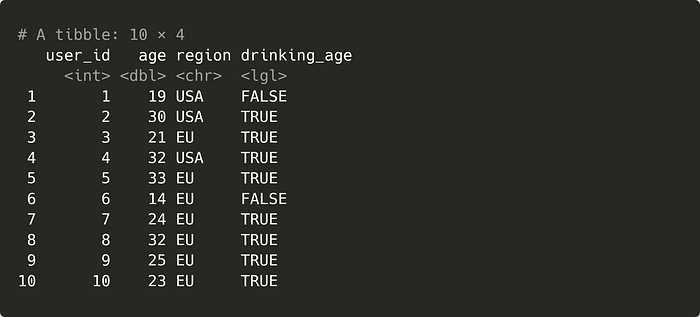
This code determines whether our site users are legally allowed to drink alcohol based on their age and location. Here, each condition is on a different line in the case_when statement. If the condition is true, we can return a value after the tilde (~) symbol — in this case, TRUE. If neither of the conditions are satisfied, the value returned is specified by the .default setting. All the values are stored in a new column, drinking_age.
If this seems a bit unfamiliar, here’s the equivalent if else statement:
if (region == "USA" & age >= 21) {
  drinking_age <- TRUE
} else if (region == "EU" & age >= 18) {
  drinking_age <- TRUE
} else {
  drinking_age <- FALSE
}
Compared with the code above, it’s easy to see that case_when provides yet another way of implementing conditional statements that is more concise than the if-else statement, while being just as powerful. It’s now my go-to for creating new columns based on complex logic or multiple conditions. For tidyverse users, it’s a must-adopt feature.
When to use different kinds of conditional statements
The methods I’ve covered only truly start to shine when you put them to work in your own code. Only by playing around with new approaches and getting comfortable with them will you reap their full benefits and achieve R programming fluency.
So, when should you use each type of conditional statement?
As with any choice between approaches in programming, there isn’t a straight answer. That said, here are some rough guidelines I use to help me choose between different ways of writing conditional statements.
- If I’m working on a problem that requires lots of complex, multi-line code to get executed upon certain conditions, I often prefer if-else statements. Using other methods often gets messy and hard to maintain in these situations.
- For problems with simpler conditions and shorter code chunks to return, I like inline if-else statements. There’s no point in making a straightforward solution longer than it needs to be!
- If working with datasets or creating columns based on conditions, I use
case_when. It works well with the other tidyverse functions I use and is easy to debug and maintain. - If I’m working with datasets and don’t want to load extra packages, I’ll use conditional indexing. It doesn’t need any extra dependencies and often runs fast too.
My advice? Have a play around with each technique and see what sticks for you. At the very least, you might pick up one new way of making your code better.
So, if you liked this article, why not share your favourite conditional statement? Else… thanks for staying until the end anyway!


