Data to Text generation with T5; Building a simple yet advanced NLG model
An implementation of Data-to-Text NLG model by fine-tuning T5

Introduction
The Data to text generation capability of NLG models is something that I have been exploring since the inception of sequence to sequence models in the field of NLP. The earlier attempts to tackle this problem were not showing any promising results. The non- ML Rule-based approaches like simple NLG did not seem to scale well as they require a well-formatted input and can only perform tasks such as changing the tense of the sentence. But in the age of language models, where new variants of transformers are getting released every two weeks, a task like this is not a far-fetched dream anymore.
In this blog, I will discuss how I approached the Data-to-text generation problem with advanced deep learning models.

The openAI GPT-2 seemed like a good option as it had compelling text generation capabilities. But training it on the web NLG 2017 data didn’t get me anywhere. The model didn’t converge at all. The conditional, as well as the unconditional text generation capabilities of GPT-2, are reasonably good, but you would hardly find a business use case that can be addressed with these tasks.
Furthermore, finetuning them on the domain-specific data at times resulted in the generation of the sentences which were out of context

With openAI(Not so open) not releasing the code of GPT-3, I was left with second best in the series, which is T5.
The Model: Google T5
Google’s T5 is a Text-To-Text Transfer Transformer which is a shared NLP framework where all NLP tasks are reframed into a unified text-to-text-format where the input and output are always text strings.

It is quite different from the BERT-style models that can only output either a class label or a span of the input. The T5 allows us to use the same model along with the loss function and hyperparameters on any NLP task.
The Data: WebNLG 2020
I used the data of the RDF-to-text generation task from WebNLG Challenge 2020 to train the T5.
Given the four RDF triples shown in (a), the aim is to generate a text such as (b)
(a) Set of RDF triples

(b) English text
Trane, which was founded on January 1st, 1913 in La Crosse, Wisconsin, is based in Ireland. It has 29,000 employees.
Preprocessing the data
To preprocess the data, one can make use of The XML WebNLG data reader in Python here, or use the xml.etree.ElementTree module as given in the code below. (I ended up using the latter as I was too ignorant to read the entire challenge documentation 😐)
In the code, you can see that we keep the normal triplets as it is and join multiple triplets with “&&”.It can be thought of as a separator when multiple rows of a table are fed into the model at once.
Training the model
As always, google’s TensorFlow implementation being really tough to interpret, I went ahead with the hugging face’s PyTorch implementation and chose the T5 base model. The entire model training was performed in google colab.

Installing the transformer library
!pip install transformersImporting the required modules
import pandas as pdimport torchfrom transformers import T5Tokenizer, T5ForConditionalGeneration,Adafactor
Load the preprocessed data and randomly shuffle the rows to have triplets with different lengths (1 triplet to 7triplets) distributed across the data frame and hence to generalize the loss quickly.
Trimming off a few data points and so that a batch would not leave any remainder, hence some lines of codes can be avoided (Okay, this might be a hackish way of doing it ).
train_df=pd.read_csv(‘webNLG2020_train.csv’, index_col=[0])
train_df=train_df.iloc[  :35000,:]
train_df=train_df.sample(frac = 1)batch_size=8
num_of_batches=len(train_df)/batch_size
Detecting the GPU.
if torch.cuda.is_available():
   dev = torch.device("cuda:0")
   print("Running on the GPU")
else:
   dev = torch.device("cpu")
   print("Running on the CPU")
Loading the pre-trained models, tokenizers, and moving the model into GPU.
tokenizer = T5Tokenizer.from_pretrained(‘t5-base’)
model = T5ForConditionalGeneration.from_pretrained(‘t5-base’,
                                             return_dict=True)#moving the model to GPU
model.to(dev)
Initiating the Adafactor optimizer with recommended T5 settings.
optimizer = Adafactor(model.parameters(),lr=1e-3,
                      eps=(1e-30, 1e-3),
                      clip_threshold=1.0,
                      decay_rate=-0.8,
                      beta1=None,
                      weight_decay=0.0,
                      relative_step=False,
                      scale_parameter=False,
                      warmup_init=False)
Html based progress bar.
from IPython.display import HTML, display
def progress(loss,value, max=100):
 return HTML(""" Batch loss :{loss}      <progress
value='{value}'max='{max}',style='width: 100%'>{value}
      </progress>             """.format(loss=loss,value=value, max=max))
Now, training the model.
It took me about 3–4 hours in Colab GPU to run four epochs.
Serializing the model
torch.save(model.state_dict(),'pytoch_model.bin')The configuration file for the t5 base model can be downloaded and placed on the same directory as the saved model. Make sure to rename it to config.json
!wget https://s3.amazonaws.com/models.huggingface.co/bert/t5-base-config.jsonLoad the trained model for inference
Make sure that the given path has both saved model and the configuration file. Also, remember to move the model and input tensors to GPU if you have one for performing the inference.
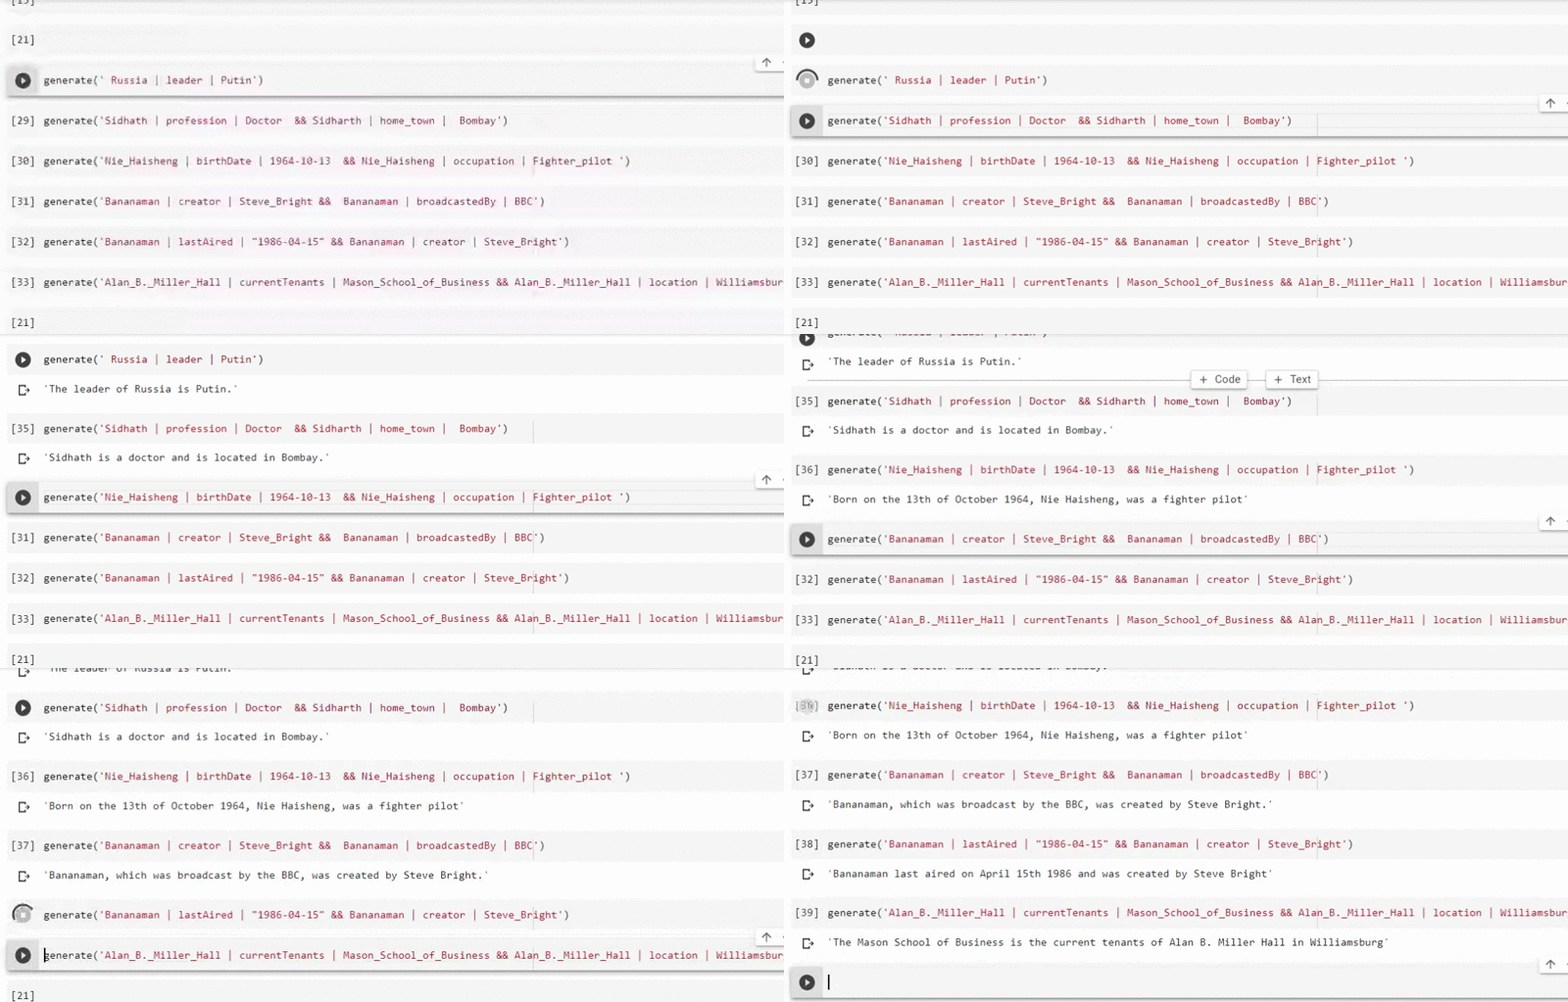
Generated results
Now let’s take a look at the generated text outputs for different inputs.

Conclusion
We discussed how we can build an advanced NLG model that generates text from structured data. The text-to-text architecture of the T5 made it easy to feed structured data(which can be a combination of text and numerical data) into the model. I used the native PyTorch code on top of the huggingface’s transformer to fine-tune it on the WebNLG 2020 dataset.
Unlike GPT-2 based text generation, here we don’t just trigger the language generation, We control it !!
However, this is a basic implementation of the approach and a relatively less complex dataset is used to test the model. When the model was tested with data points with more than two triplets, it seems to be ignoring some of the information present in the data input. Further research and a lot of experimentation need to be done in order to fix this.
You can find the code in this repo
Feel free to ask any questions! Thank you!


