Classifying Skin Lesions with Convolutional Neural Networks
A guide and introduction to deep learning in medicine.
Imagine this.
You wake up and find a frightening mark on your skin so you go to the doctor’s office to get it checked up. They say it’s fine so you go home and don’t worry about it for a couple months, but then you have a throbbing pain from that spot — it looks ugly and menacing now. It has developed into a malignant tumour as a result of your doctor’s misdiagnosis. The prevalence of misdiagnosis is scary. A study has shown that over 1 in 20 American adults have been misdiagnosed in that past and over half of these are harmful. A lot of skin lesions can be pretty much harmless but others can be life-threatening. It’s super important that these tumours are discovered right away, this is when it is the easiest to treat them.
Recently we have seen AI become an integral part of our daily lives. We find it used in our text recommendations, ad personalization, virtual assistants, and so much more! With AI making such huge strides in these fields, there is unlimited potential for it to have an impact on healthcare through deep learning. With this in mind, I set out to make an end-to-end solution to classify skin lesions using deep learning.
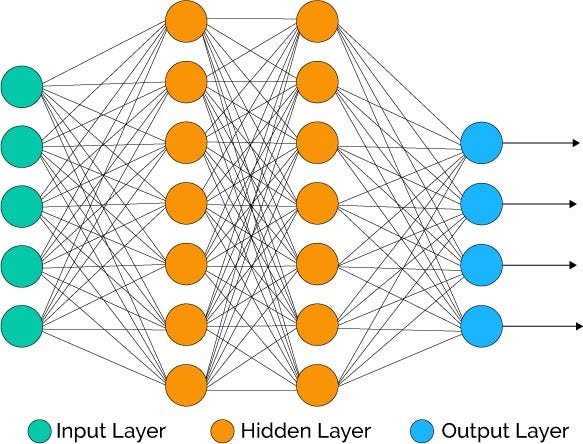
A way that we can make accurate and reliable medical image analysis tech is through the use of Convolutional Neural Networks — a type of deep neural network that is used to analyze images. Before we get into CNN’s, let’s backtrack a little bit and take a look at how neural networks work. Neural networks are essentially computer programs that are modelled in a similar fashion as to how a human brain works. Like our brain, neural networks consist of a whole bunch of neurons that can’t do much individually, but when connected together in a network, can do some pretty incredible tasks.
What does a neuron do?

The job of a neuron is quite simple, it takes in a couple inputs; let’s call them X1, X2, and X3, as per the diagram, and then spits out an output. Each of the inputs has a certain weight coefficient associated with them. These weights affect the output of the neuron and they are constantly changed to get an improved output(that’s more accurate).
Think of a neural network as a colony of termites. A termite by itself is insignificant and can’t really do anything, but when you have millions of them all together, they can do incredible tasks by learning and eventually evolving.

Neural networks are often used as a method of supervised learning, which basically means that they learn how to make predictions by recognizing patterns in data. The more data we give it, the better it will be at making predictions. But how does a neural network find patterns in some of the really complex data that we work with?
It learns in a similar way to how humans learn. At first, it goes through the data and makes super random predictions that aren’t very accurate at all, then it uses a technique called backpropagation, where it learns from the mistakes it made then tries to fix them. The more it does this, the better it gets at predicting. They often can even recognize patterns and correlations that a human could never see!
So how do we apply this to pictures of skin lesions? We use a special type of neural net called a Convolutional Neural Network.
Convolutional Neural Networks
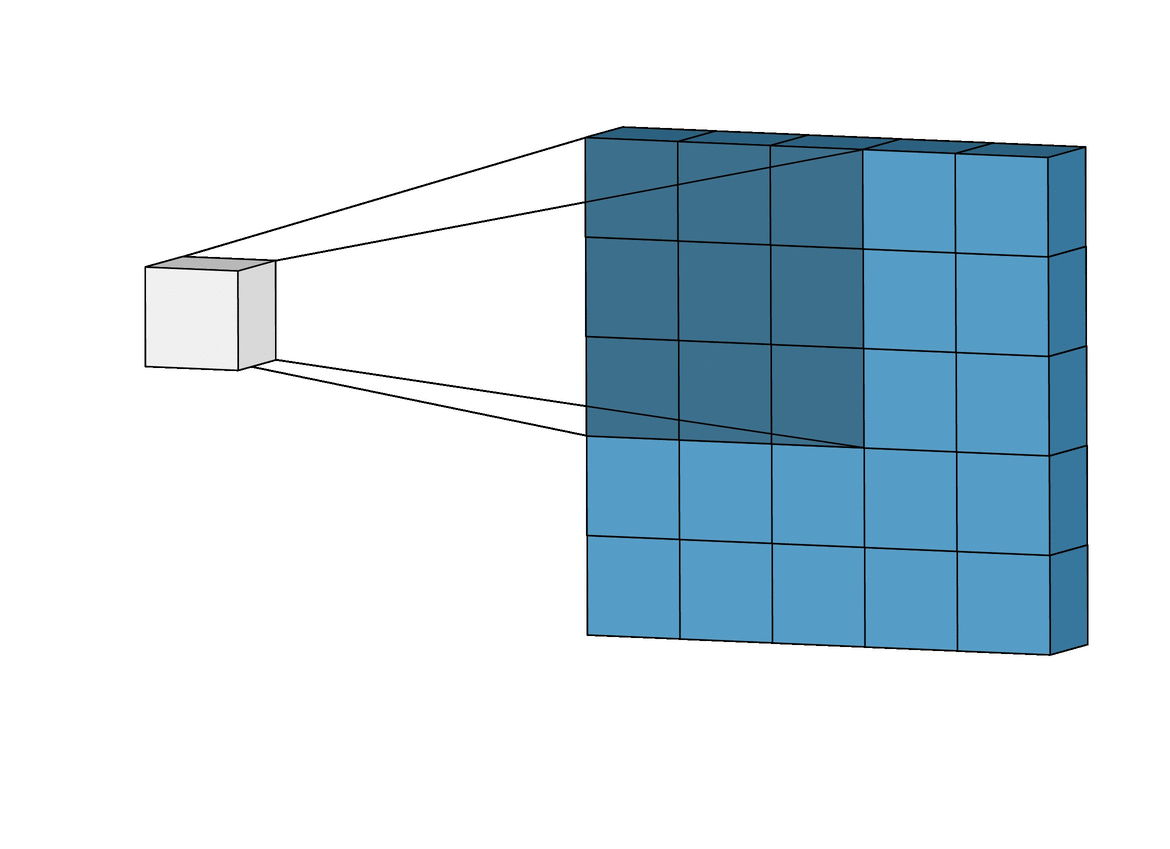
Convolutional Neural Networks are different from normal neural networks because they contain a special type of layer called a Convolutional Layer, which contains a filter that is able to understand certain types of patterns in the image.

You can think of the filter like a flashlight. You shine it on different parts of a picture, looking for some features and writing down whether it’s there or not(or to what extent it’s there) onto a feature map. Usually, layers that are right at the start would be used for something pretty simple like edge detection. Later on, layers can detect more complex features like eyes, noses, and fingers. All of these feature maps are put into a long list of features at the end of the network, which is used to finally classify the image.
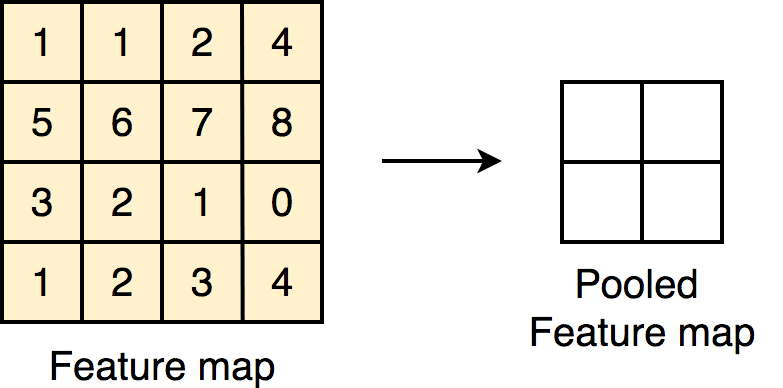
Apart from convolutional layers, CNN’s contain a couple other layers, namely pooling and classification layers.

Pooling layers are really important in making sure that it doesn’t take forever to train your CNN. They do this by reducing the dimensions of the image. It works quite similarly to a convolutional layer, where a filter passes over the image, except now, the filter passes over the data, extracts the most important information, and puts it into a smaller sized matrix. This makes it way easier for your computer to work with.

All these layers are joined together at the end, into a softmax function(classification layer) which produces the final classification.
Building the classifier
Let’s get into building the model I used to classify skin lesions. I used native Keras to build the CNN, and don’t worry if you have no experience with machine learning, through this guide, you should be able to get a pretty good understanding of how it works! I used transfer learning to create this model, which means that I took a pre-trained network called MobileNet which is trained with ImageNet, a dataset of over 14 million images, and added some more layers to it so it can classify skin lesions. The idea is that we take a model that was trained with a huge amount of data and use that for a new task where we don’t have as much data. Usually, this helps a lot with the accuracy of the final model and reduces training times too!
We use MobileNet mainly because of its speed. When I started doing this project, a problem that I encountered was the really bad performance that a model such as Resnet50 would have in terms of training speed but also for real-time predictions.
What makes MobileNet faster?
Earlier, I explained how convolutional layers pass a filter over an image. This gets really hard to compute when the image has more than one colour channel(RGB has 3 channels). This is where depthwise separable convolution comes into play. This is what makes MobileNet special and also makes it a lot faster than some other networks.

Depthwise convolution splits the process of convolution into two steps. It passes a filter to each of the individual layers in the image giving the filter a depth of 1. If there are three layers, red, green, and blue, it would pass a different filter through each of the layers. After this, it combines the layers applying a 1x1 convolution to all of the layers through a process called Pointwise Convolution. The total number of computations in depthwise separable convolution is 8–9 times lower than standard convolutions and results in it being able to run on mobile devices! I went over this really briefly, if you want to get a better understanding of depthwise convolutions, check out this paper.
HAM10000
The HAM10000 dataset is where we will get the images needed to train our model. This is a collection of around 10,000 labelled images of 7 different types of skin lesions.
These are the types of lesions that are found in the dataset:
- Actinic Keratoses
- Basal Cell Carcinoma
- Benign Keratosis
- Dermatofibroma
- Malignant Melanoma
- Melanocytic Nevi
- Vascular Lesions
You can find out more about it here.
Now let’s go over the code.
We start off by importing all the libraries we will need. A whole bunch of Keras imports are needed to construct the different parts of our CNN. We also import Numpy, itertools, and Scikit-Learn. We will be exploring what these are for as we move forward!
Now, let’s declare some variables that will be useful to us later on. We set some variables that have the location of the training data and evaluation data so it’s easier for us to work with. The number of samples are how many images are in the dataset we’re using. The batch size is how many images you process before the weights of the network are updated. The size of the image that we input to the neural network is 224x224, I’ll talk a bit more about this later. Lastly, we need to declare how many times the network needs to do a forward/backward pass until it has analyzed every single image which we can do by dividing the total number of images in our data by the batch size, and then round up.
Another really important step we need to do is data preprocessing because we are using transfer learning with MobileNet. We will need to retrain a couple of the layers in this network so that it works with skin lesion images. Noting that MobileNet takes in input images of dimensions 224x224, we will need to preprocess our data to match this criterion.
Here we do some critical changes to the network. The MobileNet model is modified by adding a dropout layer and a dense output layer. We use dropout to prevent overfitting to the data. This can happen when the network gets really, really good at classifying the data that you give it, but not really much else. After adding this layer, we add a final, dense layer, which has an activation function attached to it. This takes all of the feature maps that it has collected, and then gives us the prediction. After we make these changes to the structure of the network, we want to freeze some of the layers to make the training times a lot faster. In this case, we freeze everything except for the last 23 layers, so our image data is trained on only the last 23 layers of MobileNet.
Now that we have fine-tuned our model, we need to create a couple of metrics to determine how accurate our model is. Then we compile all the information for our model so that it’s ready to be trained. For training, we use the Adam optimizer and the Categorical Cross Entropy loss function. Essentially, a loss function measures how wrong the model’s predictions are and the optimizer changes the weights, trying to make the model more accurate. These two functions are super important in machine learning, you can learn more about them in the links above.
Now, finally, we train the model, piecing together all of the components we created above. The program saves this to the file, which is crucial if we want to implement this model.
The model obtains an accuracy of around 85%, tested with the HAM10000 dataset, however, I predict in real-world use it would not be as reliable. Of course, this problem is easily solved by simply having a larger collection of images to train it on, and on a wider variety of environments.
To run this on the web, I converted the Keras model to a TensorflowJS model and was able to quite easily actualize it on the web by following this guide.
You can see my website for the implementation of the model here, make sure to check out my GitHub if you want to take a closer look at the model.

Here is the web implementation of the model, I have provided a description of the project as well as some information on the types of skin lesions, sourced from here.
In case if you don’t have any images to test it with, I have also provided some sample images for each of the classes. The model doesn’t fare too well with pictures of lesions that have a non-skin background because it hasn’t been trained with images such as that. As I said above, the accuracy, calculated from the HAM10000 dataset is around 85%, and while this is definitely not adequate for medical use, a professional backing and larger datasets would result in a model that would be ready for clinical use and at-home diagnosis.
The implications of technology such as this are huge. We could potentially eradicate misdiagnosis in clinics by using AI technology, such as this. The more data and support that we have for this, the more it can grow and become more accurate. With only 10,000 images, we achieved an accuracy of around 85%, but imagine how much better it could be if we had millions of images. These models would have the skills of a doctor that had literally seen and learned from millions of images. Can you imagine that?
AI is already disrupting the healthcare scene. As we continue to adopt it into mainstream medicine, the quality of treatments, as well as diagnosis will improve tremendously. We’ve already seen AI replace many manufacturing and clerical jobs, but many don’t consider the impact AI has on a field as crucial as healthcare. Through the use of AI for diagnosis, we can eliminate preventable diseases, and create a future where we no longer need to worry about getting an accurate diagnosis.
If you enjoyed my article or learned something new, make sure to:
- Connect with me on LinkedIn.
- Send me some feedback and comments (aryanmisra@outlook.com).
- Check out the web implementation.
