![Photo by Annie Spratt on Unsplash [5].](https://towardsdatascience.com/wp-content/uploads/2022/01/1TeyJDOo8zo_vdbT94CYsyw-scaled.jpeg)
The application of NLP oftentimes requires us to extract texts from input documents as prerequisites.
The problem is, sometimes we need to do extra work to extract texts from the input documents because they normally come in PDF, JPEG, or PNG format. And this is where we usually use OCR Engine. It helps us to convert written texts in an image or scanned document into machine-readable text data.
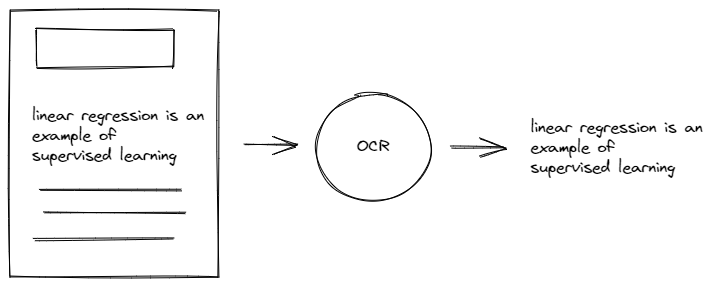
However, there is one caveat that we need to address before extracting texts with OCR. Sometimes our input document consists of not only a bunch of texts, but also a title, an image, and a table, as you can see below:
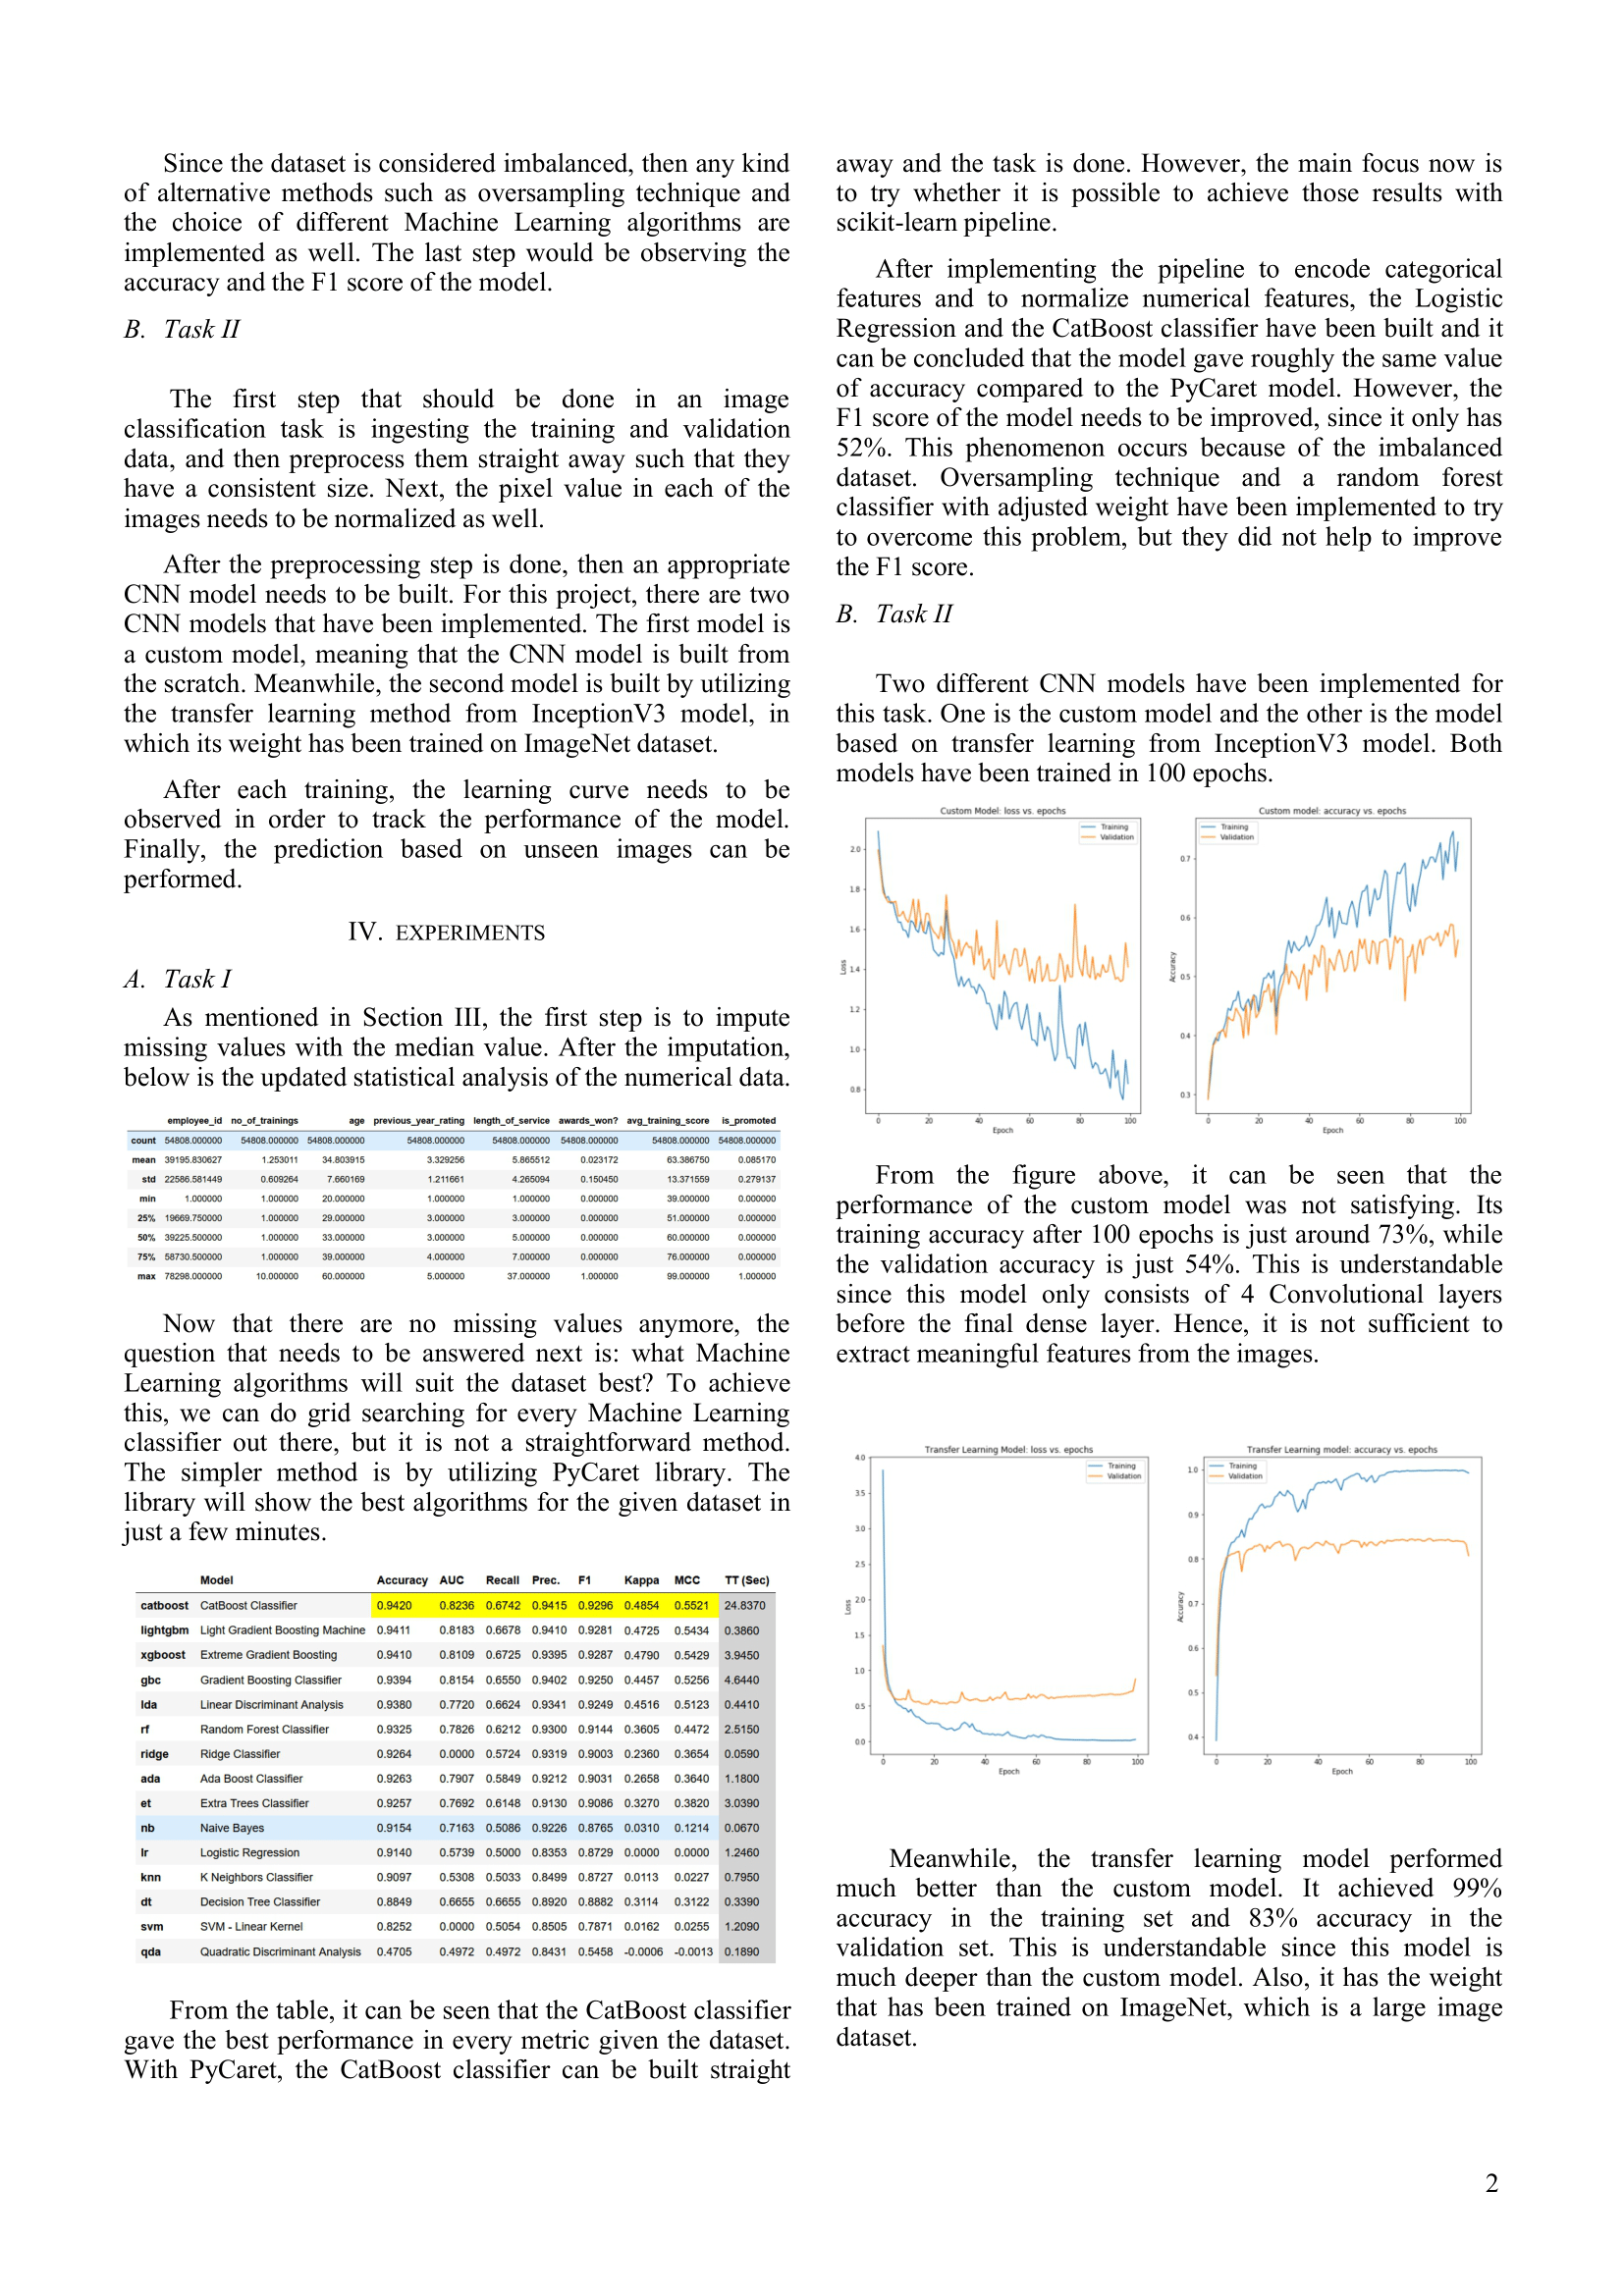
Let’s say that for our use case, we only want to extract the texts from each paragraph in our input document above. This means that we want to omit the texts in the table, title, and image region.
But how can we do that? This is where we need to categorize each section of our input document before we use OCR. And we’re going to use LayoutParser to do this.
What is LayoutParser?
LayoutParser is a Python library that provides a wide range of pre-trained deep learning models to detect the layout of a document image.
The advantage of using LayoutParser is that it’s really easy to implement. You literally only need a few lines of code to be able to detect the layout of your document image. We will see the steps in the following section.
With LayoutParser, you can leverage some pre-trained deep learning models that have been trained on various datasets, such as PubLayNet, HJDataset, PrimaLayout, Newspaper Navigator, and TableBank.
If your document image looks similar to any of the datasets mentioned above, then you’ll have a good chance to get a very good layout detection result with LayoutParser.
Now let’s get straight into LayoutParser implementation.
Layout Detection with LayoutParser
To use LayoutParser to detect the layout of our document image, we need to install the package together with Detectron2 models via pip install as follows:
pip install layoutparser torchvision && pip install "detectron2@git+https://github.com/facebookresearch/detectron2.git@v0.5#egg=detectron2"If your document is in PDF format, you need to convert it to PNG file. To do this conversion with Python, we can use pdf2img library.
pip install pdf2imgThe document that I will use as an example in this article is still in PDF format, so this pdf2img library is essential to convert the document to PNG file. We literally only need two lines of code to do this:
And that’s it. Now our document is ready to use for layout detection.
LayoutParser uses Detectron2 based pre-trained model like Faster R-CNN, RetinaNet, and Mask R-CNN to detect the layout of our input document. To initialize the pre-trained model, we can do the following:
As you can see, we provide three parameters when we instantiate Detectron2LayoutModel :
model_path: config path to the pre-trained model. To see various pre-trained models currently supported by LayoutParser and their corresponding config path, check their documentation page.extra_config: this is an optional argument. However, you can provide one to adjust the default configuration of Detectron2 model. In the example above, we change the threshold value of each detected layout to be 0.5. This means that if a detected layout has a confidence score below 0.5, the corresponding bounding box won’t be shown.label_map: mapping from the ids of model prediction into the actual string representation. This label map depends on the pre-trained model that you choose and on what dataset that model has been trained. You can see the complete info about label map in this page.
Now we can use detect method from our model to detect the layout of our input document as follows:
And we’re basically done. Now if you print what’s inside layout_result , you’ll get the following:
Layout(_blocks=[TextBlock(block=Rectangle(x_1=126.12479400634766, y_1=1335.8980712890625, x_2=806.6560668945312, y_2=1578.486328125), text=None, id=None, type=Text, parent=None, next=None, score=0.9993358254432678),TextBlock(block=Rectangle(x_1=854.9361572265625, y_1=259.9295654296875, x_2=1530.5875244140625, y_2=592.3228149414062), text=None, id=None, type=Text, parent=None, next=None, score=0.9992992877960205),....This is basically an object consists of a list of detected layouts. In each of detected layout, you get the following important information:
- Coordinates of the bounding box (x1, y1, x2, y2) of each detected layout
- The type of detected layout (i.e text, image, table, list, or title)
- The id of detected layout
- The text inside each detected layout
- The confidence score of each detected layout
All of these information will come in handy if we want to further adjust or refine the result of layout detection, which you’ll see later in this post.
If you want to visualize the result of layout detection, you can do so by using draw_box method from LayoutParser as follows:
And you’ll get the following visualization:

Let’s say we only want to detect the text region and omit the image and table region, then we can filter the result by using the corresponding label map:
And after filtering process, we can visualize the result with draw_box method again:

OCR with LayoutParser
Not only layout detection, but we can also extract the text in each detected layout with LayoutParser. To do so, you need to install an additional dependency via pip install:
pip install "layoutparser[ocr]"LayoutParser currently supports two OCR engines: Tesseract and Google Cloud Vision. In this post, we’re gonna use Tesseract as our OCR engine to extract text from detected layout.
If you use Tesseract, then you might also need to install the engine itself. Refer to their documentation on how to install Tesseract engine depending on your platform.
But before that, we need to sort the element ID of the detected layout because our OCR engine will extract the text sequentially based on layout’s element ID. As you can see from visualization above, the element ID of the detected layout is not yet in order.
Now we are ready to extract the text of each detected layout with OCR. First, we need to initialize Tesseract OCR Agent object with TesseractAgent from LayoutParser.
As you already know from previous section, our text_blocks variable is basically a Layout object with several useful information, including the text inside of each detected layout, as you can see below:
Layout(_blocks=[TextBlock(block=Rectangle(x_1=126.12479400634766, y_1=1335.8980712890625, x_2=806.6560668945312, y_2=1578.486328125), text=None, id=0, type=Text, parent=None, next=None, score=0.9993358254432678),....However, if you take a look closely, the textof each detected layout still has a value of None. We will transform this Nonevalue to the actual text with Tesseract OCR.
What we do in the above code is basically the following:
- Iterate over each detected layout
- In each detected layout, we crop the original image to only the area of that detected layout
- Perform OCR on the cropped image
- Set the value of
textof each detected layout fromNoneto the actual text resulting from OCR
Finally, we can fetch the text of each detected layout as follows:
Below I only show the text extracted from the first three text regions:
Since the dataset is considered imbalanced, then any kind of alternative methods such as oversampling technique and the choice of different Machine Learning algorithms are implemented as well. The last step would be observing the accuracy and the F1 score of the model.
---
The first step that should be done in an image classification task is ingesting the training and validation data, and then preprocess them straight away such that they have a consistent size. Next, the pixel value in each of the images needs to be normalized as well.   ---
After the preprocessing step is done, then an appropriate CNN model needs to be built. For this project, there are two CNN models that have been implemented. The first model is a custom model, meaning that the CNN model is built from the scratch. Meanwhile, the second model is built by utilizing the transfer learning method from InceptionV3 model, in which its weight has been trained on ImageNet dataset.
And that’s it! Now you can save the output into a text file, a CSV file, or preprocess it directly to use it as an input for whatever NLP task that you want to do.
Adjusting the Result from LayoutParser
Since LayoutParser leverages pre-trained models that have been trained on a specific dataset, of course, the resulting layout detection sometimes will be a little bit off from what we expect.
The example above works perfectly because the document provided is very similar to typical scientific documents in PubLayNet dataset, which was the training dataset for the model that we chose.
When the layout of our input document is slightly different, let’s say the document has only one column instead of the typical two-column format, we might get a slightly inaccurate result.
In this section, I will show you an example where the layout detection result is slightly off and one possible way how we can make adjustments to improve the result’s quality.
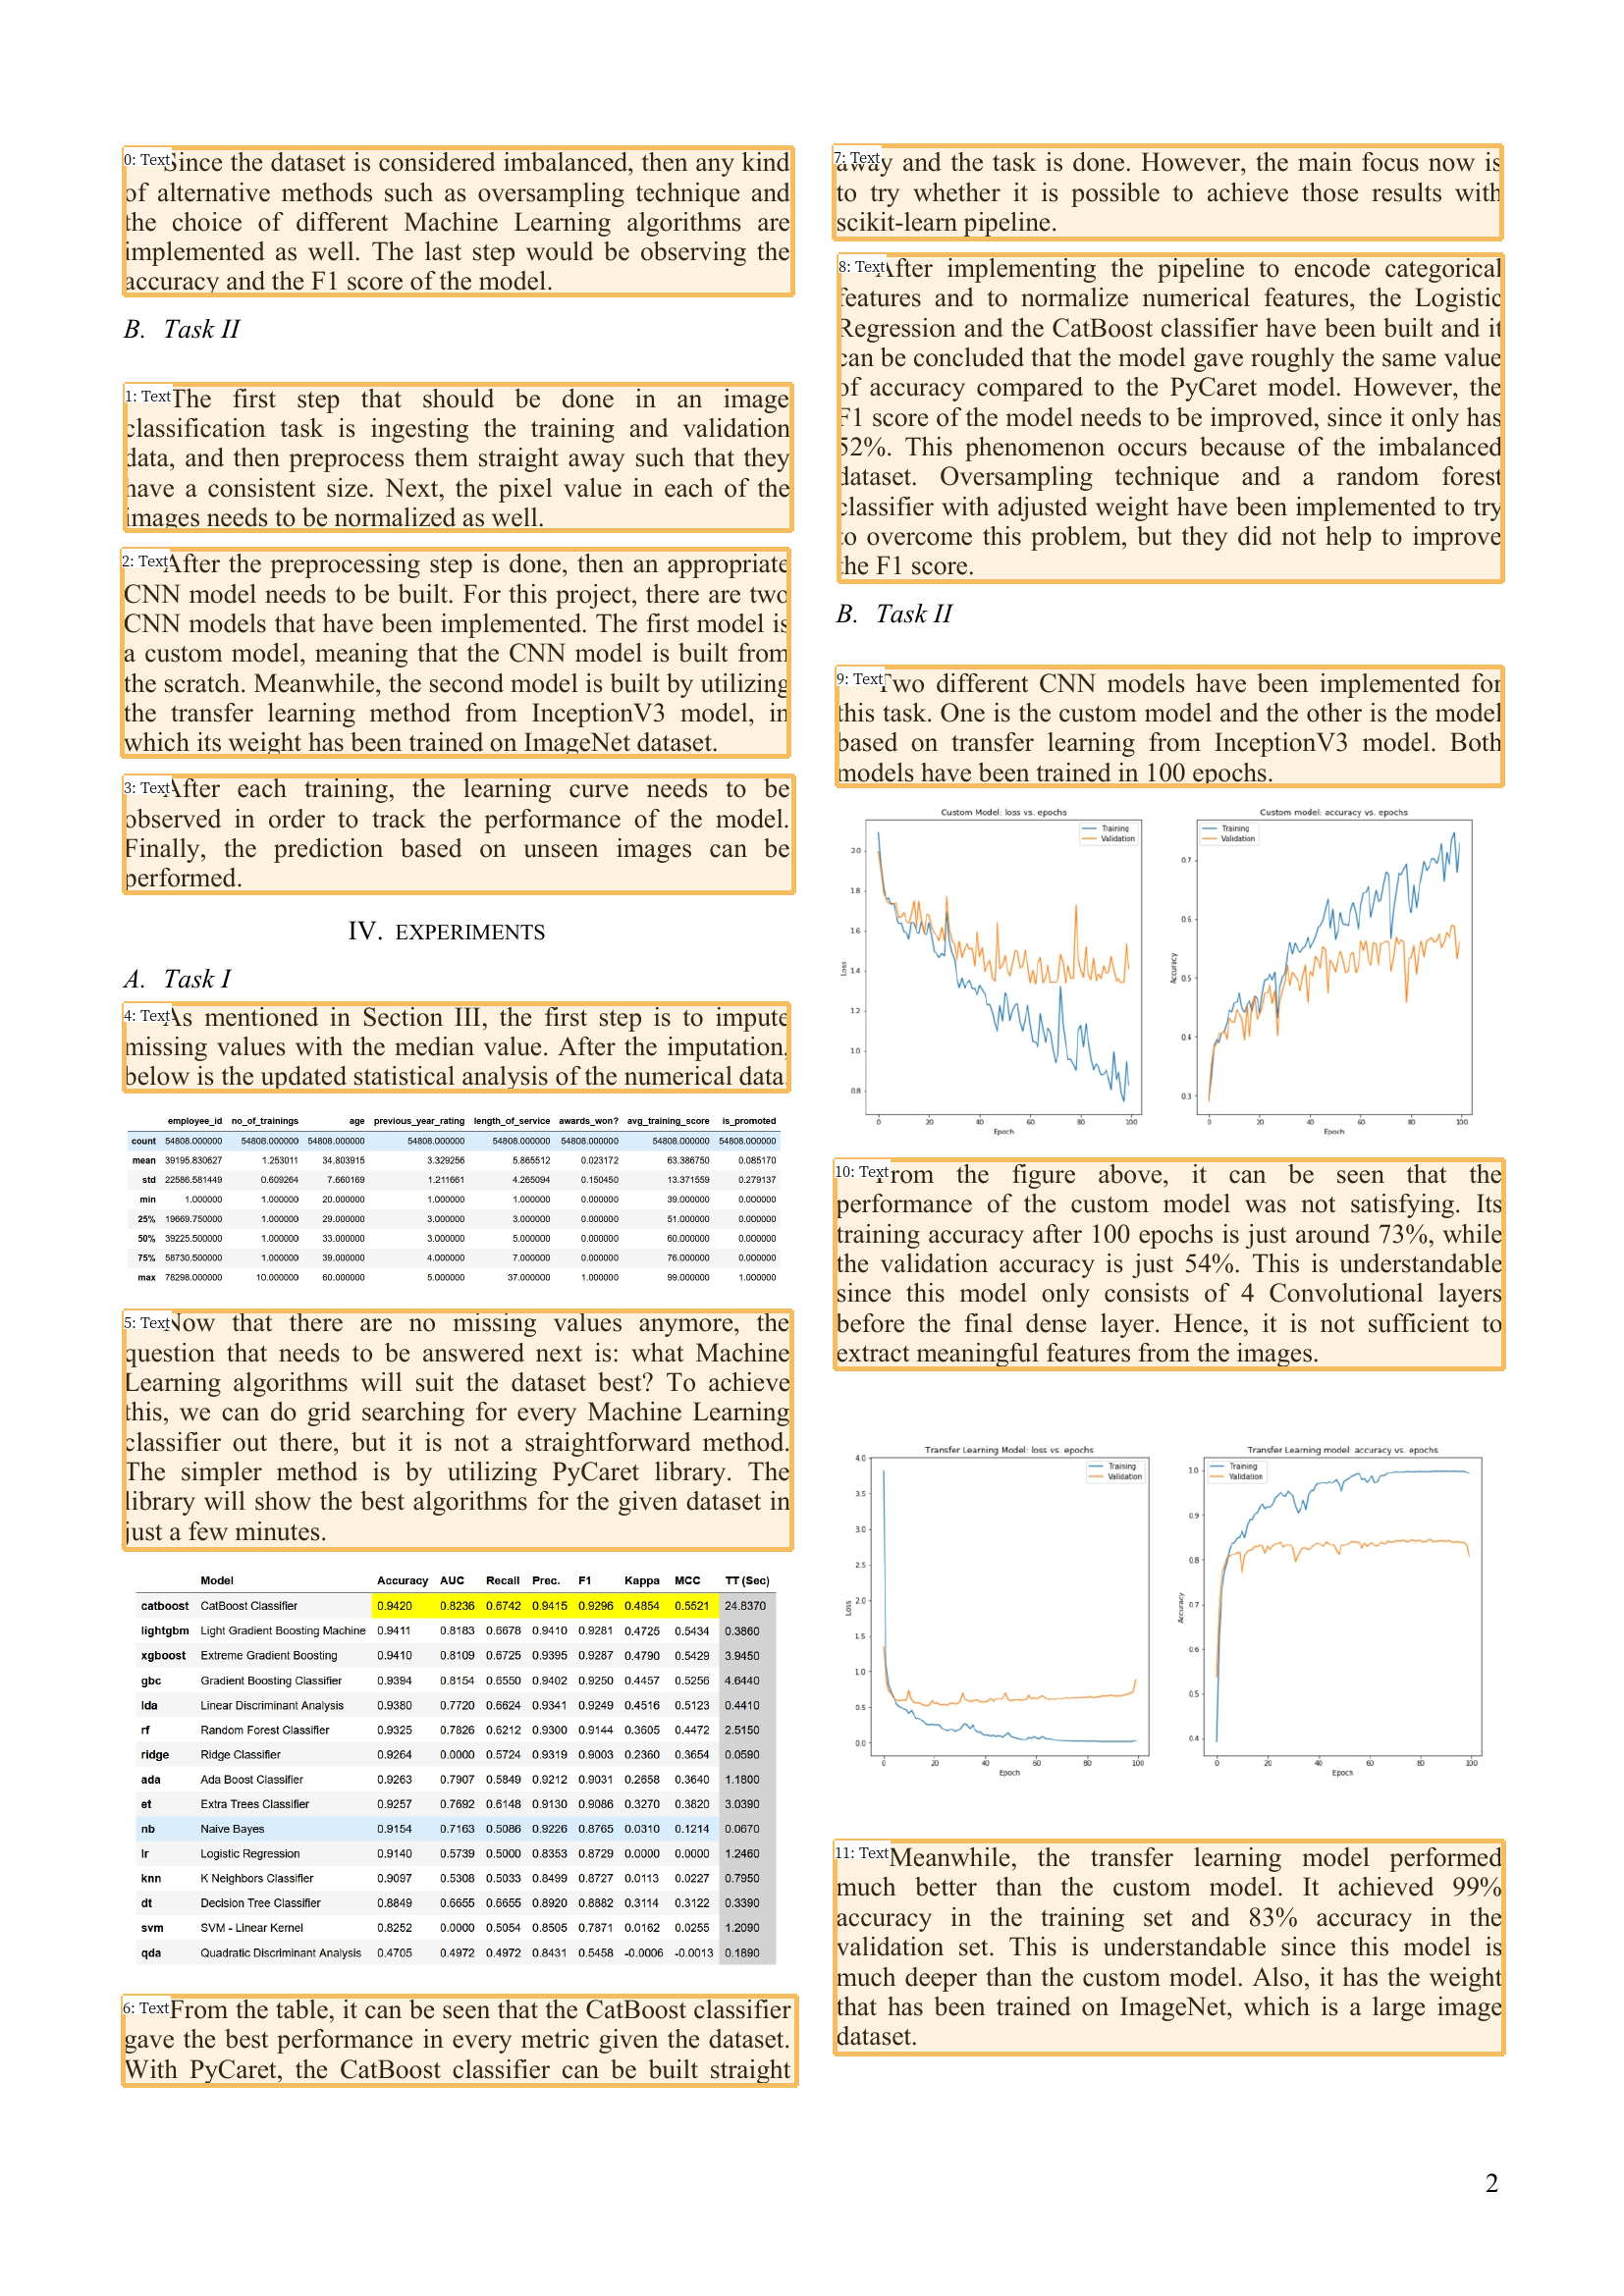
With the exact same model configuration as in the previous section (threshold 0.5), we get the following result from our one-column format input document:

There are two problems with the above result:
- There are a lot of redundant bounding boxes inside another bounding box, which won’t be ideal for our Ocr process.
- The text ‘Diameter Thickness‘ shouldn’t be detected as it is a part of table region.
One possible way to alleviate these problems is by increasing the threshold value in the extra_config argument when we initialize the model. Let’s say we increase it from 0.5 to 0.8
As you can see from the result above, we have a trade-off when we adjust the threshold value. A lower threshold means that we’ll get a lot of noises and a higher threshold means a higher risk of missing one or more text regions.
If we don’t want to miss a lot of text regions, then we can set the threshold value to a lower value (in this example we use 0.5). Then, we remove bounding boxes that reside inside of a bounding box afterward by computing the intersection over union (IoU) of one bounding box to another.
This is what the code above does:
- Compute the IoU of each bounding box against another.
- If the IoU is above certain threshold, then we compute the area of two bounding boxes.
- Change the type of bounding box with smaller area from
TexttoNone - At the end, we filter the detected layout to only include the bounding box with type
Text
And here’s the result after refining the detected layout.

Now the result looks so much better since we’ve removed bounding boxes that reside inside of a bounding box.
But there is one more problem. The detected layout with text ‘Diameter Thickness‘ shouldn’t be there since it’s a part of table region. One simple way to remove this layout is by looking at its index and then set its type from Text to None as follows:
And that’s it. Now we can proceed to extract the text from each layout with OCR as you can see in the previous section.
Of course, the example above is just one of many possibilities that you can do to adjust the result from LayoutParser. It all depends on your creativity to decide what methods will work best for your use case.
However, what if the result is so bad on your data that adjusting the output is no longer a viable option?
With LayoutParser, you can actually train the model available on LayoutParser’s model zoo on your own custom dataset. To do this, you can follow the steps mentioned on their GitHub page.
Conclusion
LayoutParser is a great library to detect the layout of document images in just a few lines of code. Not only detecting the layout, but we can also extract the text of each detected layout with OCR.
Depending on your use case, you can actually adjust or refine the layout detection result from LayoutParser. However, if the result is so poor that adjusting it is no longer an option, you can train the model available on LayoutParser on your custom dataset.
I hope this article helps you to get started to explore LayoutParser! You can see the code in this article in this notebook.


